Non-taxable Payment
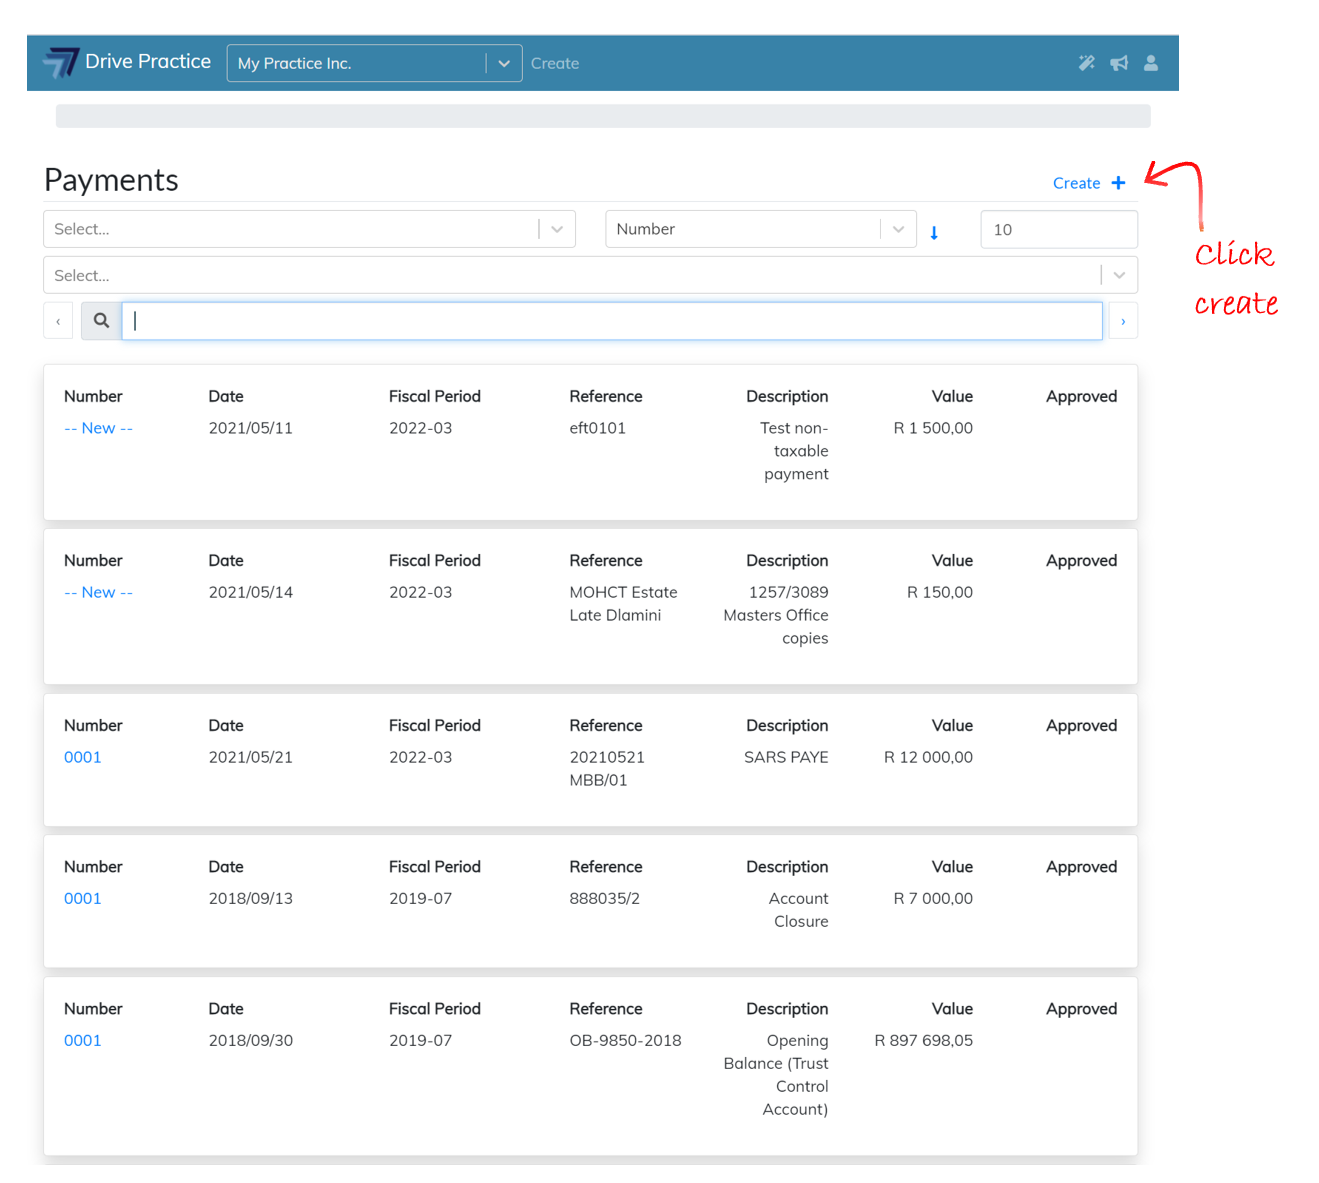
To create a new Non-taxable payment, click on the Create button on the Payments list screen.
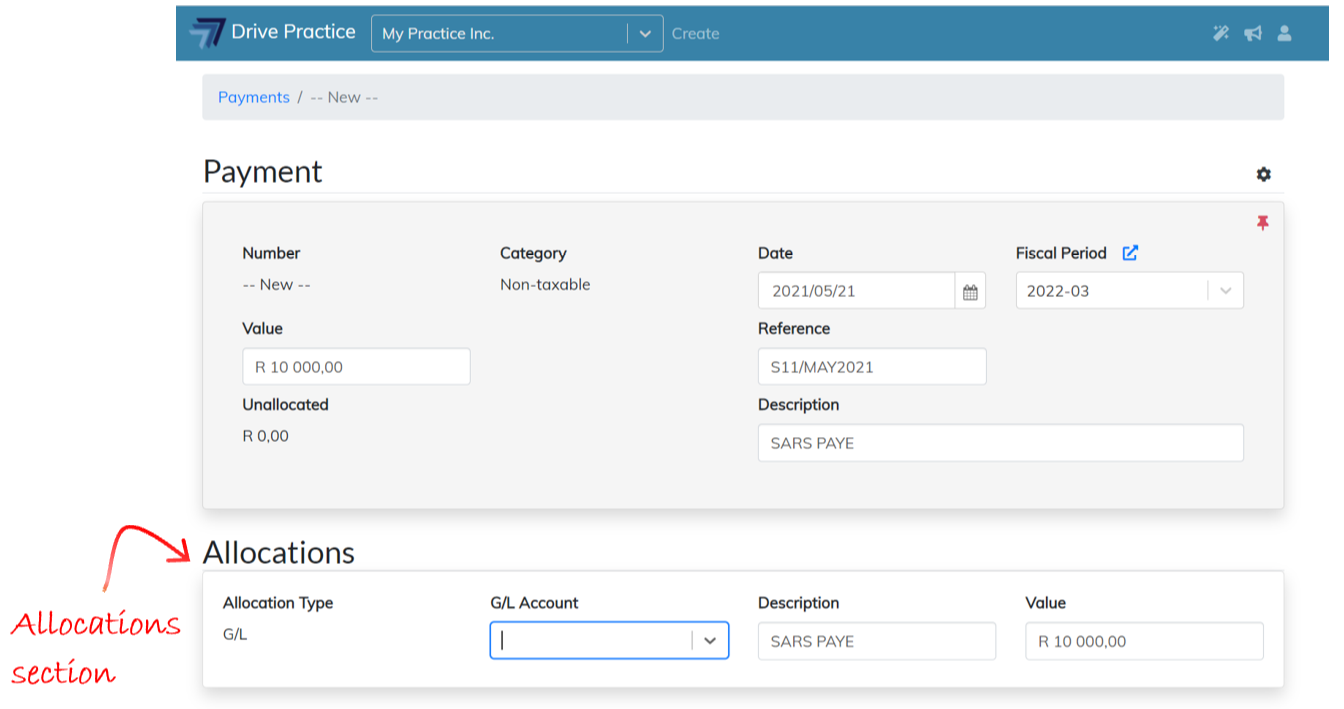
The Payment page will open with the Payment Header fields to complete.
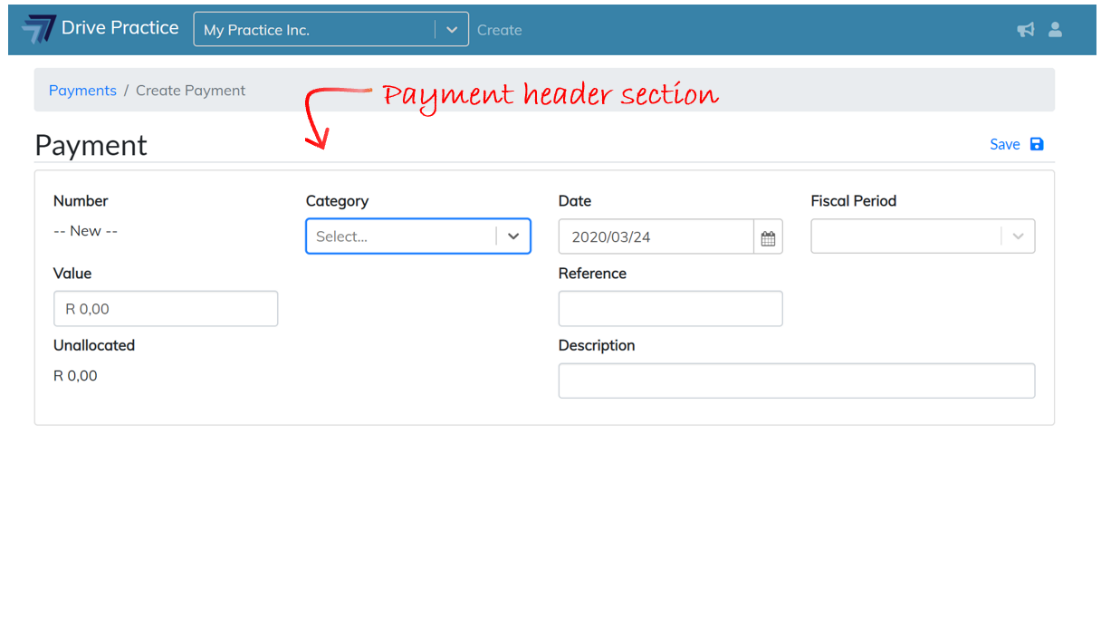
The Payment Header fields for a Non-taxable payment are described below.
-
Number
The payment number is a system allocated number that runs sequentially for each bank account. For new payments the number is set to —New— until the payment is approved, whereupon it inherits the sequential system allocated number for the bank account to which it has been assigned.
-
Category
Select Non-taxable from the Category field dropdown list. Once the payment type has been selected the Bank field will appear under the Category field. The bank account list for the bank account field is dependent on which payment type is selected. The Tax Group fields will also open once the selection is made.
-
Date
The Date field will default to today. Either manually change the date or select the date from the date picker denoted by the calendar icon.
-
Fiscal Period
The Fiscal Period will default to the period within which the Date falls. The Fiscal Period can be changed to another period if required.
-
Value
Enter the total amount including tax of the payment into the Value field.
-
Bank
Select the Bank account from the list presented. The list presented will show all bank accounts as the payment Category selected is Non-taxable.
-
Reference
Enter a Reference for the payment, usually a bank statement number followed by the entry number on the bank statement, or a month or date, followed by a number of the payment or bank entry for that month or date.
-
Unallocated
This is a system calculated value field indicating the value of the payment less the total value of the allocations. The Unallocated value on a G/L payment must be equal to zero in order for the payment to be approved.
-
Description
Enter a Description for the payment that will be meaningful when looking at the transaction at a later date, for example “SARS PAYE”.
Once all the fields are filled in, click on the Save button, or use the shortcut key Ctrl-Enter to save the payment.
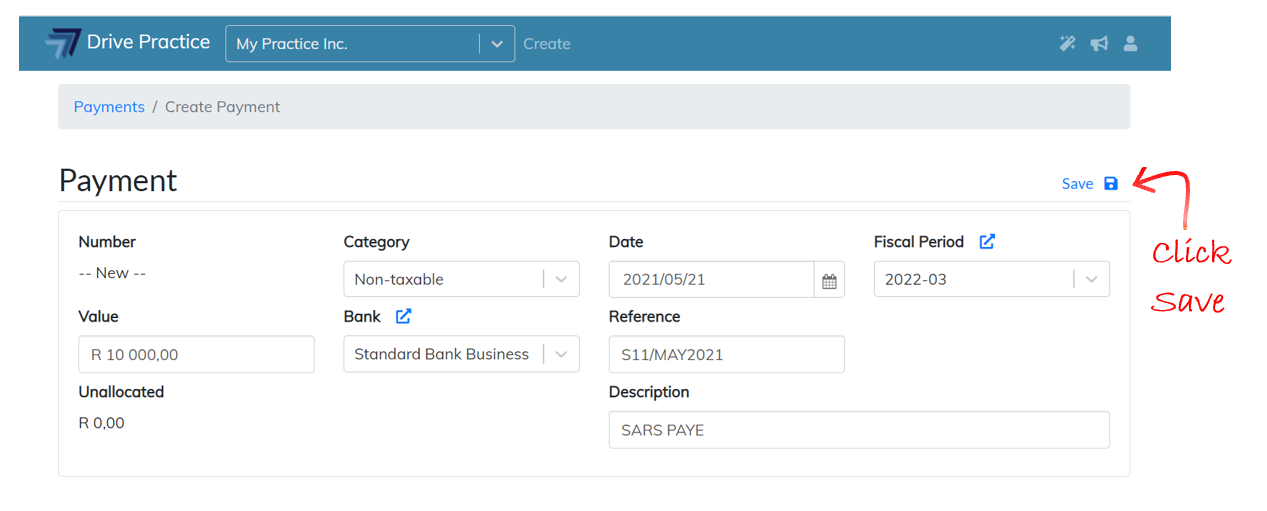
Once saved, the Allocations section will open below the Header section so that the payment can be allocated.
Edit Header
To edit the Header fields, click on the field and change the entered data. The field name(s) of the field(s) edited turn yellow, indicating that the field has been edited.
Click the Gear icon at the top right of the payment and then click on the Save menu item or use the shortcut key Ctrl-Enter to save the amendments. The field names will revert to black indicating that the changes have been saved.
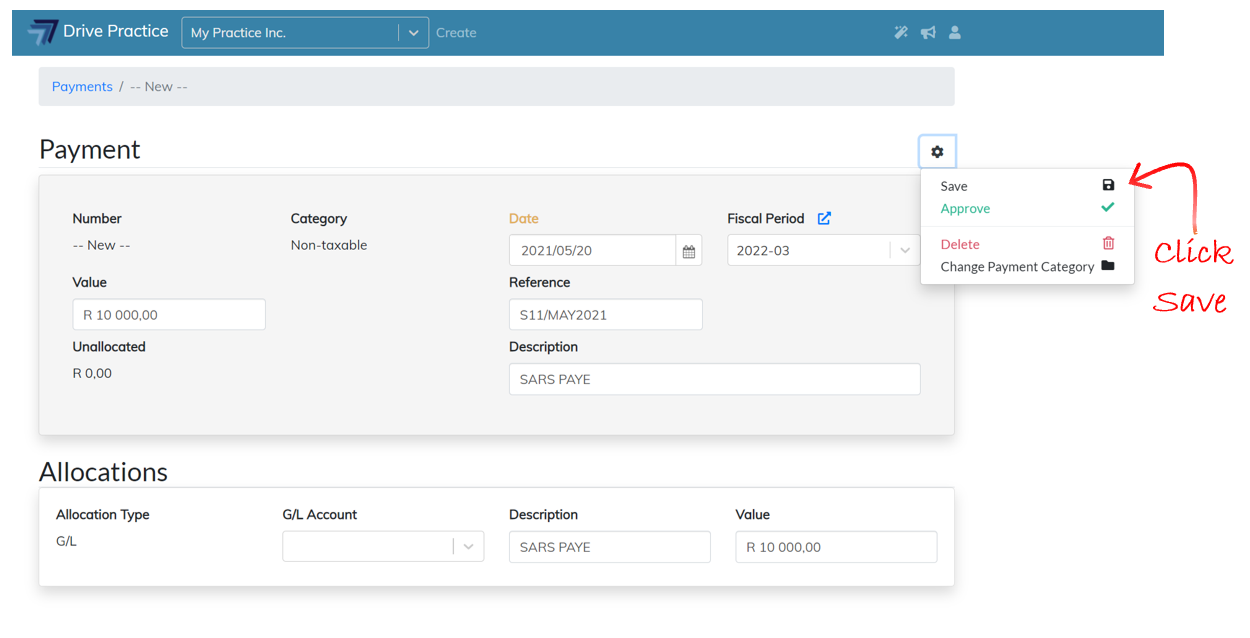
Note that the Category field cannot be changed in this way and is therefore not available to edit in the Header section.
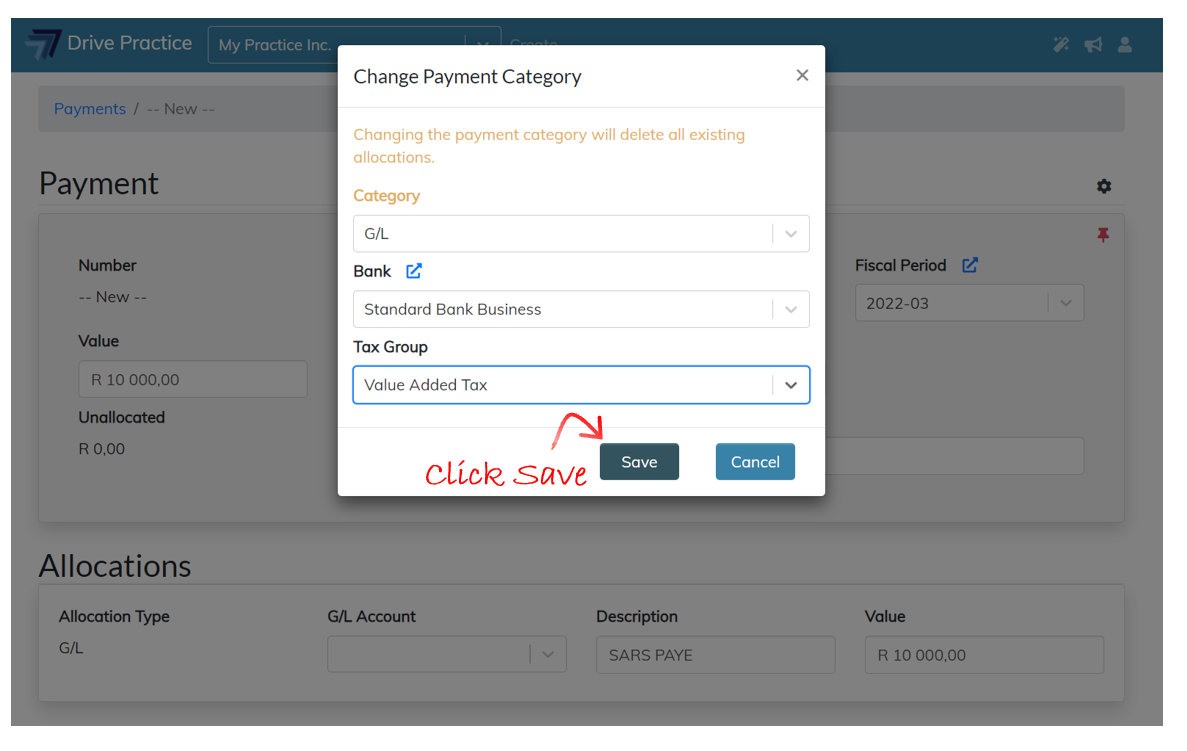
To change the Category field, click on the Gear icon at the top right of the payment and then click on the Change Payment Category menu item. A pop-up screen will appear to select a different payment category.
Changing the payment category deletes any allocations already made since these allocations will be different for a different category of payment.
Depending on which Category is selected as the new Category, the bank account and tax group assigned may need to be edited because of the new payment category selected.Once the fields in the pop-up screen have been completed, click on Save at the bottom of the pop-up screen to save the category change and return to the payment, or Cancel to cancel the change and return to the payment.
Allocate
To allocate the Non-taxable payment, complete the fields in the Allocation section which are explained below.
-
Allocation Type
The Non-taxable payment category can only be allocated directly to a G/L account and the field is therefore not editable.
-
G/L Account
Tab to or click in the field to open the dropdown list or start typing an account number or name in the field to search for an account. Double click on the account line to select it or use the up and down arrow keys to move to the account and then press enter to select the account.
If a Trust bank account was selected in the Header section, only Trust type G/L accounts will be in the list, and if a Business bank account was selected in the Header section only business type G/L accounts will be listed in the dropdown list.
As soon as a G/L account is selected, another Allocation section will open below the current allocation in anticipation that there may be multiple allocations for the payment.
Should the payment not have multiple allocations, the empty allocation can be ignored and will be removed when the payment is approved.
-
Description
The Description field in the Allocations section will default to what was typed in the Description field in the Payment Header section but can be edited if required.
-
Value
The value of the allocation will default to the lesser of the payment Value or the Unallocated value if there have been other allocations on the payment. The value can be edited to a smaller amount if the payment has multiple account or matter allocations.
Note that the field name(s) for the field(s) that have been changed turn yellow. This is to indicate that the payment needs to be saved to save the changes made to the fields.
Click on the Gear icon at the top right of the payment and then click on the Save menu item or use the shortcut key Ctrl-Enter to save the allocation.
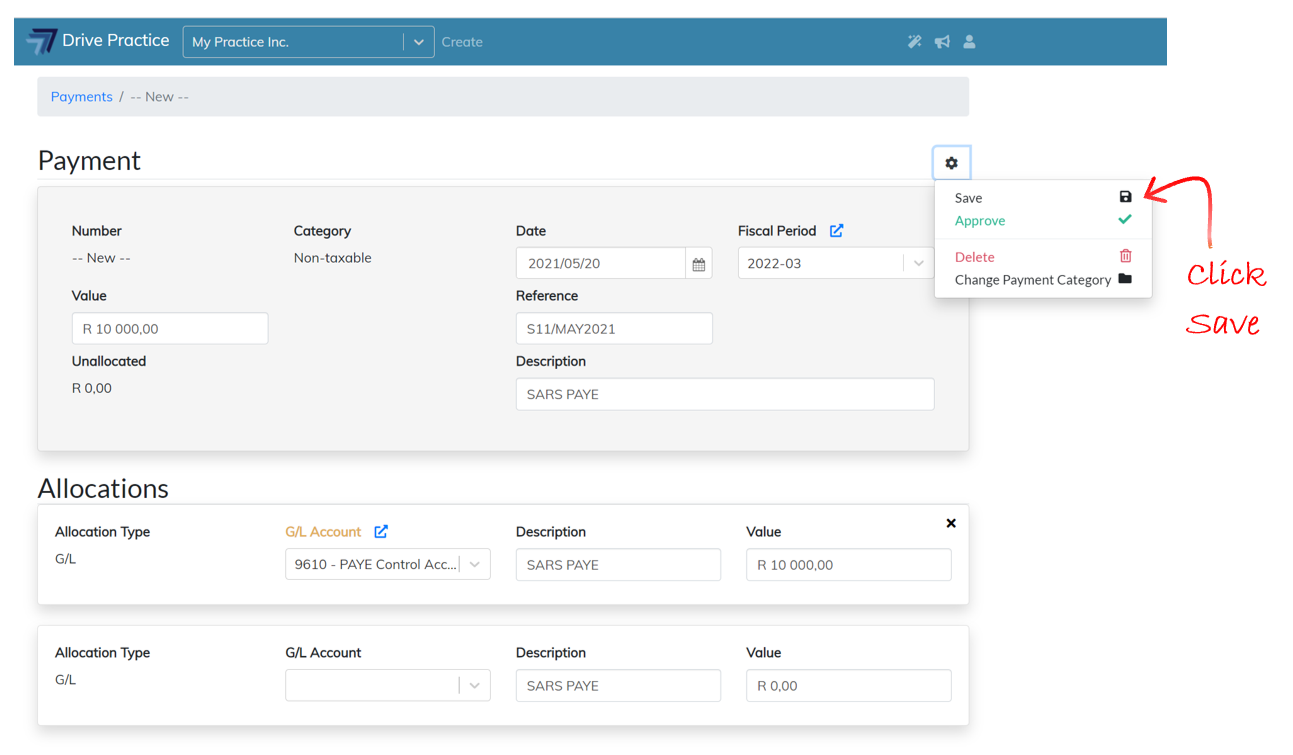
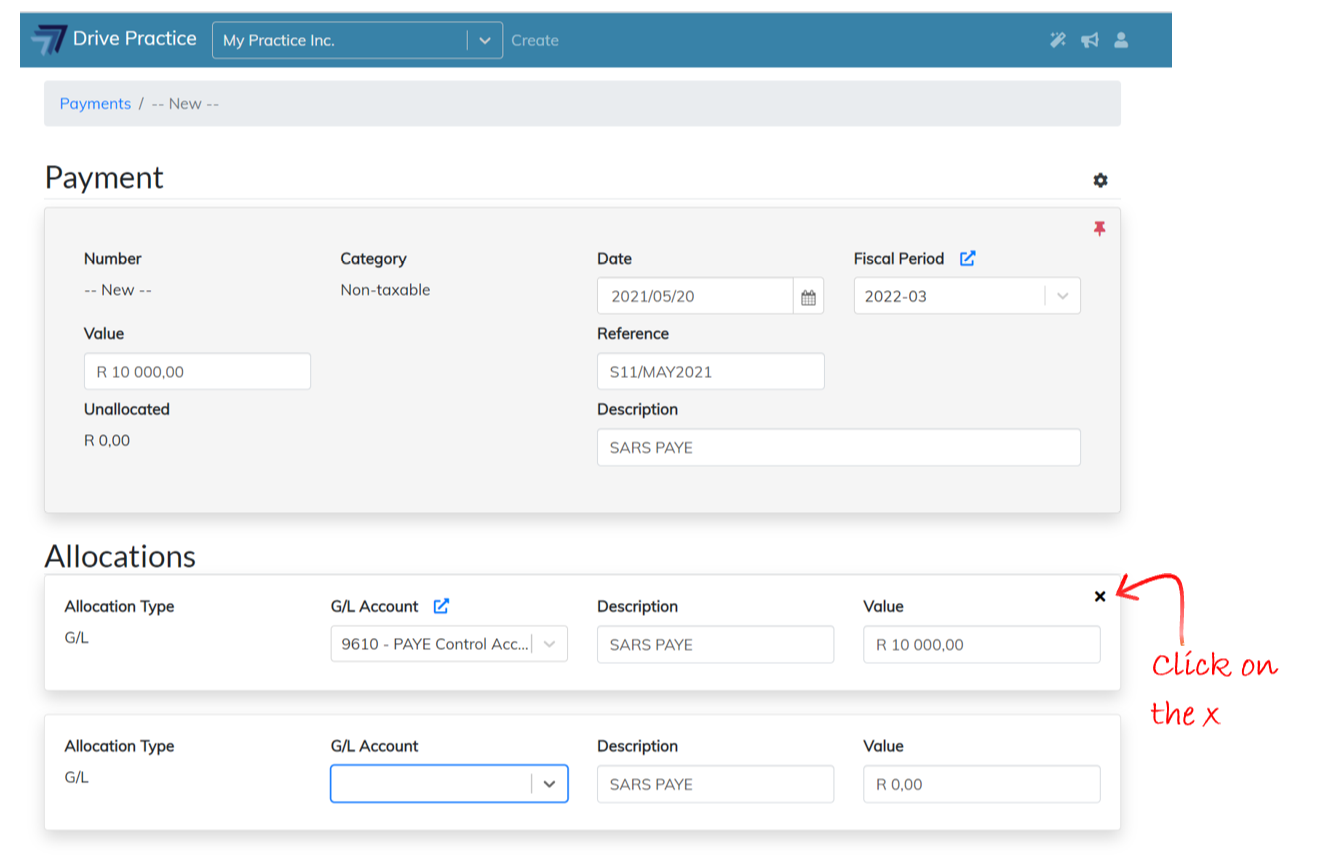
If an error has been made on an allocation or additional allocations need to be removed, click on the X at the top right of the allocation to delete an allocation.
Edit Allocation
The fields in the Allocation section(s) are open for editing. The field header(s) of the field(s) that have been edited will change to yellow to indicate that the changes need to be saved.
Click the Gear icon on the right of the Payment Header section and then click on Save or use the shortcut key Ctrl-Enter to save the amendments. Once saved, the field names will revert to black indicating that the changes have been saved.
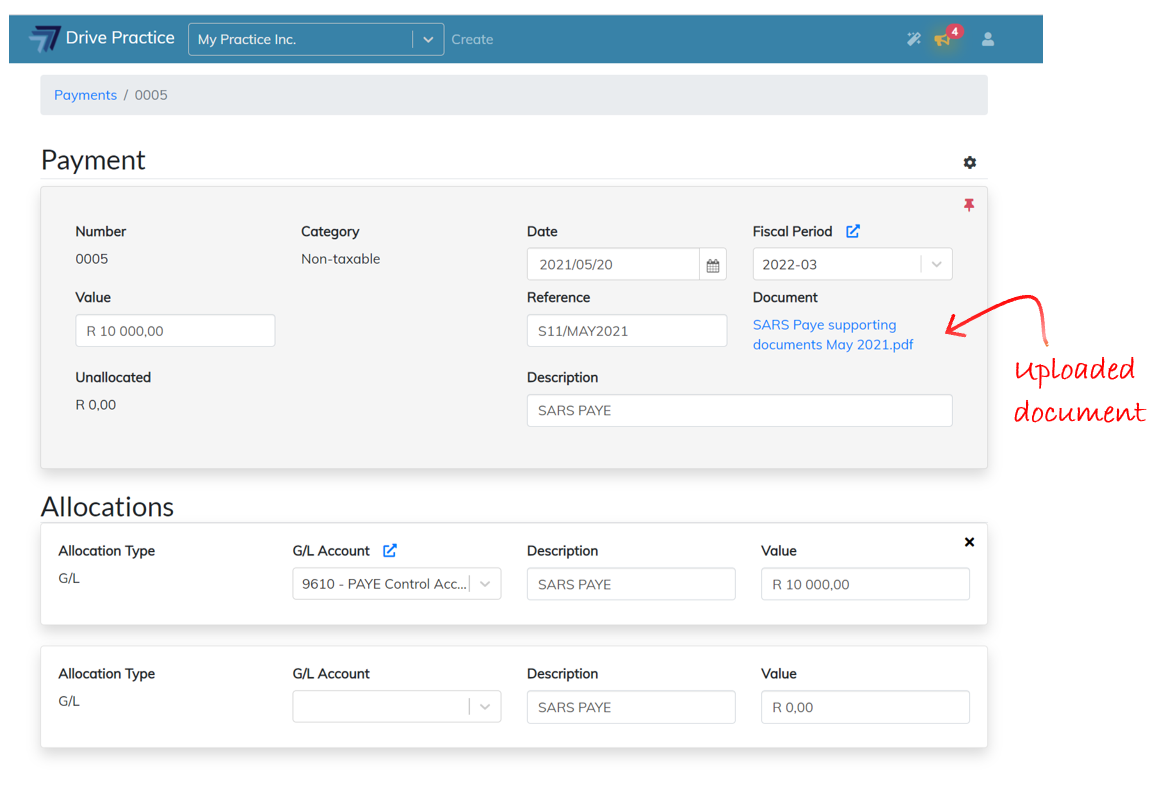
Upload Document
Supporting documents relevant to the payment can be uploaded for easy reference and access. The documents should be saved in pdf format and properly named for reference purposes.
These uploaded supporting documents will be available to print with client invoices if the payment is a disbursement on behalf of the client.
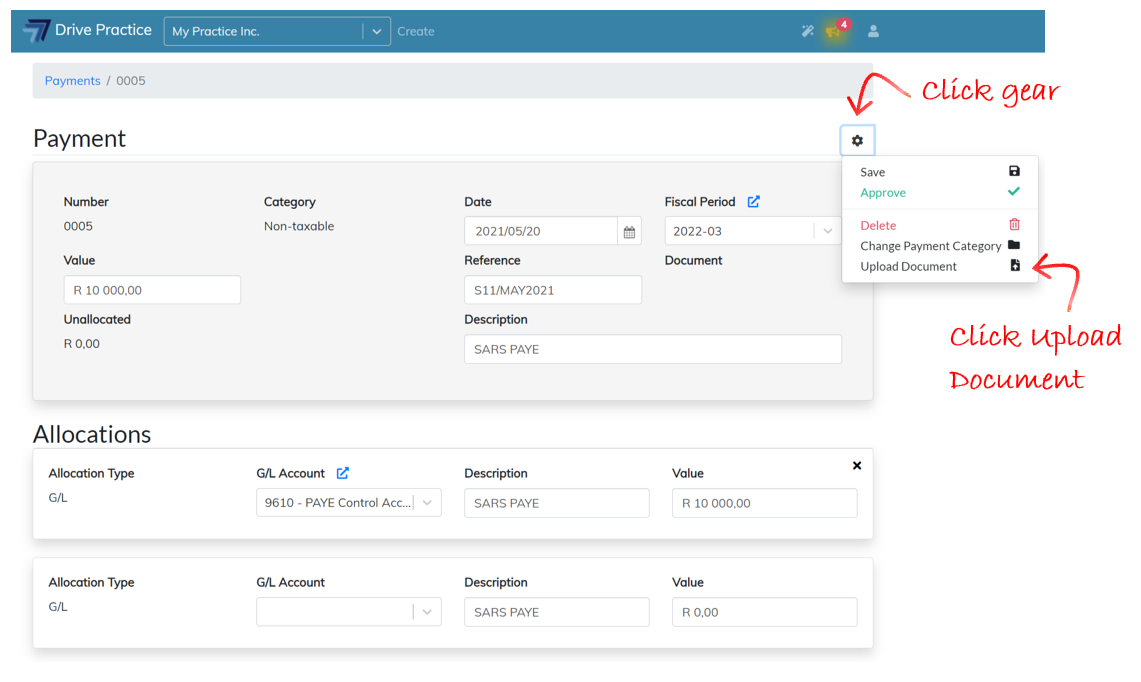
Click on the Gear icon on the right of the Payment Header section and then click Upload Document.
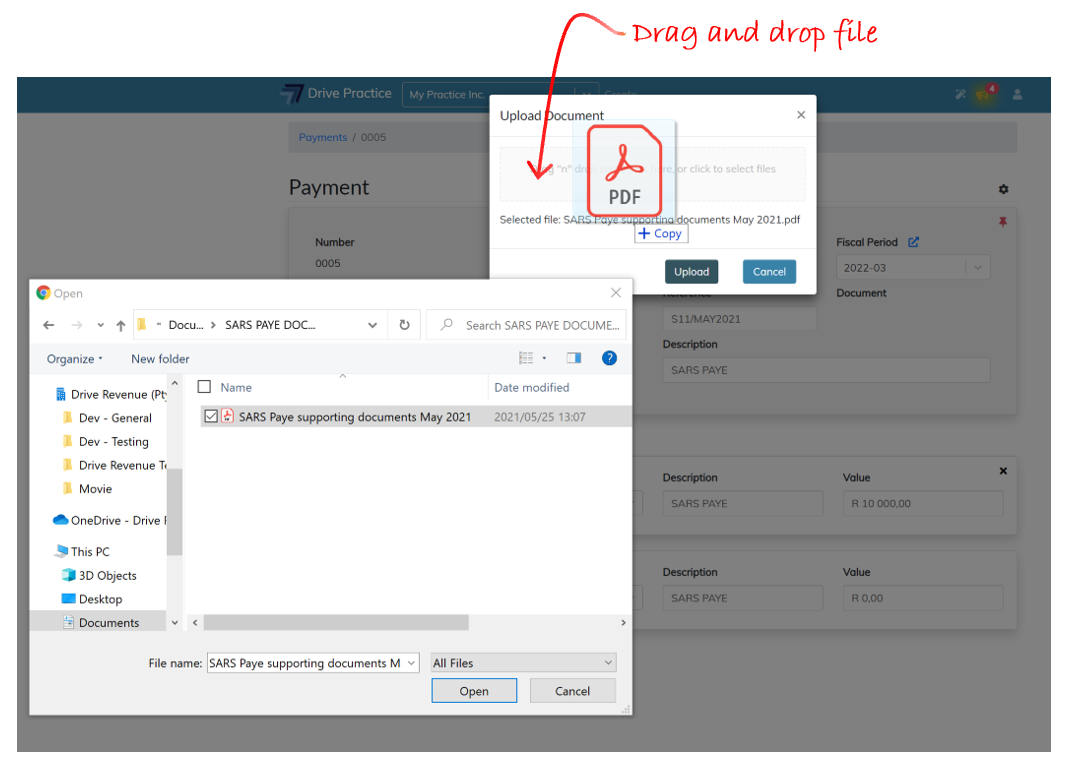
The Upload Document box will open with options to drag and drop or select a document.
Click in the grey block to navigate to where the supporting document is saved in the file explorer.

Double click on the relevant file or click on the file to select it and click on Open in file explorer.

Or click on the file and drag it to the grey block in the Upload Document box until a green border appears around the grey block. “Drop” the file and close the file explorer.
Click on the Upload button to save the document to the payment or click on Cancel to cancel the upload.
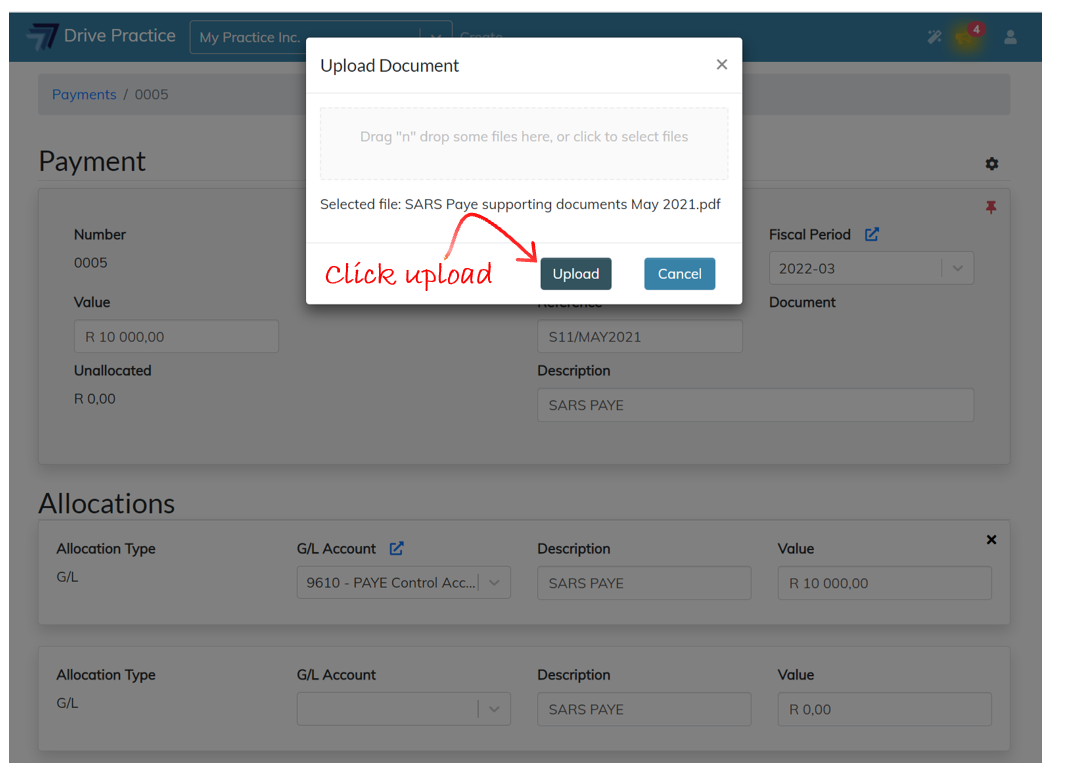
The uploaded document will display under the Document field header in the Payment Header section as a hyperlink. Click on the document name to view the document.
Approve, Delete or Un-approve
Click on the Gear icon on the right of the Payment Header section to open the options to approve or delete the payment transaction.
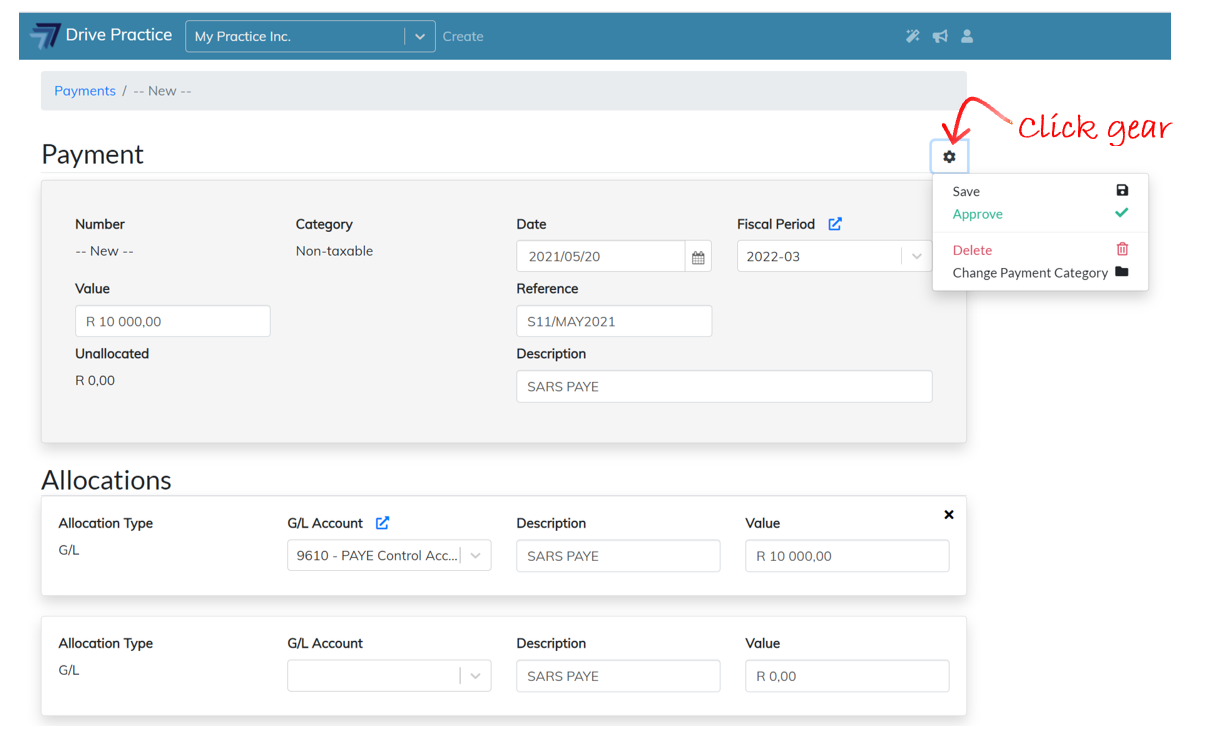
Click on the Approve button to approve the payment. The unused Allocation section will be removed when the payment is approved.
The Delete option will delete the payment.
The Approve option will approve the payment and remove any un-used Allocation section.
The Approve menu option saves and approves the payment in one step. Instead of using the menu invoked by the clicking on the gear icon, using the shortcut key Ctrl-Shift-Enter does the same thing, saving and approving the payment.
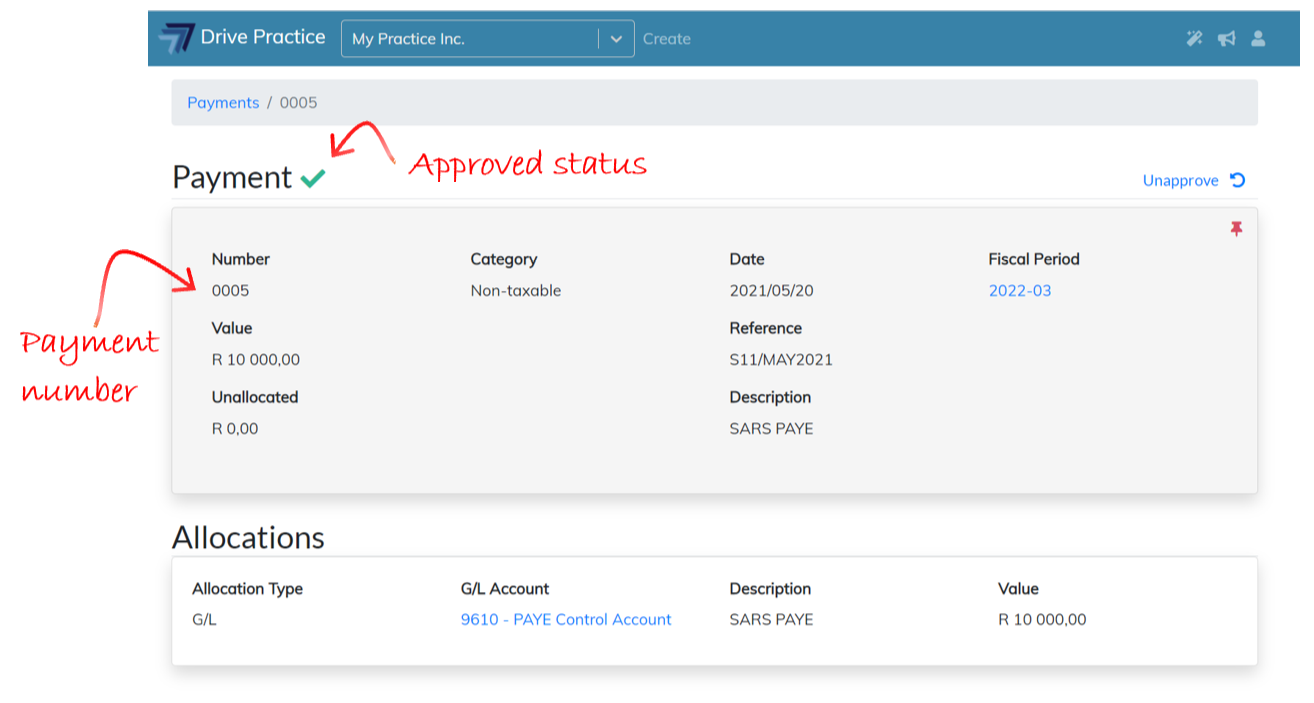
Once a payment has been Approved is allocated the next sequential payment number for the bank account selected and the payment will have a green tick indicating that it is in an approved state.
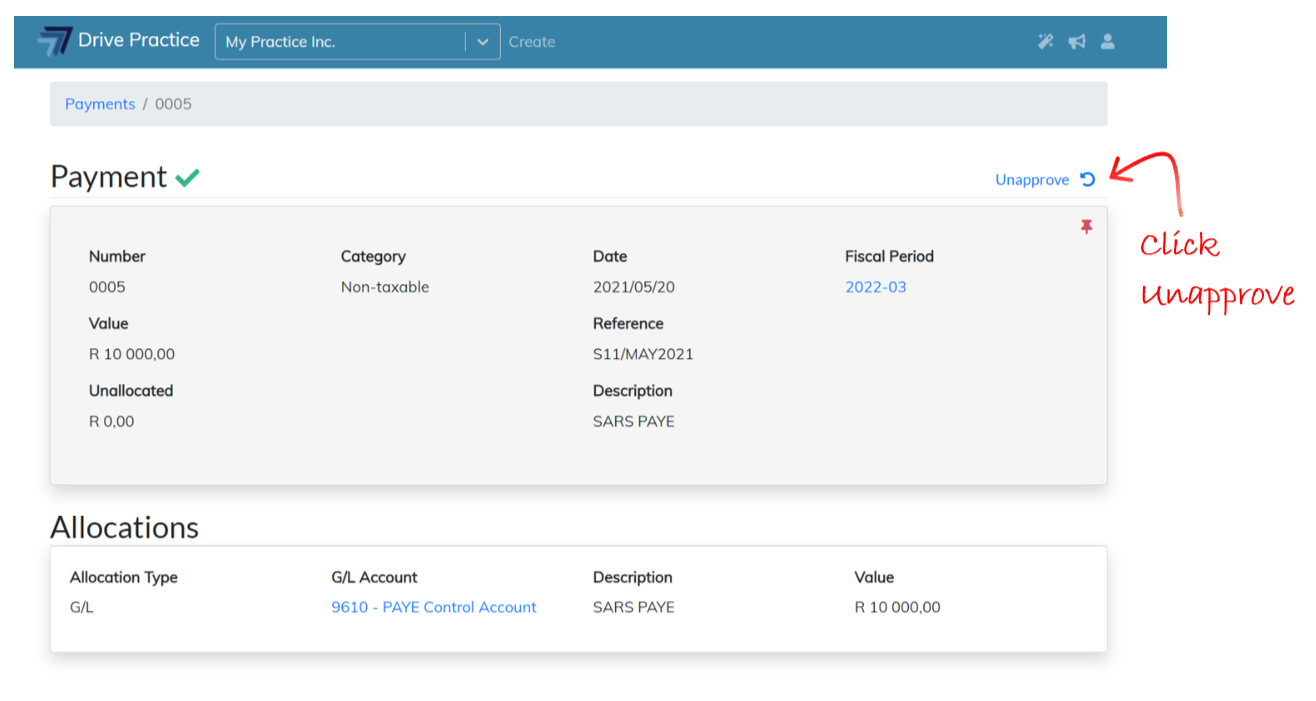
Should there be a requirement to amend an approved payment, click on the Un-approve button at the top right of an approved payment.
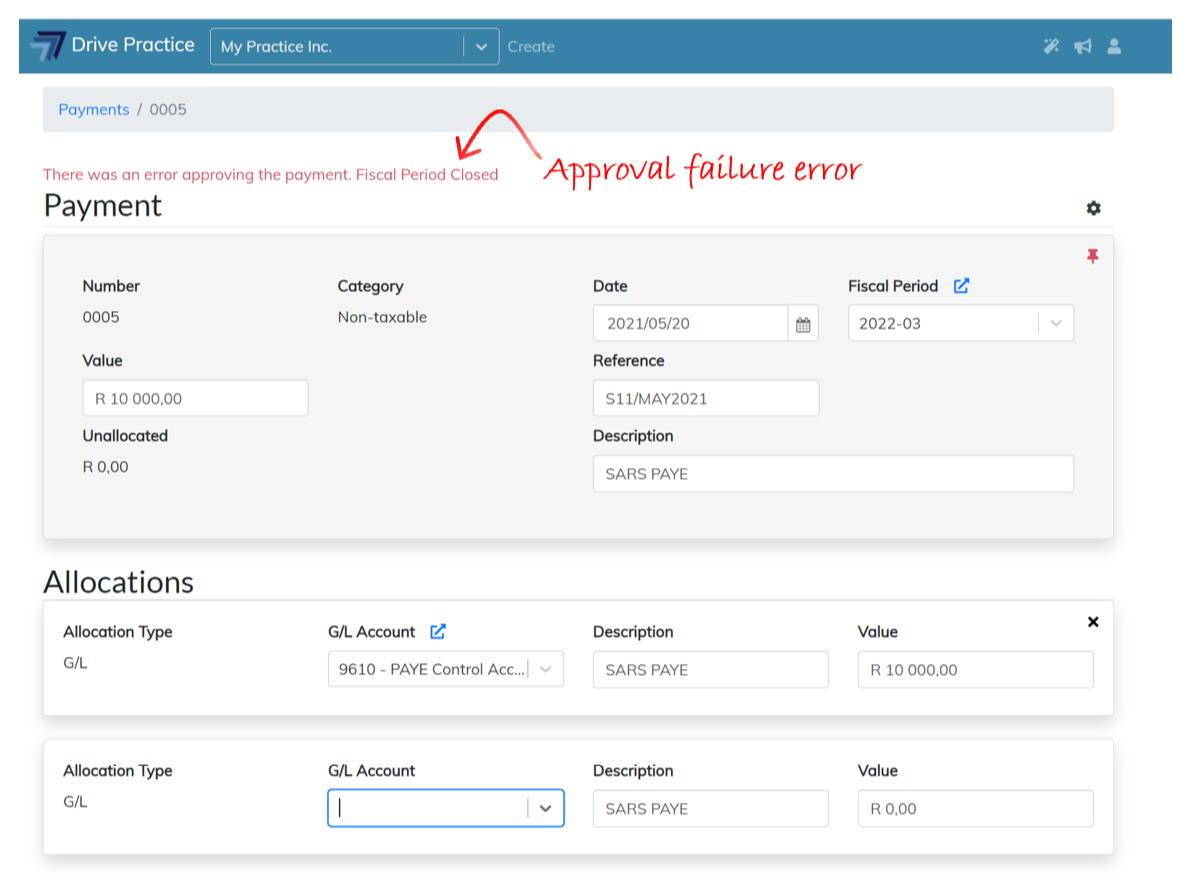
On invoking the Approve function a number of business rules are run on the payment. If the payment fails a business rule the payment will not be approved and an error message with the reason for the failure is displayed.
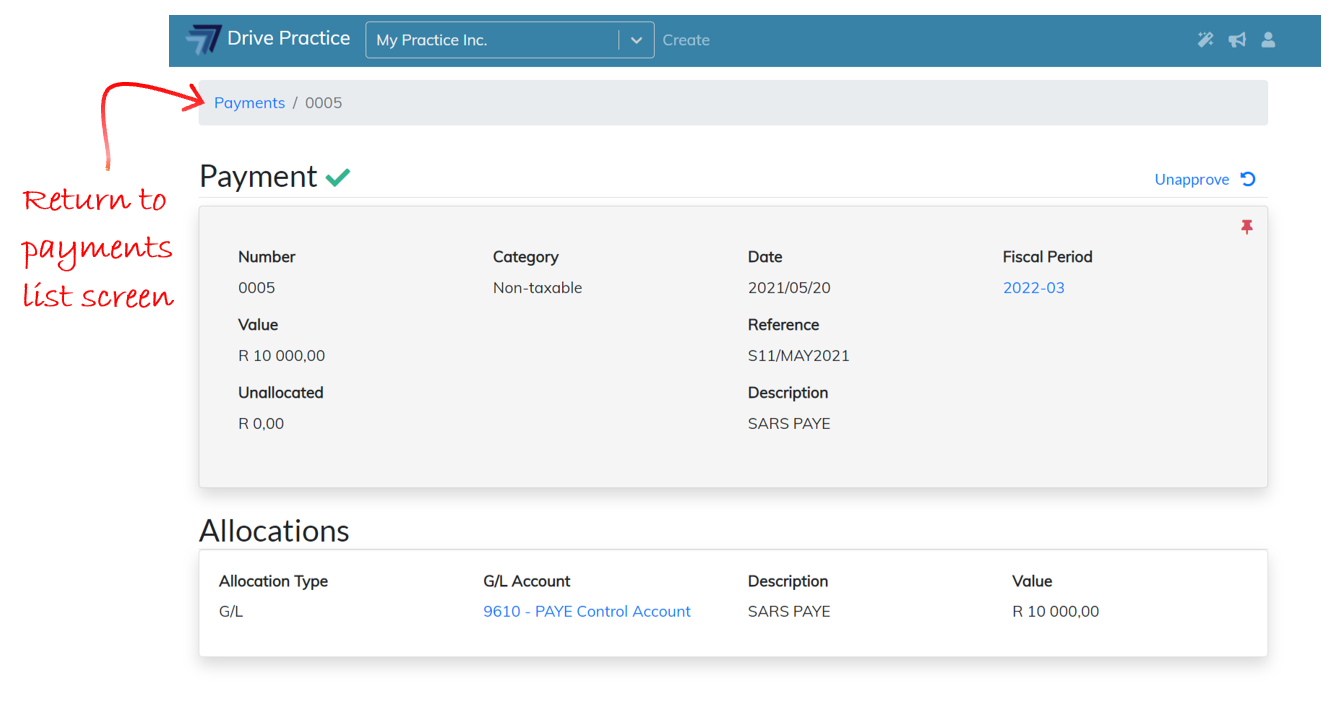
To return to the main menu, click on the Drive Practice logo or click on the blue hyperlink Payments in the breadcrumb to return to the Payments list.
When a payment is deleted, the system automatically returns to the Payments list screen.