Edit Bank Import
After Creating or selecting an existing Bank Import by clicking on the bank import name in the Bank Imports list screen, the page with the imported entries will open.
The Bank Import is divided into sections. The top section is the header section for the Bank Import, and a separate detail section will be created for each bank account imported if there were multiple bank accounts imported from a zipped file of OFX downloaded statements and/or CSV files.
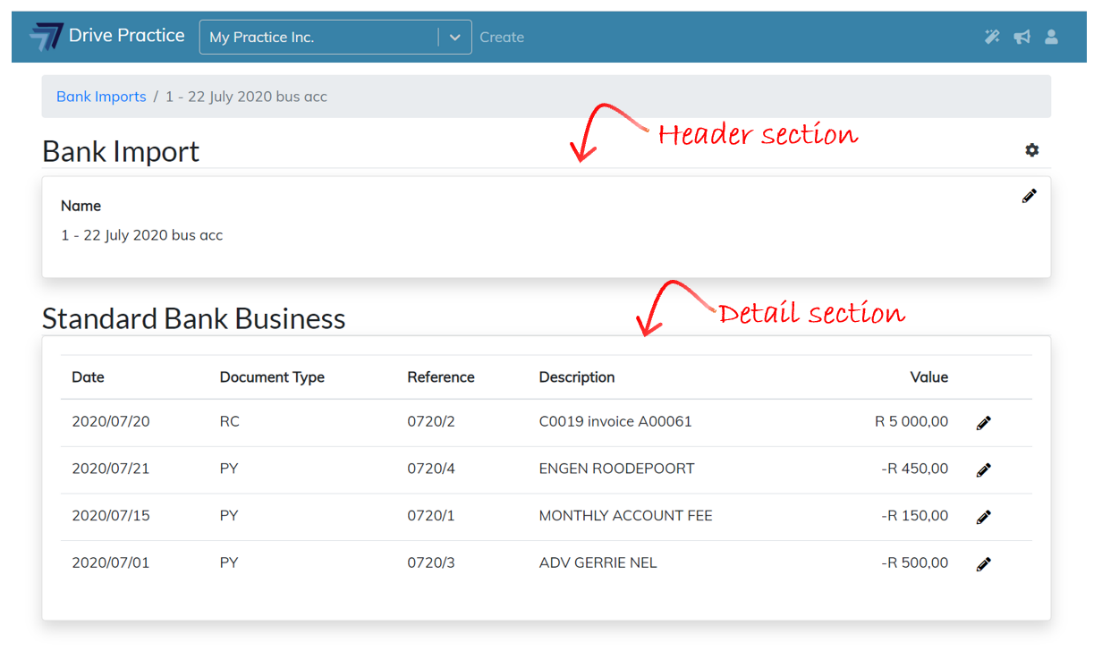
Header Section
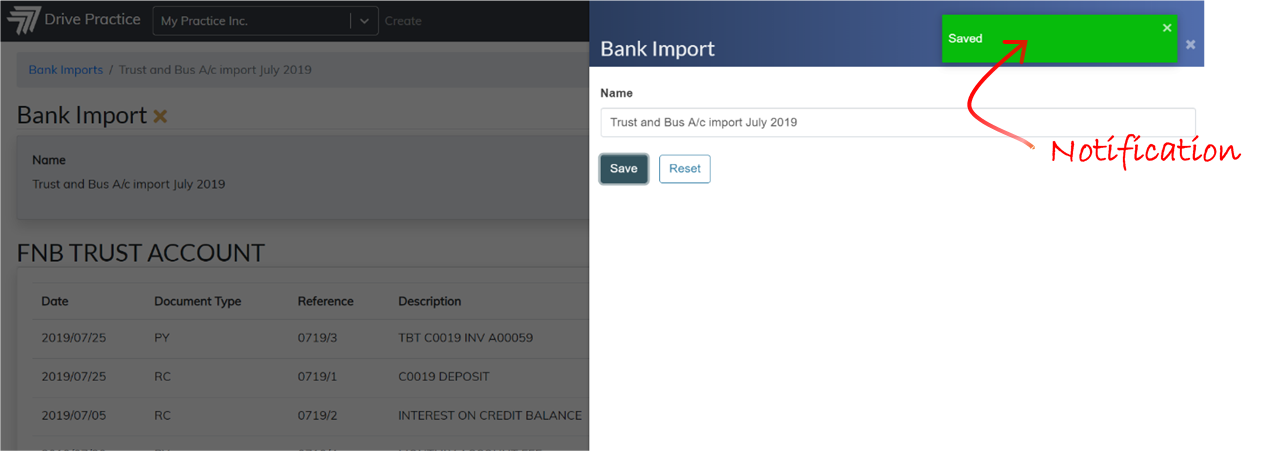
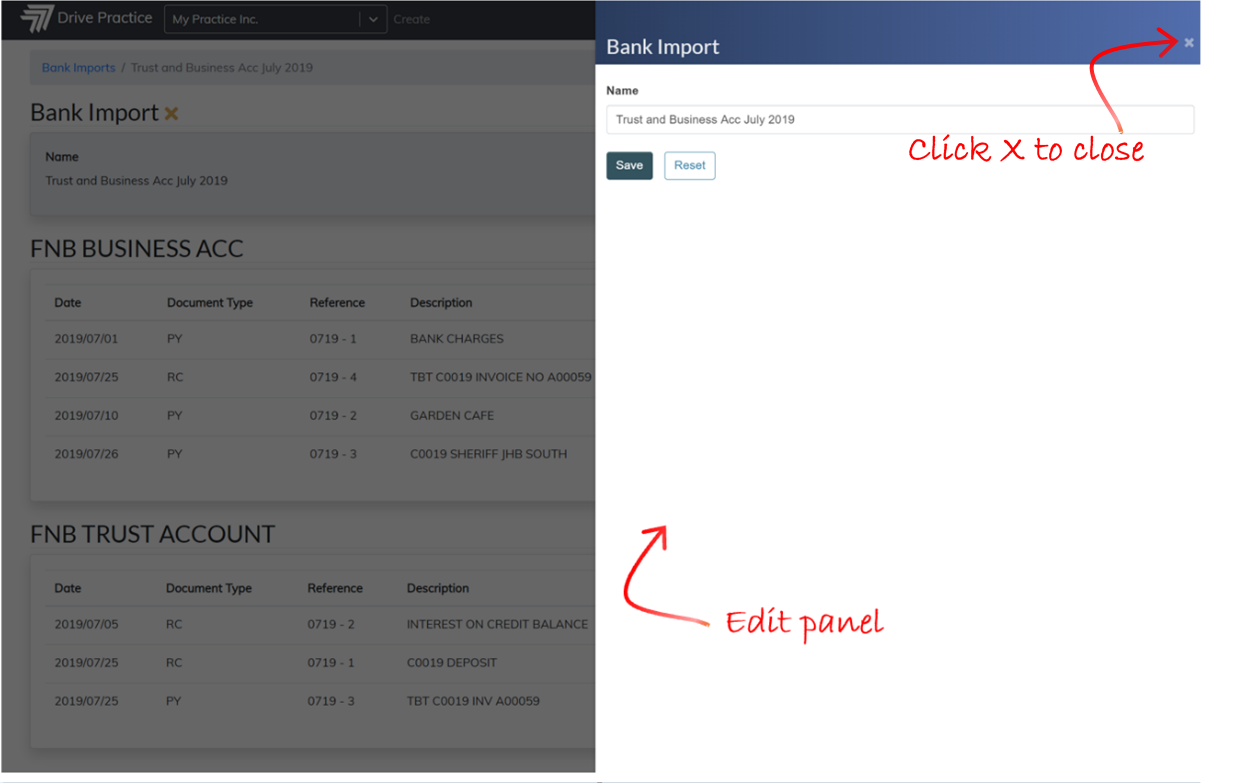
To edit the Bank Import Name, click on the pencil icon on the top right of the header section or double click on the section to open the edit panel on the right.
![]()
Once the change has been made, click on Save to save the changes, or Reset to revert to the original text before the edit. A brief notification will appear confirming the Save or Reset action selected.
To return to the Bank Import click outside of the edit panel or click on the “X” at the top right of the edit panel.
Clicking on the gear icon on the outside right of the header section provides options to Approve or Delete the import file.
![]()
Deleting an import file deletes all the allocations that may already have been made on a Bank Import, deletes the imported data completely and the record on the Bank Import list.
All entries must be allocated or marked to be ignored before a bank import can be approved.
Detail Section(s)
The Detail Section(s) list each bank account imported as a separate detail section with the name of the bank account listed at the top of each detail section.
Each detail section has column headings. The entries in the section can be sorted on any one of the column headings by clicking on the desired column on which to sort the data. Clicking twice on the same heading changes the sort order of that column from ascending to descending.

The columns of data provide details of each entry and are explained below.
-
Date
Date of the entry on the bank statement that was imported.
-
Document Type
Receipt (RC) or Payment (PY).
-
Reference
Auto-generated number using the prefix entered when creating the bank import. The system counts the number of entries in the import file for each bank account and allocates an appropriate postfix per bank account, based on the count, so that the entries can sort back to their original order in the bank import file if required.
-
Description
Description of the entry on the bank statement.
-
Value
Amount of the entry on the bank statement.
Allocate Transactions
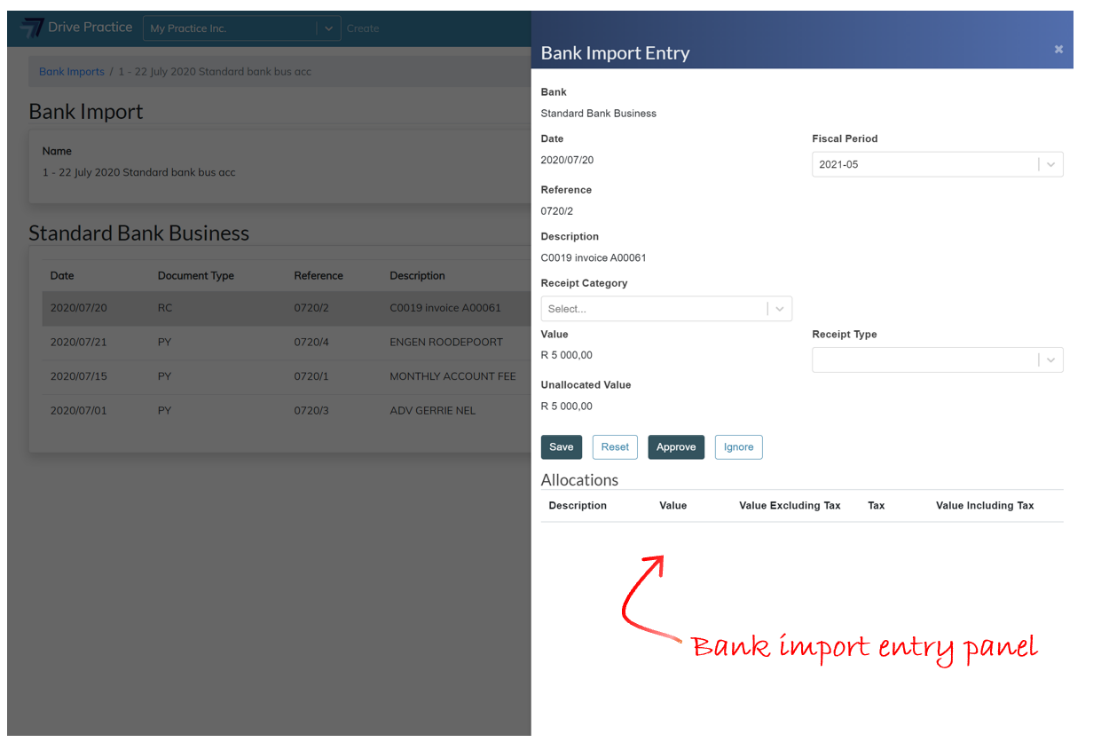
Each entry in the list can be allocated in detail by clicking on the pencil icon on the right of the entry, or by double clicking on an entry line.
![]()
Either action brings up the Bank Import Entry edit panel on the right which provides the functionality to allocate the entry. Initially the pencil icon is black, indicating that an entry is not allocated. Entries where the allocation has only partially been completed have a yellow pencil icon, those that are fully allocated have a green pencil icon, and entries where unsaved changes exist have a red pencil icon.
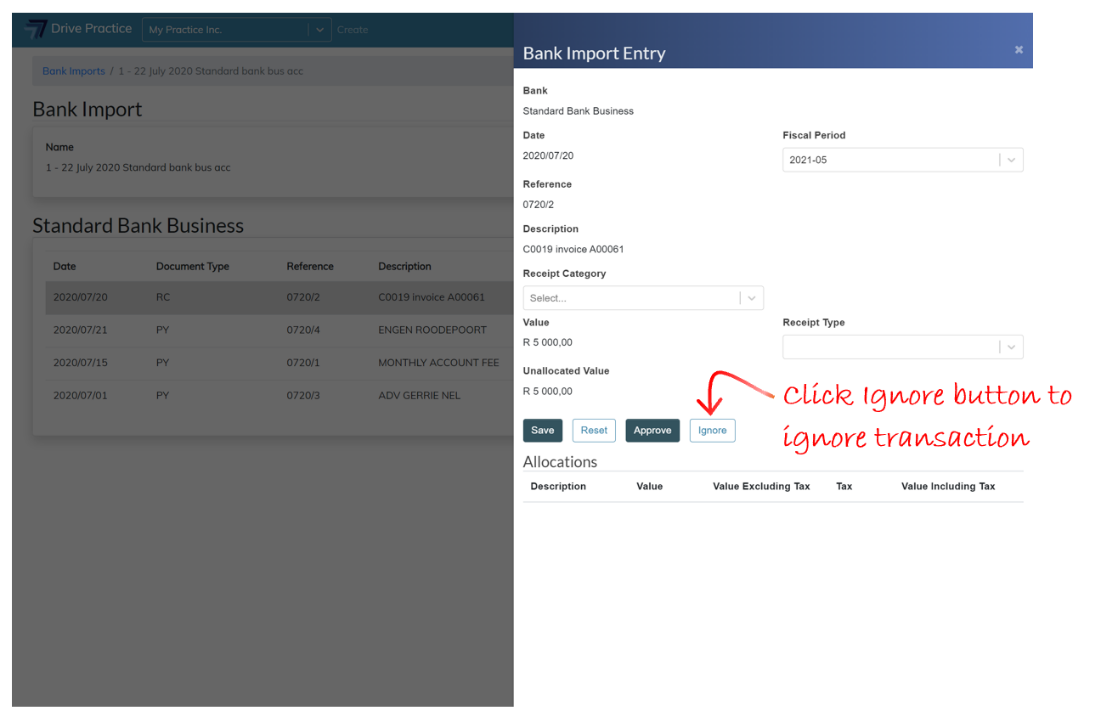
If you do not want to allocate an entry at all, then check the Ignore box and the Approve bank import function will ignore this entry.
Allocations are done in two parts, first the entry needs to be set according to entry type and then allocated to a Client, Matter, Invoice or G/L account depending on the nature of the entry.
In the first section the options to categorize receipt and payment entries will differ if the entry is imported for a Business Bank Account as opposed to entries imported for a Trust Bank Account. The options presented for entries for these different types of bank accounts are listed below.
Business Bank Accounts
- Payment entries can be allocated as either a Supplier or G/L Account type entry.
- Receipt entries can be allocated as either a Client or G/L Account type entry.
Trust Bank Accounts
- Receipt entries can be allocated as either a Trust or G/L Account type entry.
- Payment entries can be allocated as either a Trust or G/L Account type entry.
Examples of each type of entry are detailed below, providing detail on how these entries are further allocated in the second part of the allocation.
Business Bank Accounts
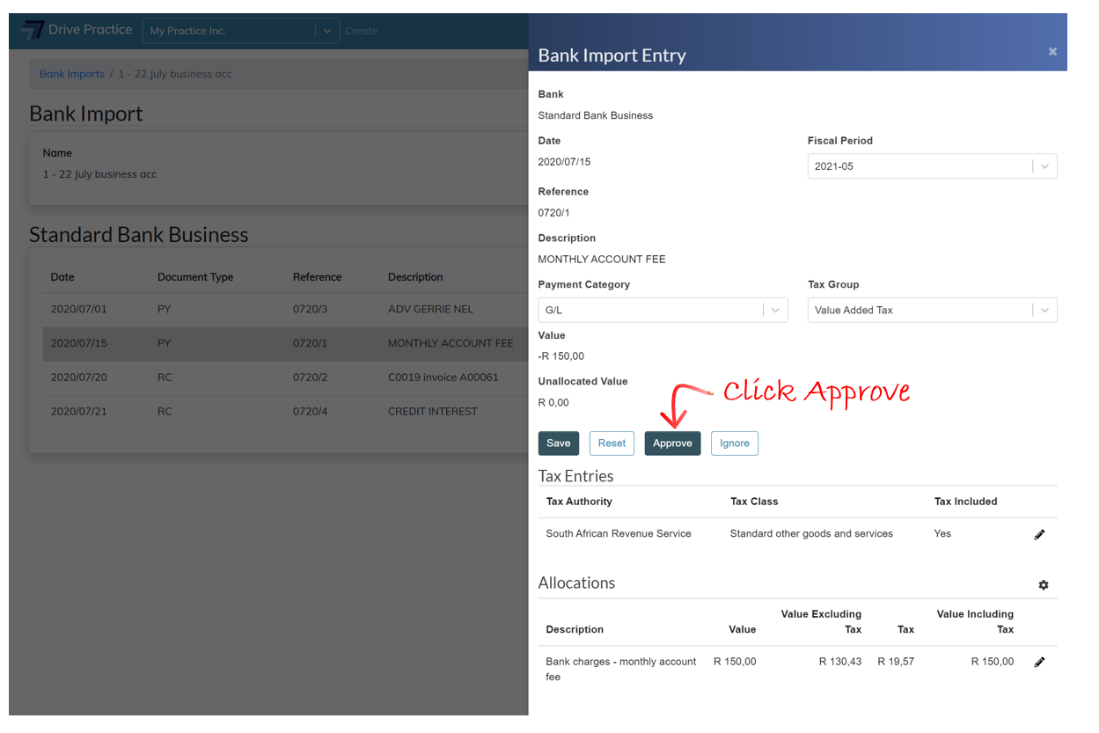
G/L Payment
In this example a bank charge entry on a business bank account will be allocated. Click on the pencil icon on the right of the entry or double click the entry to open the Bank Import Entry panel on the right.
In the top section of the Bank Import Entry panel, the fields from the entry list columns describing the entry are presented to provide context for allocating the entry.
The Fiscal Period for the entry is defaulted from the entry date automatically but can be changed if required.
Click on the dropdown on the Payment Category field and select G/L.
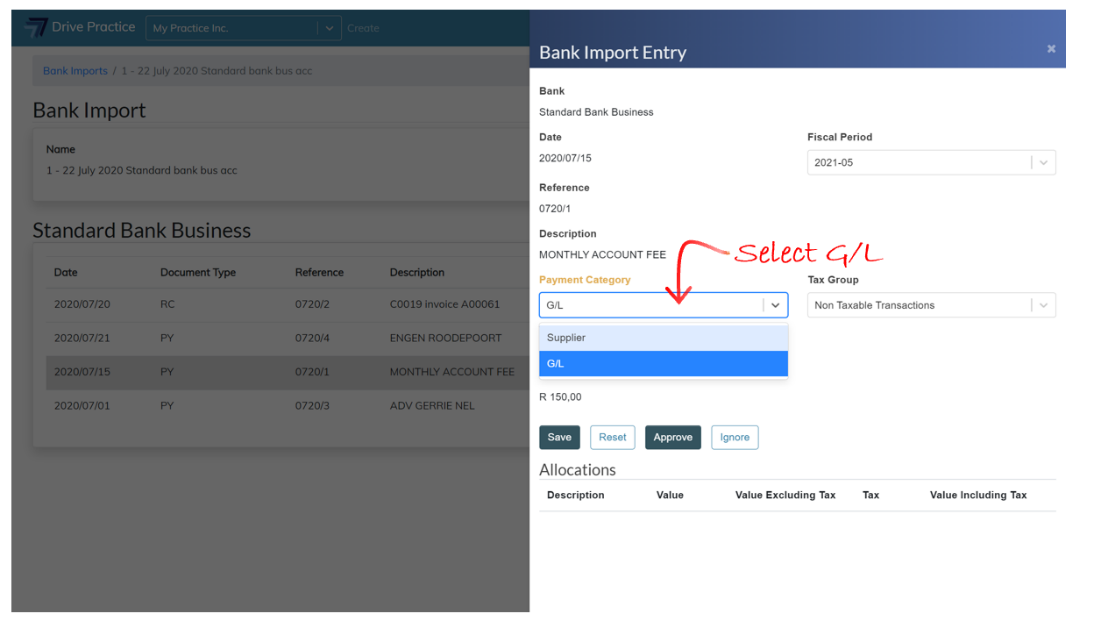
Once selected the Tax Group field will appear on the right of the Payment Category field. Click on the dropdown for the Tax Group field and select the correct Tax Group for the entry.

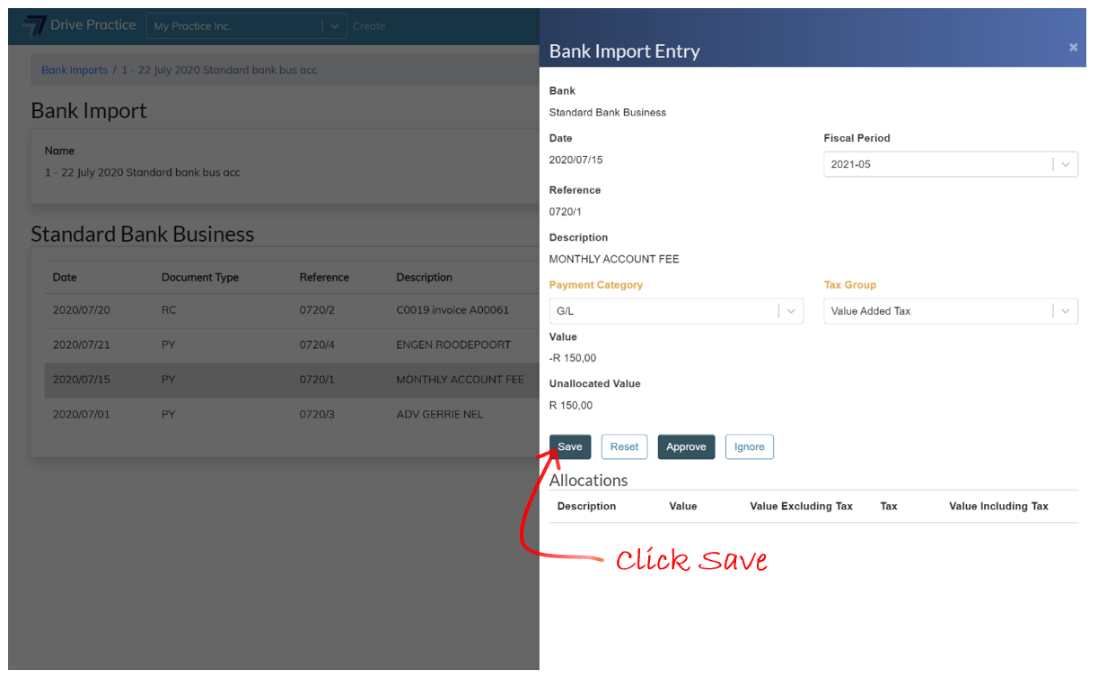
At this stage the Payment Category and Tax Group field labels will be yellow, indicating that the options selected have not been saved. Click on the Save button to save the options selected. The Reset button will undo all selections and/or changes made.
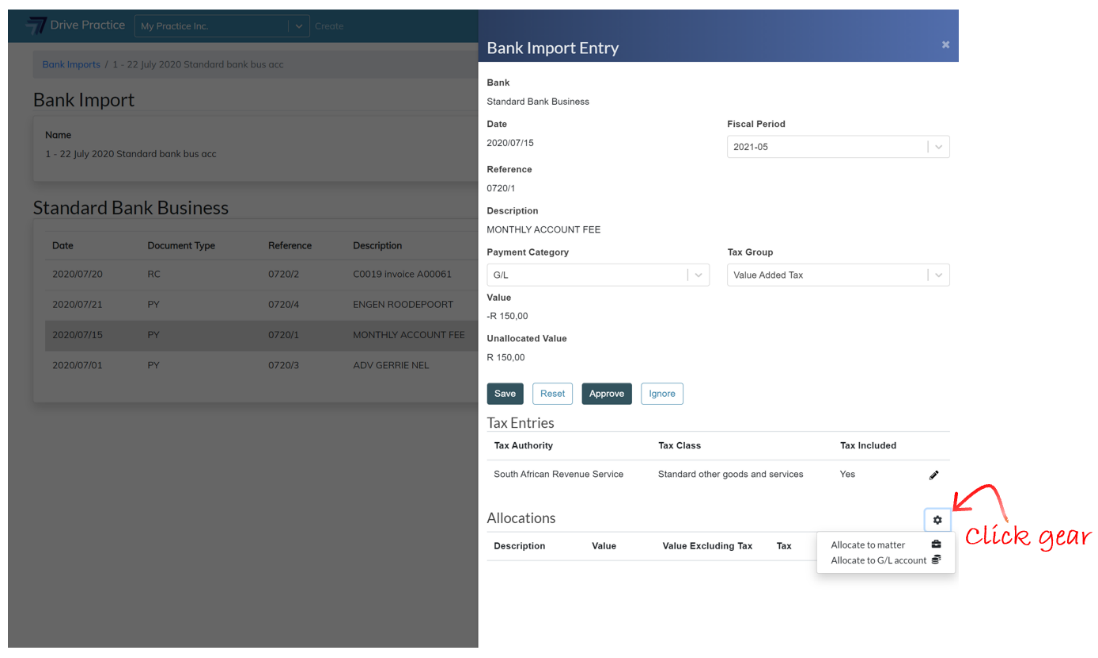
Once the selections have been saved, a gear icon will appear on the right above the Allocations section. The default Tax Classes that have been set in Setup for the selected Tax Group will appear above the Allocations section. Click on the pencil icon next to the Tax Entries to edit the classes if required.
The gear icon, when clicked, lists options to allocate to a G/L Account or to a Matter (which option will create a disbursement on the matter selected). Select Allocate to G/L Account.
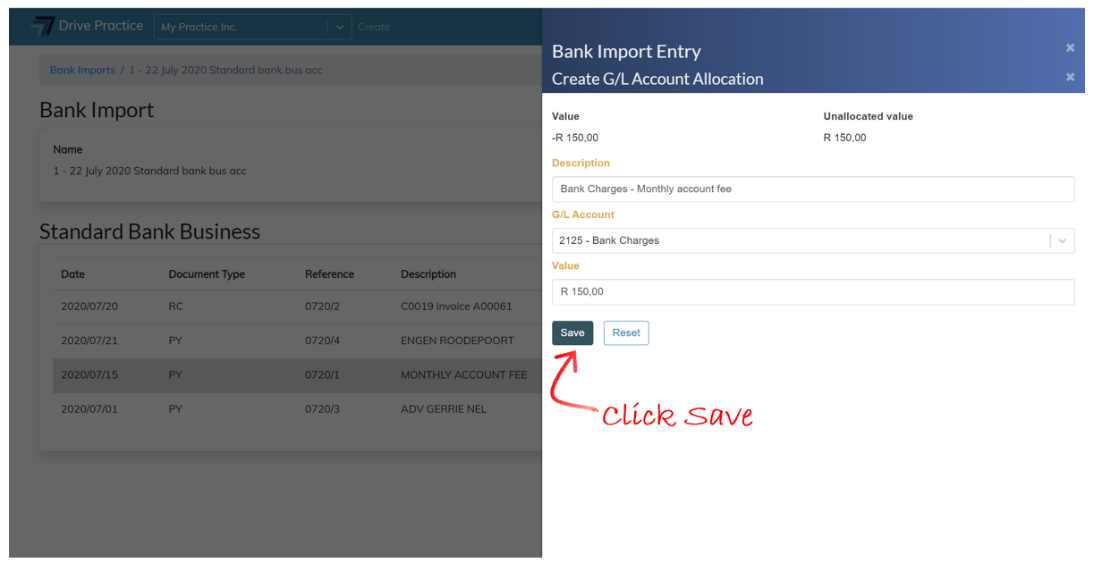
The Create G/L Account Allocation panel will open, and the value of the payment and the Unallocated value will be displayed at the top of the panel. For the first allocation, the full value of the entry equals the Unallocated value. Where there are multiple allocations, the Unallocated value will decrease to reflect the remaining balance of the entry.
Enter a description for the allocation in the Description field and then click on the G/L Account field to search for the G/L Account for Bank Charges. The search function searches on the account name or an account number.
Enter a value for the allocation into the Value field. The value entered cannot be more than the Unallocated value of the entry.
Like with the previous panel, as fields are updated on the panel the field labels turn yellow, indicating that the data has not been saved.
Save the allocation by clicking Save. The Reset button will undo all the selections and/or changes made.
Clicking off the panel to the left or clicking on the “X” at the top right of the Create G/L Account Allocation panel next to the Create G/L Account heading, will close the allocation panel and the Bank Import Entry panel showing the allocation to the entry will be returned. If the payment is to be allocated to multiple G/L accounts, click the gear icon to allocate to additional G/L Accounts in the same manner as described above.
To edit an allocation, click on the pencil icon next to the allocation entry on the Entry panel.
Once the payment is fully allocated, click off the entry panel to return to the Bank Import.
The pencil icon next to the allocated entry will turn green once the allocation is fully allocated.
If the allocation is incomplete the pencil icon will turn yellow, and where there are unsaved changes, the pencil icon will be red.
Supplier Payment
The next example demonstrates how to allocate a Supplier Payment. Click on the pencil icon on the right of the entry or double click the entry to open the Bank Import Entry panel on the right.
In the top section of the Bank Import Entry panel, the fields from the entry list columns, describing the entry, are presented to provide context for allocating the entry.
The Fiscal Period for the entry is defaulted from the entry date automatically but can be changed if required.
Click on the dropdown on the Payment Category and select Supplier.

The Supplier field will appear on the right. Click on the Supplier field and type in the Supplier’s name or number to search for and select the Supplier.
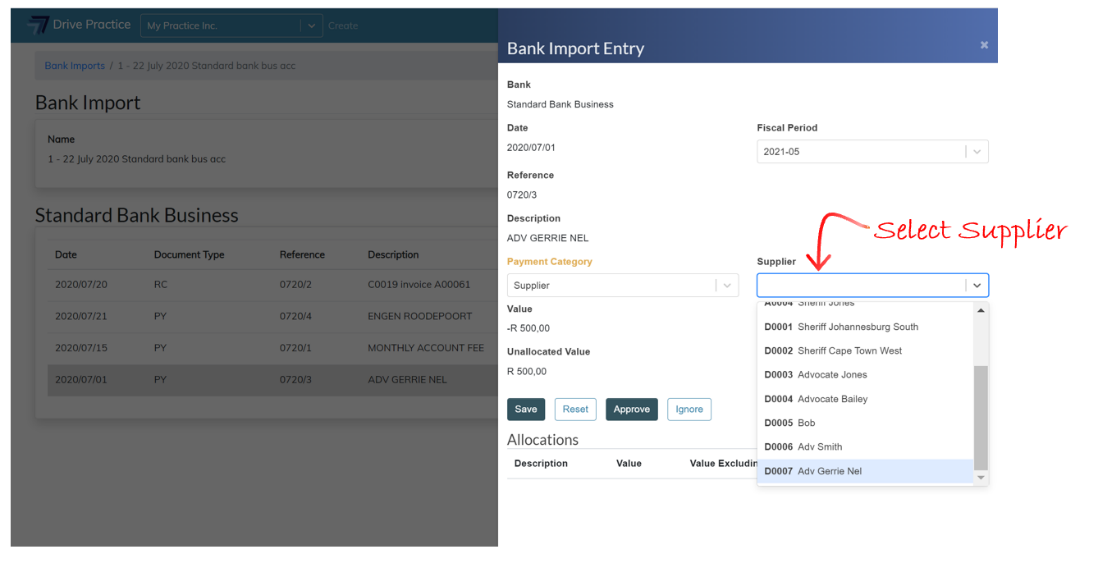
At this stage the Payment Category and Supplier field labels will be yellow, indicating that the options selected have not been saved. Click on the Save button to save the options selected. The Reset button will undo all selections and/or changes made.
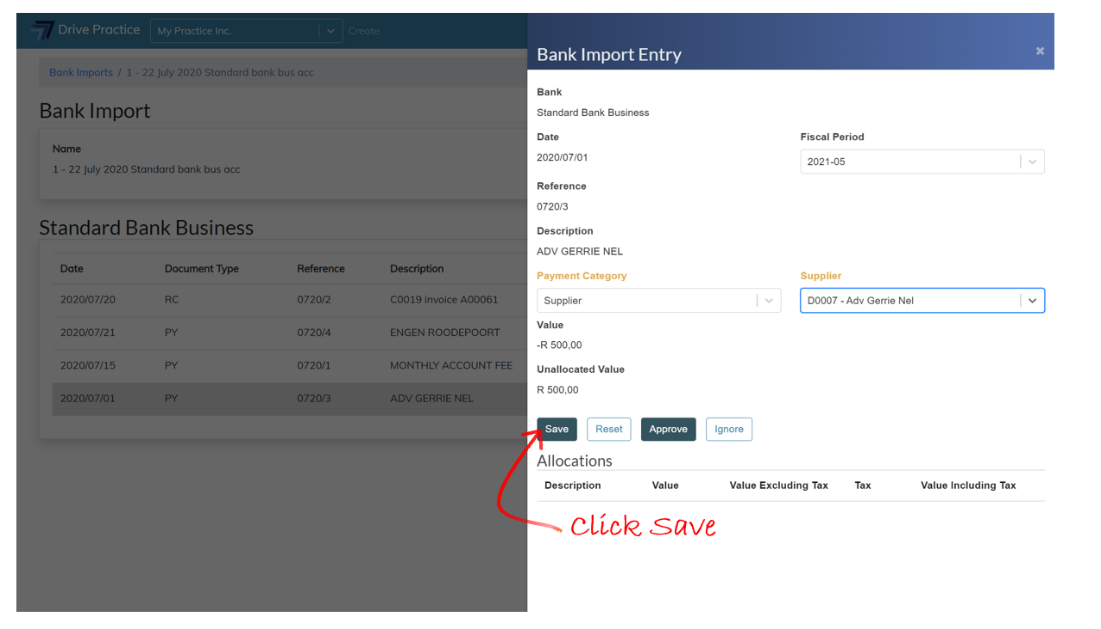
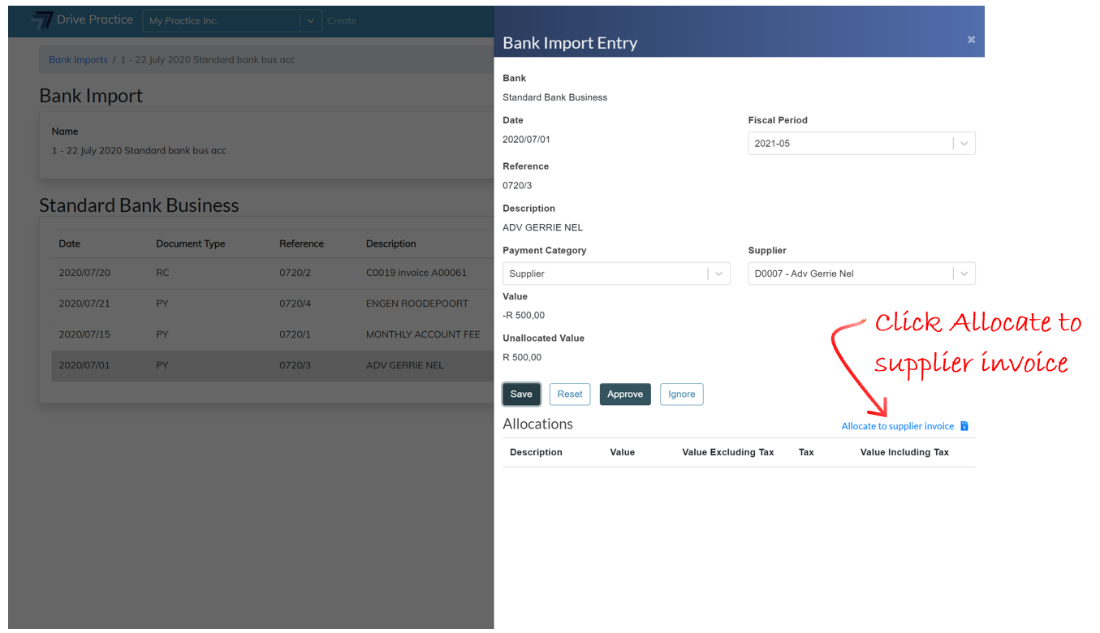
Once the selections have been saved, an Allocate to Supplier Invoice button will appear on the right above the Allocations section.
The Allocate to Supplier Invoice button, when clicked, will list an option to allocate to a supplier invoice.
The Allocate to Supplier Invoice button, when clicked, will list an option to allocate to a supplier invoice.
The Create Supplier Invoice Allocation panel will open, and the Value of the payment and the Unallocated value will be displayed at the top of the panel. For a first allocation, the full value of the entry is the Unallocated value. Where there are multiple allocations, the Unallocated value will decrease to reflect the remaining balance of the entry.
Enter a description for the payment into the Description field and select the invoice to allocate the payment to from the Supplier Invoice dropdown field.
The Value of the Allocation will default to the lesser of the value of the outstanding amount of the supplier invoice or the unallocated value of the payment.
The Value field can be edited but cannot be more than the outstanding value of the Supplier Invoice selected, or the remaining Unallocated value of the entry.
Like with the previous panel, as fields are updated on the panel the field labels turn yellow, indicating that the data has not been saved.
Save the allocation by clicking Save. The Reset button will undo all the selections and/or changes made.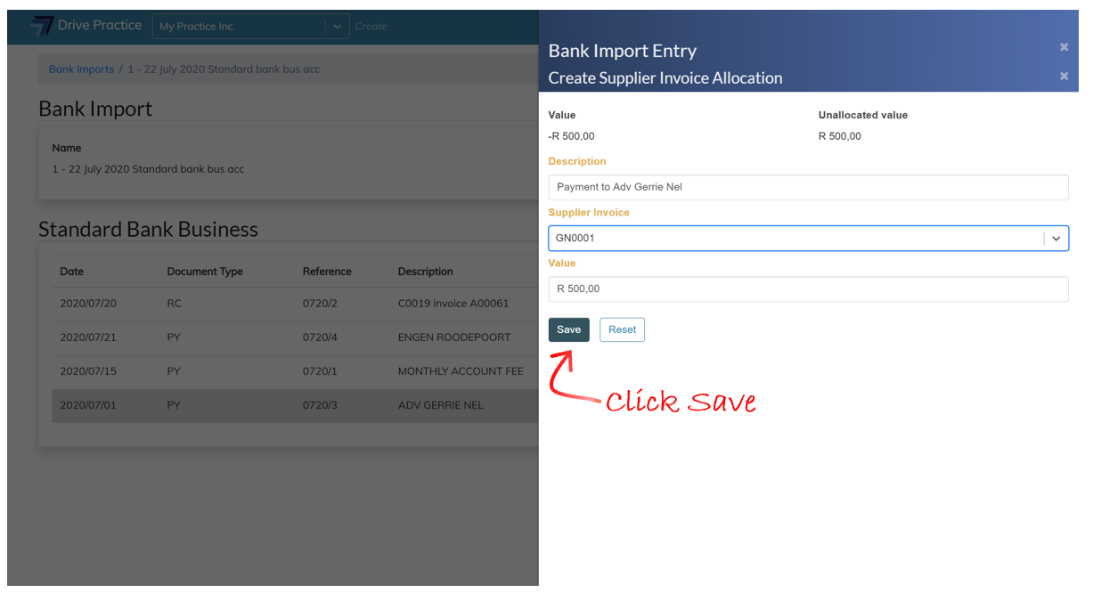
Clicking off the panel to the left or clicking on the “X” at the top right of the Create Supplier Invoice Allocation panel next to the Create Supplier Invoice Allocation heading, will close the allocation panel and the Bank Import Entry panel showing the allocation will be returned. If the payment is to be allocated to multiple invoices, click the gear icon to allocate to additional invoices in the same manner as described above.
To edit an allocation, click on the pencil icon next to the allocation entry on the Entry panel.
Once the payment is fully allocated, click off the entry panel to return to the Bank Import.
The pencil icon next to the allocated entry will turn green once the allocation is fully allocated.
If the allocation is incomplete the pencil icon will turn yellow, and where there are unsaved changes, the pencil icon will be red.
Client Receipt
This example demonstrates how to allocate a receipt from a Client, which receipt could either be a trust to business transfer that was done for a specific invoice or invoices raised, or it could be funds deposited directly into the business account by a client being payment of a specific invoice or invoices provided to the client.
Click on the pencil icon on the right of the entry or double click the entry to open the Bank Import Entry panel on the right.
In the top section of the Bank Import Entry panel, the fields from the entry list columns, describing the entry, are presented to provide context for allocating the entry.
The Fiscal Period for the entry is defaulted from the entry date automatically but can be changed if required.
Click on the dropdown on the Receipt Category field and select Client.
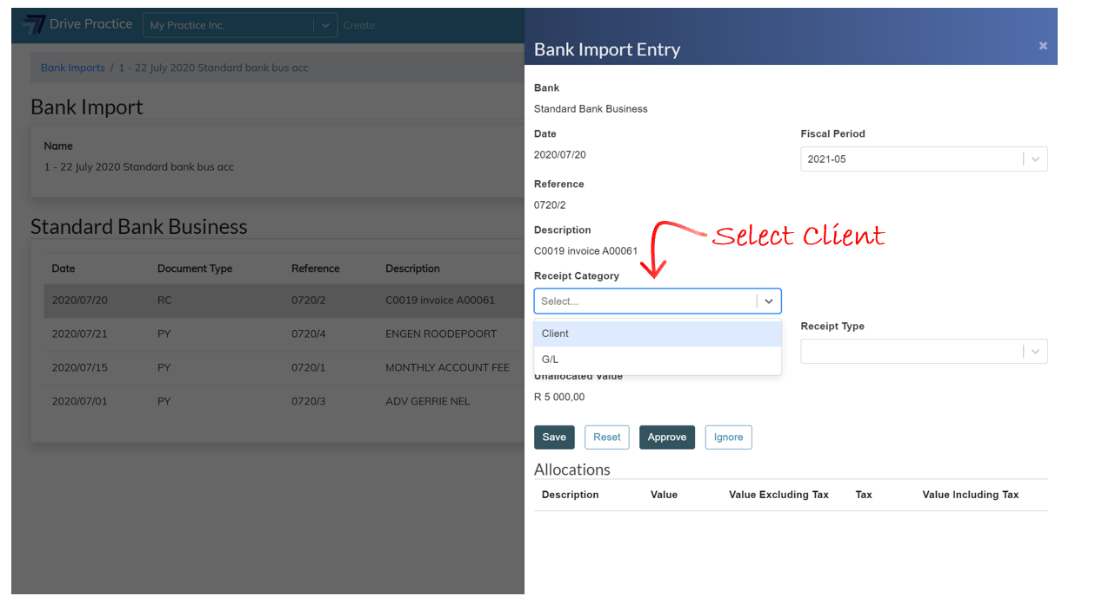
The Client field will appear on the right. Click on the Client field and type in the Client’s name or number to search for and select the Client.
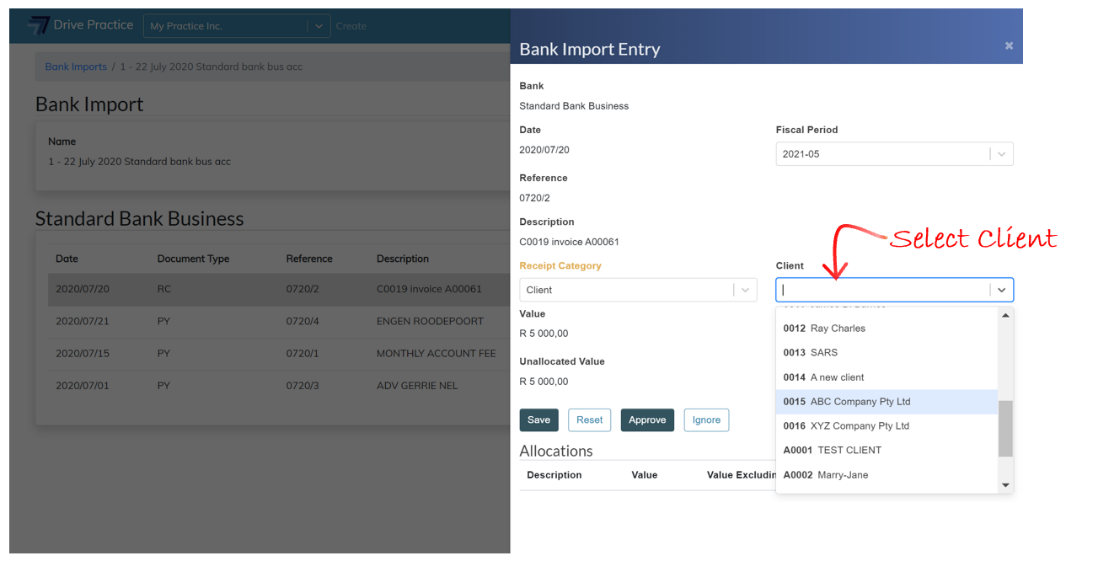
Next, select the receipt type from the Receipt Type dropdown list, which will display the receipt type options created for the Organisation in the Setup menu.
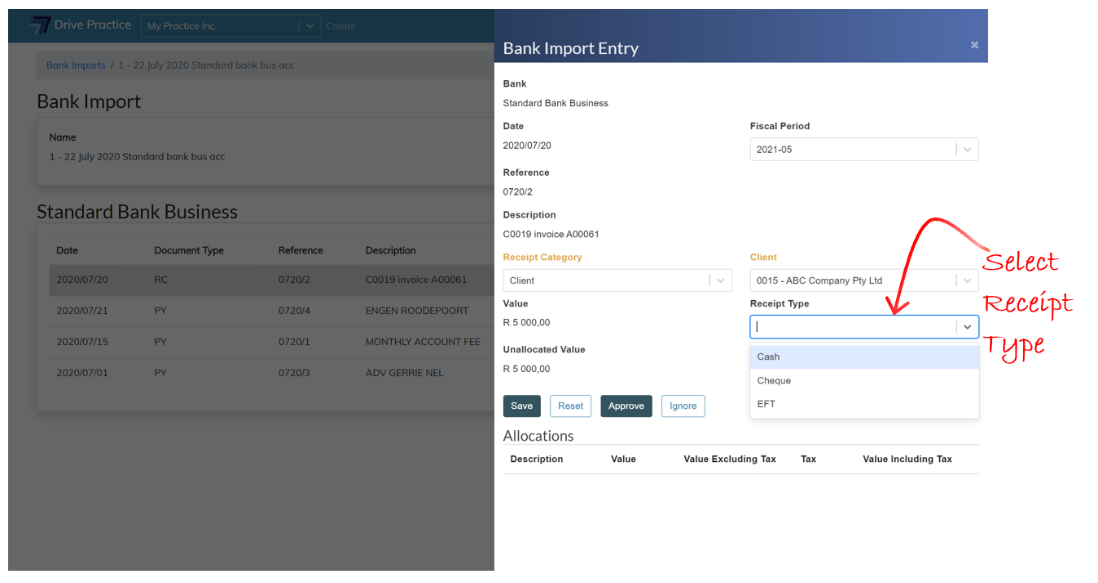
At this stage the Receipt Category, Client and Receipt Type field labels will be yellow, indicating that the selections made have not been saved. Click on the Save button to save the selections. The Reset button will undo all selections and/or changes made.
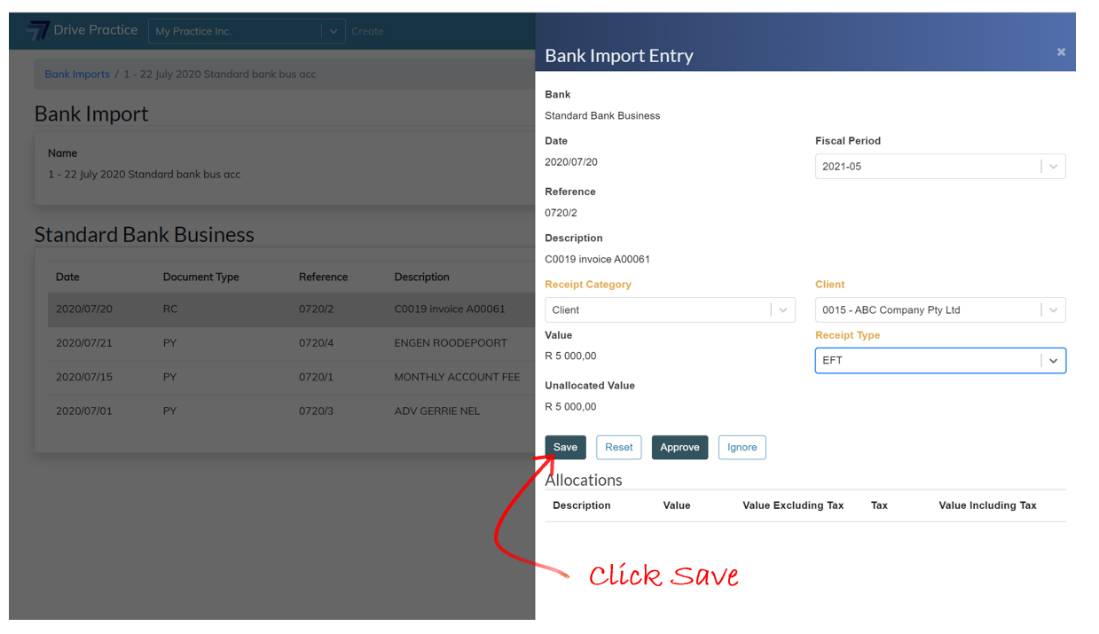
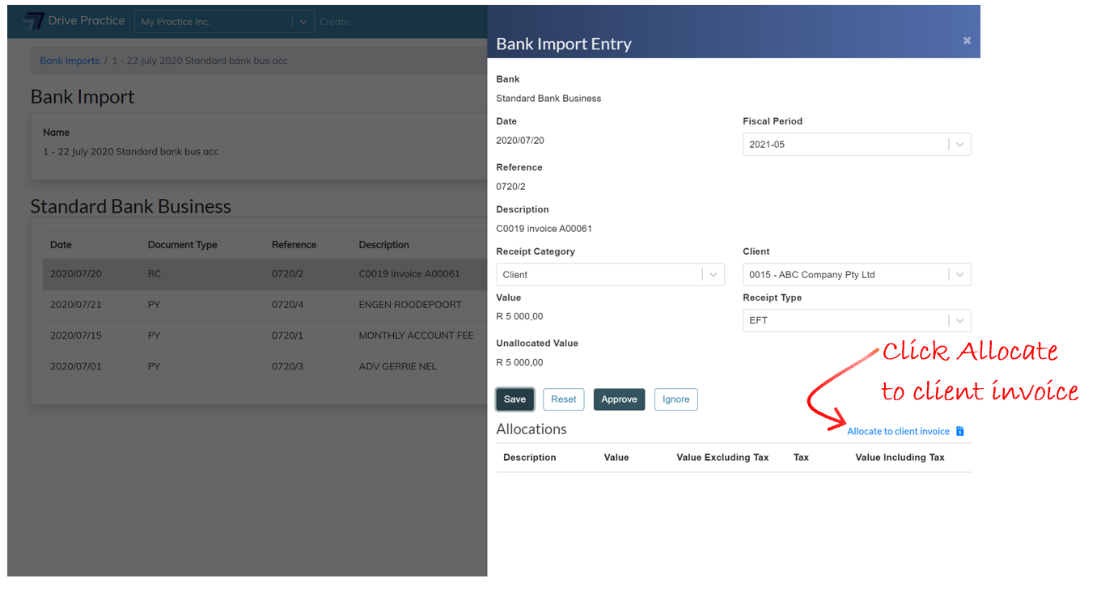
Once the selections have been saved, an Allocate to Client Invoice button will appear on the right above the Allocations section.
The Allocate to Client Invoice button, when clicked will list an option to allocate to a client invoice. Click Allocate to Client Invoice
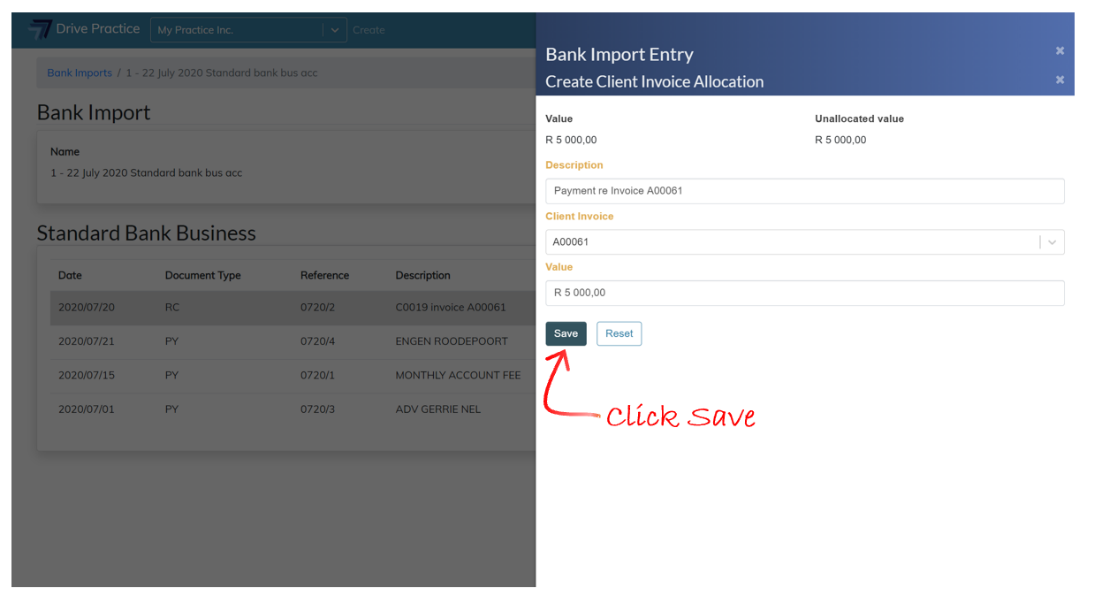
The Create Client Invoice Allocation panel will open, and the Value of the receipt and the Unallocated value will be displayed at the top of the panel. For a first allocation, the full value of the entry is the Unallocated value. Where there are multiple allocations, the Unallocated value will decrease to reflect the remaining balance of the entry.
Enter a description for the receipt into the Description field and select the invoice to allocate the receipt to from the Client Invoice dropdown field.
The Value of the Allocation will default to the lesser of the value of the outstanding amount of the client invoice or the unallocated value of the receipt.
The Value field can be edited but cannot be more than the outstanding value of the Client Invoice selected, or the remaining Unallocated value of the entry.
Save the allocation by clicking Save.The Reset button will undo all the selections and/or changes made.
Like with the previous panel, as fields are updated on the panel the field labels turn yellow, indicating that the data has not been saved.
Clicking off the panel to the left or clicking on the “X” at the top of the Create Client Invoice Allocation panel next to the Create Client Invoice Allocation heading will close the allocation panel and the Bank Import Entry panel showing the allocation will be returned. If the receipt is to be allocated to multiple invoices, click the gear icon to allocate to additional invoices in the same manner as described above.
To edit an allocation, click on the pencil icon next to the allocation entry on the Entry panel.
Once the receipt is fully allocated, click off the entry panel to return to the Bank Import.
The pencil icon next to the allocated entry will turn green once the entry is fully allocated.
If the allocation is incomplete the pencil icon will turn yellow, and where there are unsaved changes, the pencil icon will be red.
G/L Receipt
The next receipt example demonstrates how to allocate a receipt that is not from a Client, which receipt could interest received, a reversal of a payment, a transfer from a business call account, or any other type of receipt which did not arise from an invoice to a client. The example used in this instance is to allocate interest received.
Click on the pencil icon on the right of the entry or double click the entry to open the Bank Import Entry panel on the right.
In the top section of the Bank Import Entry panel, the fields from the entry list columns describing the entry are presented to provide context for allocating the entry.
The Fiscal Period for the entry is defaulted from the entry date automatically but can be changed if required.
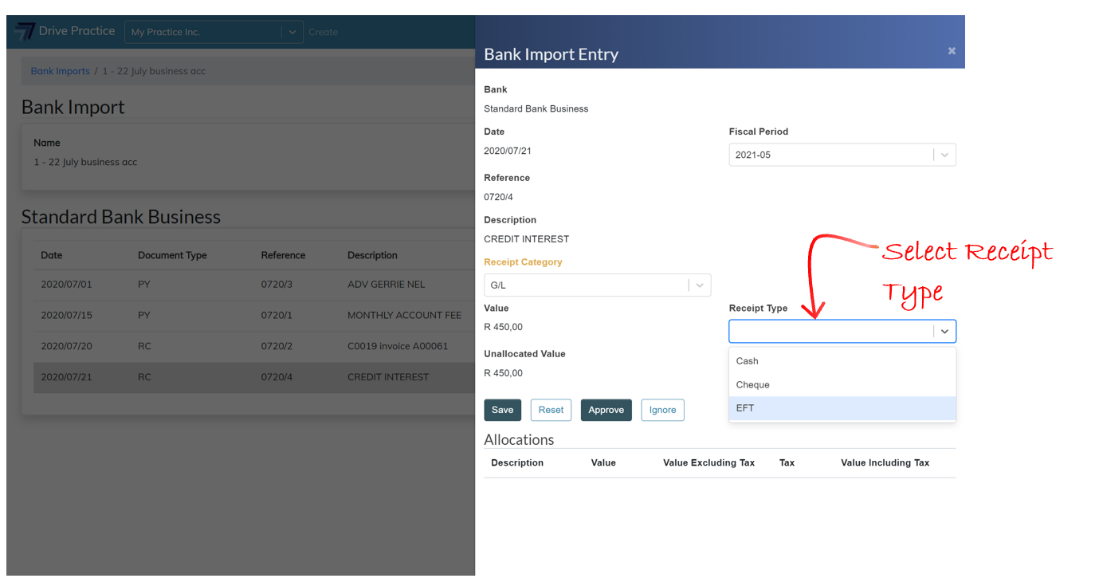
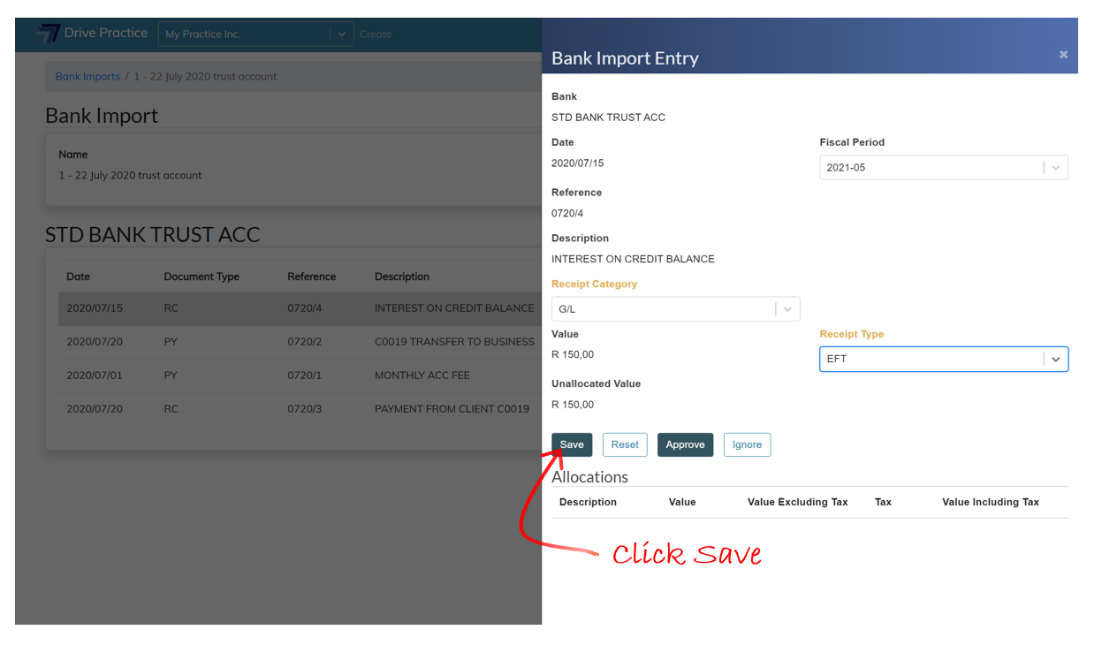
Click on dropdown on the Receipt Category field and select G/L.
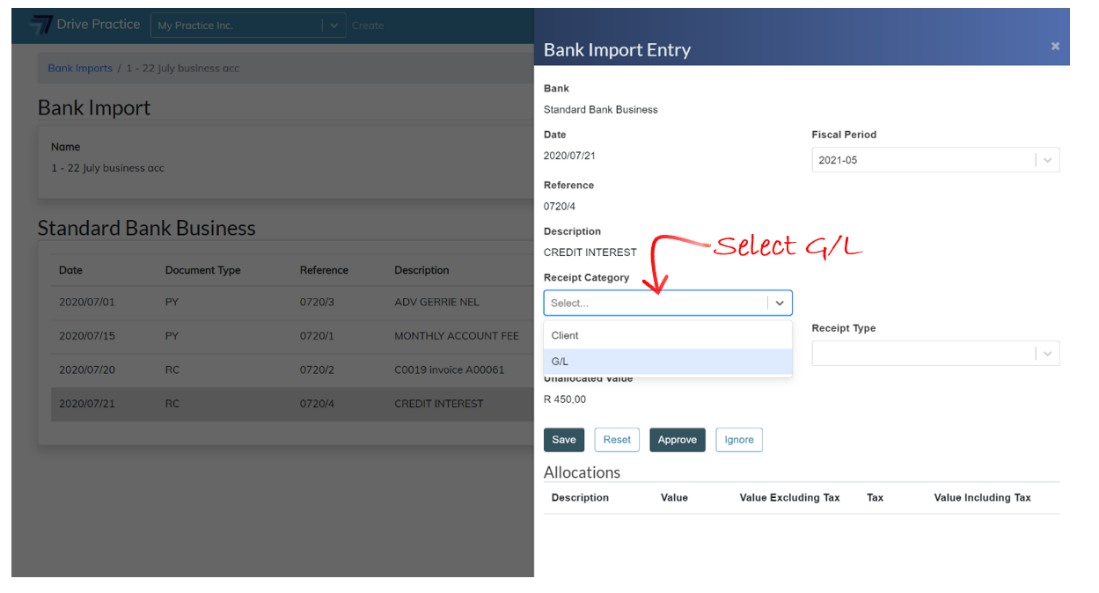
Next, select the Receipt type from the Receipt Type dropdown list, which will display the receipt type options created for the Organisation in the Setup menu.
At this stage the Receipt Category, Client and Receipt Type field labels will be yellow, indicating that the selections made have not been saved. Click on the Save button to save the selections. The Reset button will undo all selections and/or changes made.
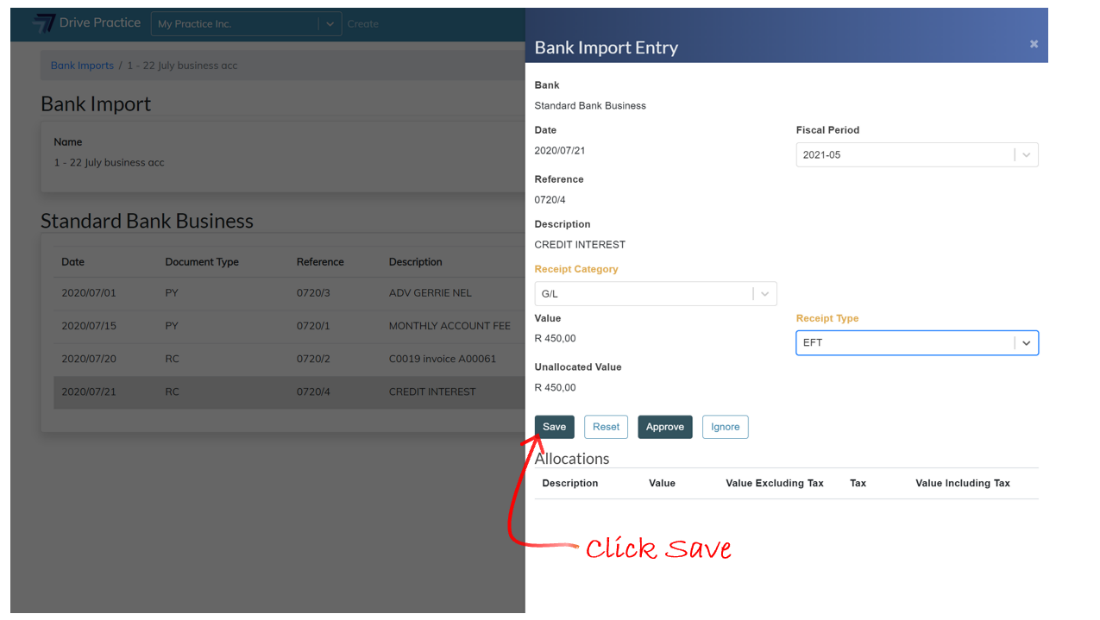
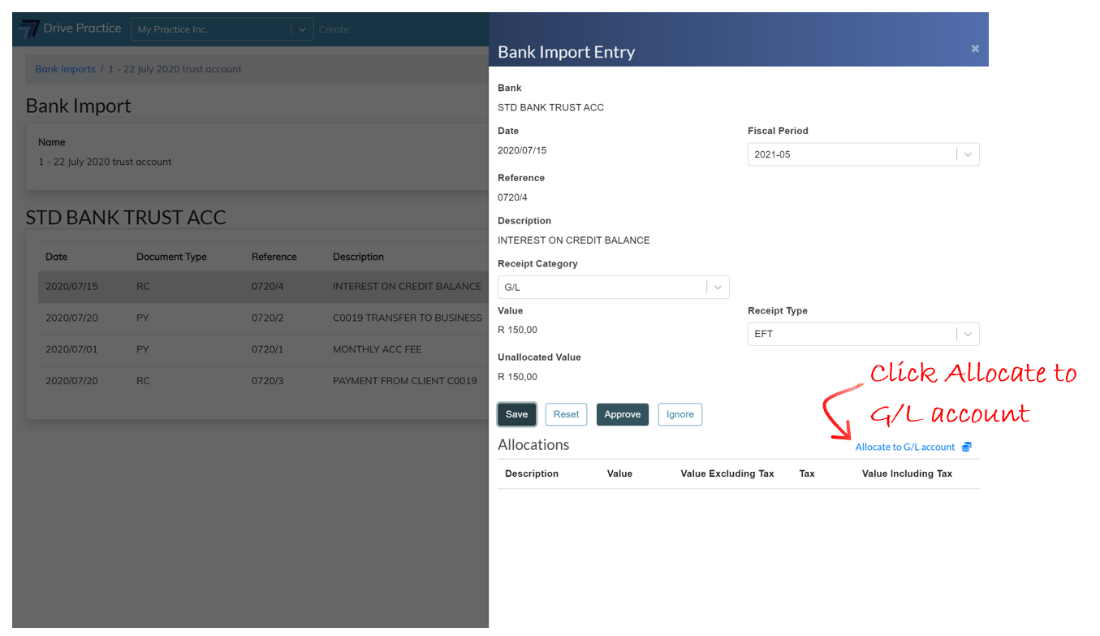
Once the selections have been saved, an Allocate to G/L Account button will appear on the right above the Allocations section.
The Allocate to G/L Account button, when clicked, will list an option to allocate to a G/L account. Click Allocate to G/L Account button.

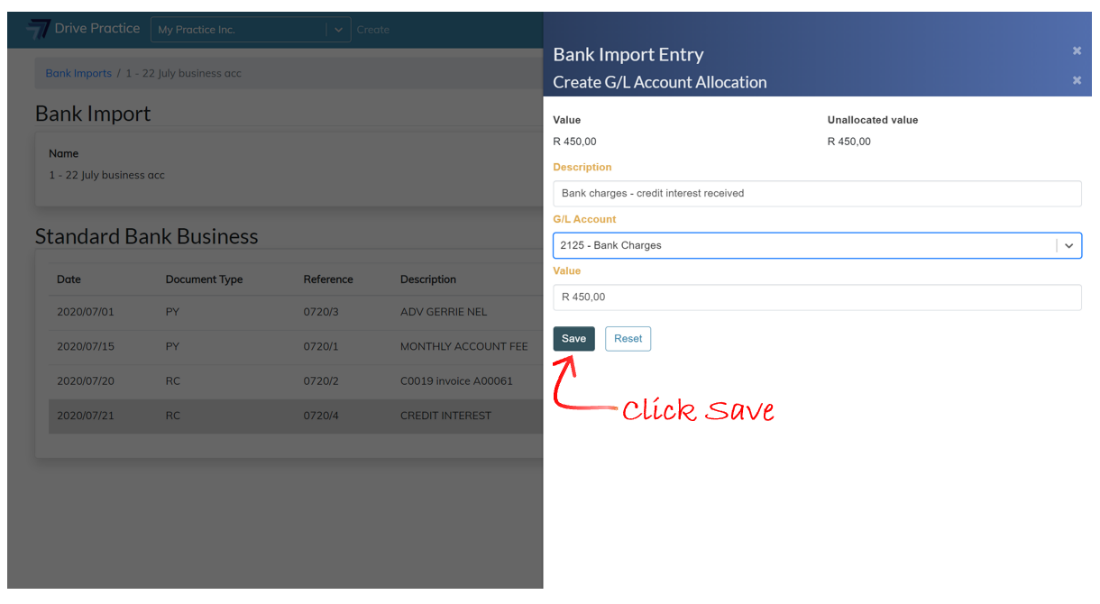
The Create G/L Account Allocation panel will open, and the Value of the receipt and the Unallocated value will be displayed at the top of the panel. For a first allocation, the full value of the entry is the Unallocated value. Where there are multiple allocations, the Unallocated value will decrease to reflect the remaining balance of the entry.
Enter a description for the receipt into the Description field and select the interest received G/L Account to allocate the receipt to from the G/L Account field. The search function searches on the account name or an account number.
The Value of the Allocation will default to the lesser of the value of the outstanding amount of the client invoice or the unallocated value of the receipt.
The Value field can be edited but cannot be more than the value of the remaining Unallocated value of the entry.
Like with the previous panel, as fields are updated on the panel the field labels turn yellow, indicating that the data has not been saved.
Save the allocation by clicking Save.The Reset button will undo all the selections and/or changes made.
Clicking off the panel to the left or clicking on the “X” at the top right of the Create G/L Account Allocation panel next to the Create G/L Account heading, will close the allocation panel and the Bank Import Entry panel showing the allocation to the entry will be returned. If the receipt is to be allocated to multiple G/L accounts, click the gear icon to allocate to additional G/L Accounts in the same manner as described above.
To edit an allocation, click on the pencil icon next to the allocation entry on the Entry panel.
Once the receipt is fully allocated, click off the entry panel to return to the Bank Import.
The pencil icon next to the allocated entry will turn green once the allocation is fully allocated.
If the allocation is incomplete the pencil icon will turn yellow, and where there are unsaved changes, the pencil icon will be red.
Trust Bank Accounts
G/L Payment
In this example a bank charge entry on a trust bank account will be allocated. Click on the pencil icon on the right of the entry or double click the entry to open the Bank Import Entry panel on the right.
In the top section of the Bank Import Entry panel, the fields from the entry list columns describing the entry are presented to provide context for allocating the entry.
The Fiscal Period for the entry is defaulted from the entry date automatically but can be changed if required.
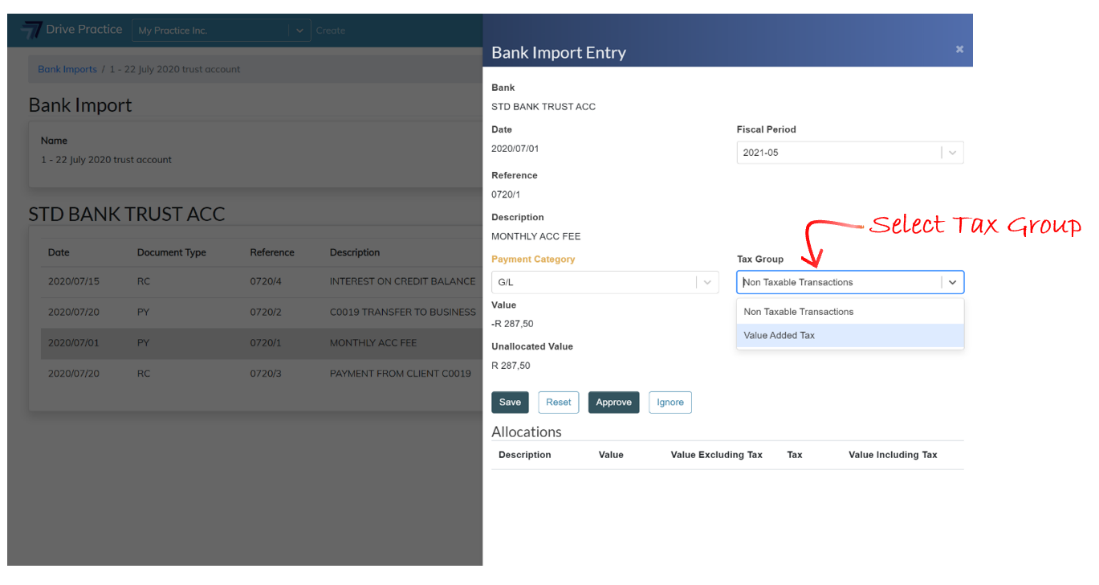
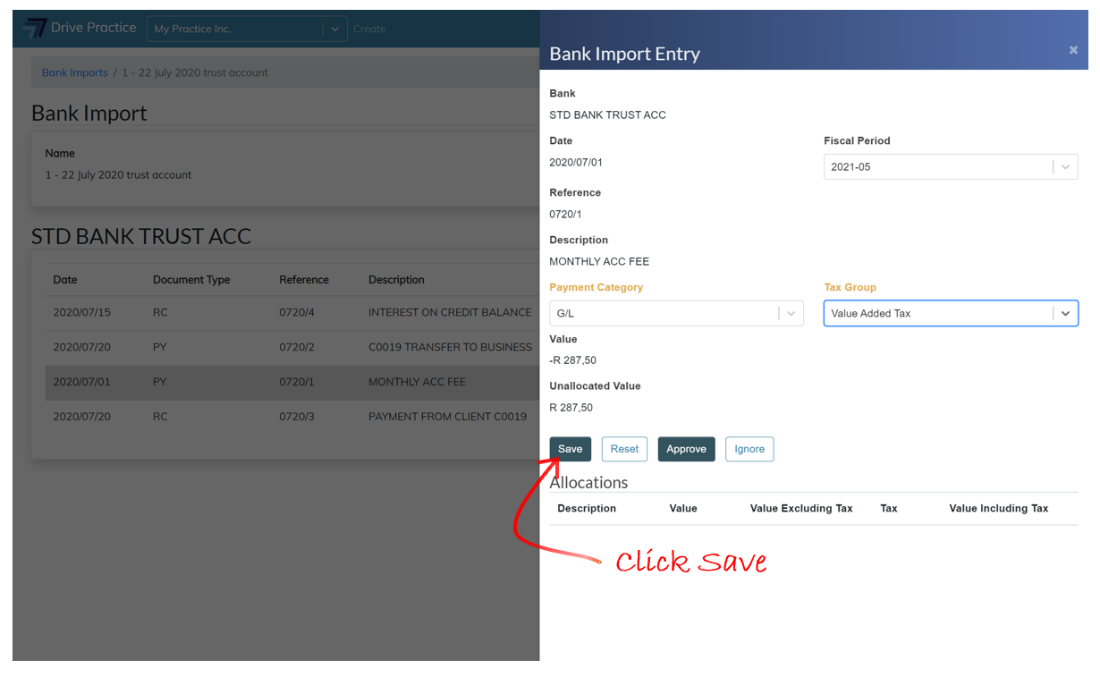
Click on the dropdown on the Payment Category field and select G/L.

Once selected the Tax Group field will appear on the right of the Payment Category field. Click on the dropdown for the Tax Group field and select the correct Tax Group for the entry.
At this stage the Payment Category and the Tax Group field labels will be yellow, indicating that the options selected have not been saved. Click on the Save button to save the options selected. The Reset button will undo all selections and/or changes made.
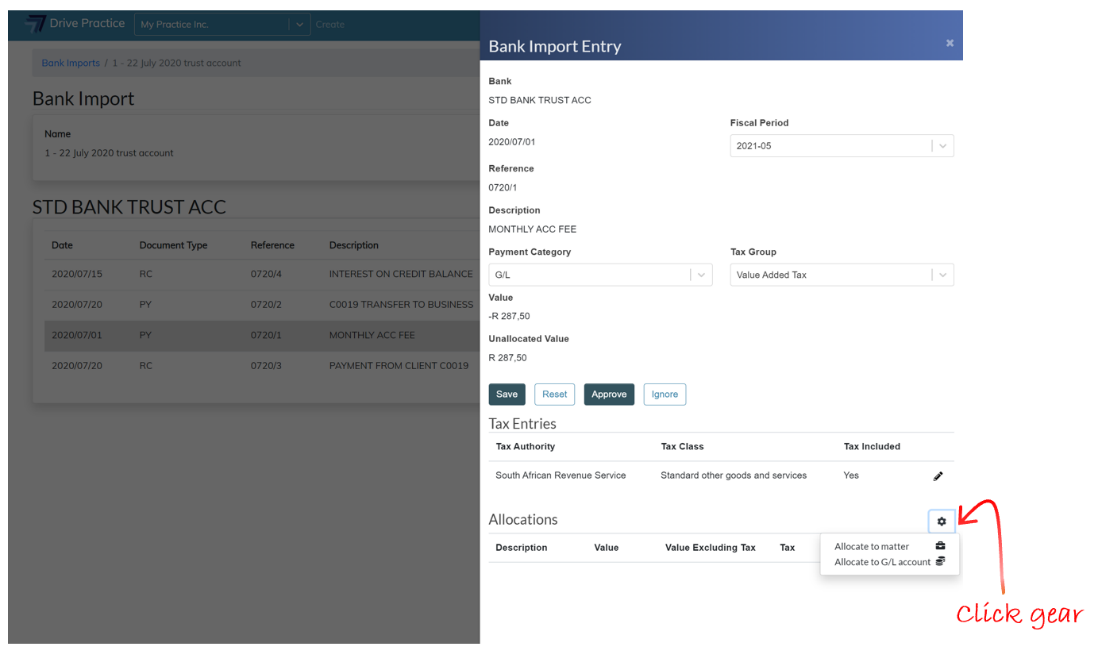
Once the selections have been saved, a gear icon will appear on the right above the Allocations section. The default Tax Classes that have been set for the selected Tax Group will appear above the Allocations section. Click on the pencil icon next to the Tax Entries to edit the classes if required.
The gear icon, when clicked, lists options to allocate to a matter or to a G/L account. Select the Allocation to G/L account.
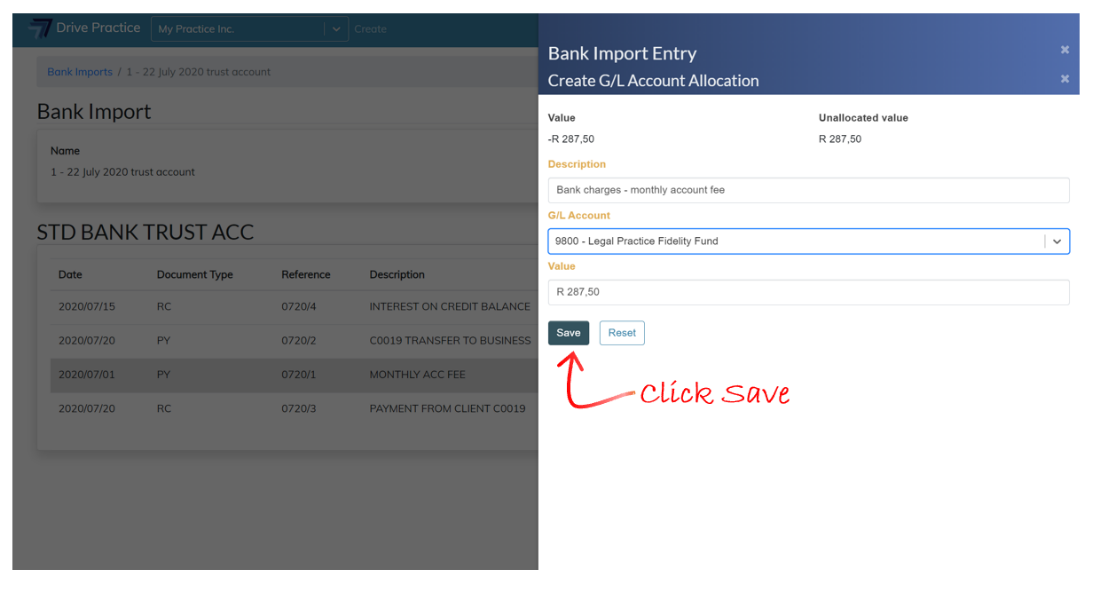
The Create G/L Account Allocation panel will open, and the Value of the payment and the Unallocated value will be displayed at the top of the panel. For the first allocation, the full value of the entry equals the Unallocated value. Where there are multiple allocations, the Unallocated value will decrease to reflect the remaining balance of the entry.
Enter a description for the allocation in the Description field and then click on the G/L Account field to search for the G/L Account to which Bank Charges on a trust bank account are allocated (this example uses the Legal Practice Fidelity Fund Control account). The search function searches on the account name or an account number.
Enter a value for the allocation into the Value field. The value entered cannot be more than the Unallocated value of the entry.
Like with the previous panel, as fields are updated on the panel the field labels turn yellow, indicating that the data has not been saved.
Save the allocation by clicking Save.The Reset button will undo all the selections and/or changes made.
Clicking off the panel to the left or clicking on the “X” at the top right of the Create G/L Account Allocation panel next to the Create G/L Account heading, will close the allocation panel and the Bank Import Entry panel showing the allocation to the entry will be returned. If the payment is to be allocated to multiple G/L accounts, click the gear icon to allocate to additional G/L Accounts in the same manner as described above.
To edit an allocation, click on the pencil icon next to the allocation entry on the Entry panel.
Once the payment is fully allocated, click off the entry panel to return to the Bank Import.
The pencil icon next to the allocated entry will turn green once the allocation is fully allocated.
I the allocation is incomplete the pencil icon will turn yellow, and where there are unsaved changes, the pencil icon will be red.
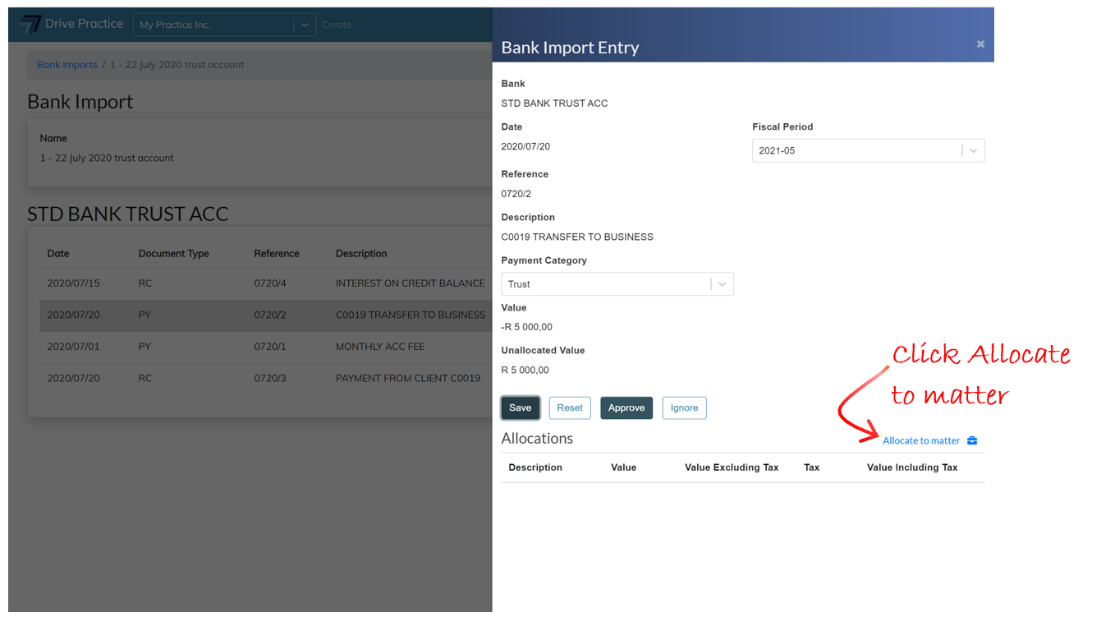
Trust Payment
The next example demonstrates how to allocate a Trust Payment. Click on the pencil icon on the right of the entry or double click the entry to open the Bank Import Entry panel on the right.
In the top section of the Bank Import Entry panel, the fields from the entry list columns describing the entry are presented to provide context for allocating the entry.
The Fiscal Period for the entry is defaulted from the entry date automatically but can be changed if required.
Click on the dropdown on the Payment Category field and select Trust.

At this stage the Payment Category field label will be yellow, indicating that the option selected has not been saved. Click on the Save button to save the option selected. The Reset button will undo the selection and/or changes made.
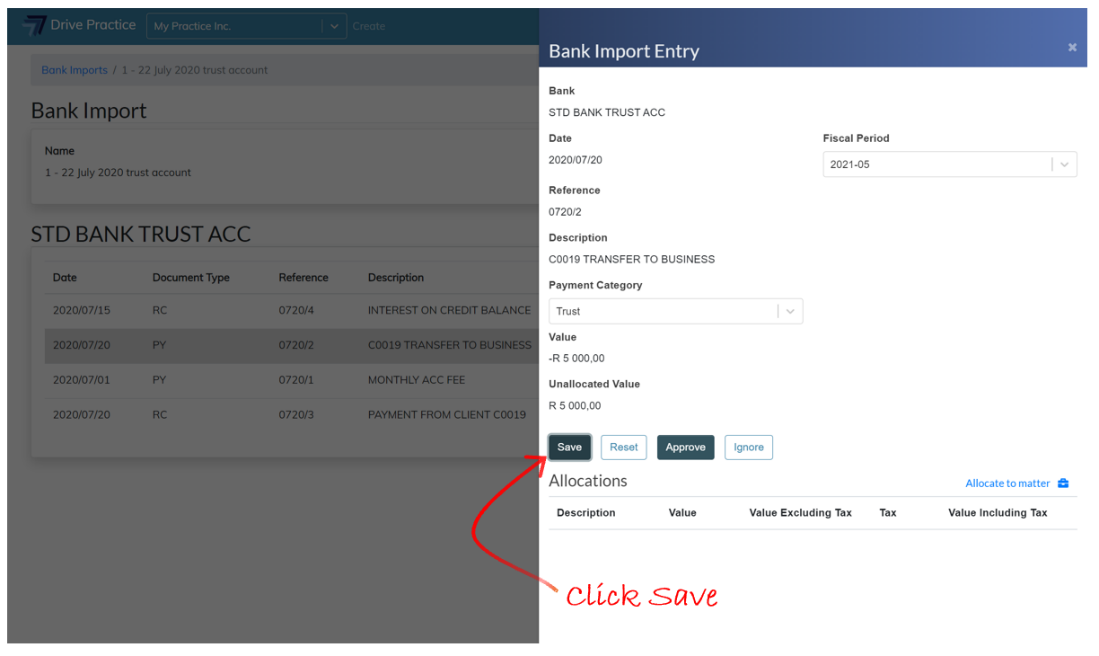
Once the selection has been saved, an Allocate to Matter button will appear on the right above the Allocations section.
The Allocate to Matter button, when clicked, will list an option to allocate to a matter. Click Allocate to matter.
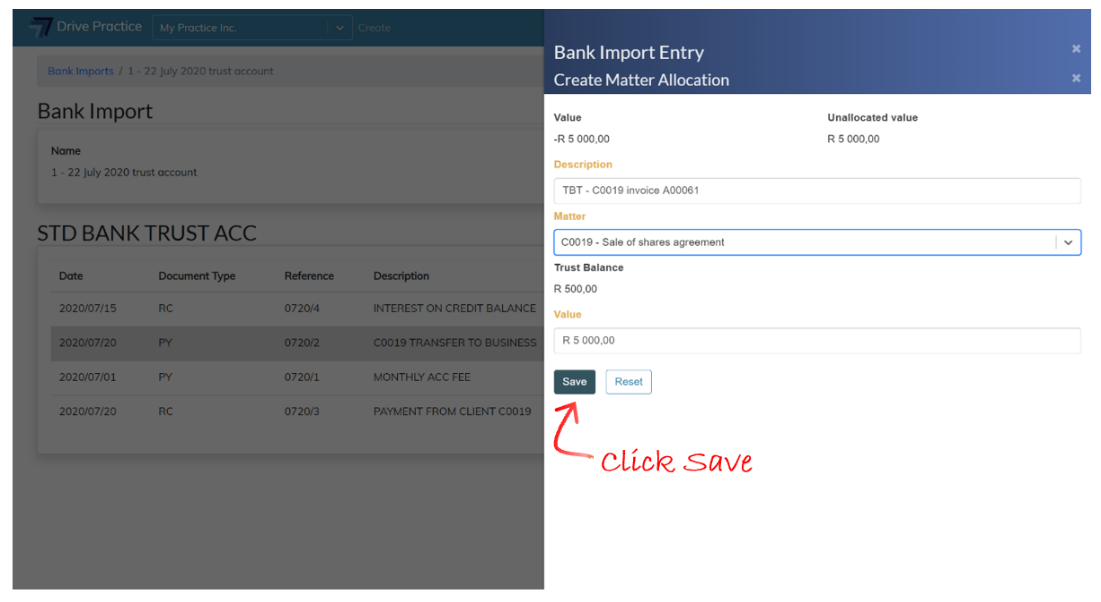
The Create Matter Allocation panel will open, and the Value of the payment and the Unallocated value will be displayed at the top of the panel. For a first allocation, the full value of the entry is the Unallocated value. Where there are multiple allocations, the Unallocated value will decrease to reflect the remaining balance of the entry.
Enter a description for the payment into the Description field and select the Matter field to search for the matter to allocate the payment. The search function searches on the matter and client name or matter or client number.
The Value of the Allocation will default to the lesser of the value of the entry, the Unallocated value of the entry and the value of available trust funds for the matter selected.
The Value field can be edited but cannot be more than the value of available trust for the matter selected, or the remaining Unallocated value of the entry.
Like with the previous panel, as fields are updated on the panel the field labels turn yellow, indicating that the data has not been saved.
Save the allocation by clicking Save.The Reset button will undo all the selections and/or changes made.
Clicking off the panel to the left or clicking on the “X” at the top right of the Create Matter Allocation panel next to the Create Matter Allocation heading, will close the allocation panel and the Bank Import Entry panel showing the allocation will be returned. If the payment is to be allocated to multiple matters, click the gear icon to allocate to additional invoices in the same manner as described above.
To edit an allocation, click on the pencil icon next to the allocation entry on the Entry panel.
Once the payment is fully allocated, click off the entry panel to return to the Bank Import.
The pencil icon next to the allocated entry will turn green once the allocation is fully allocated.
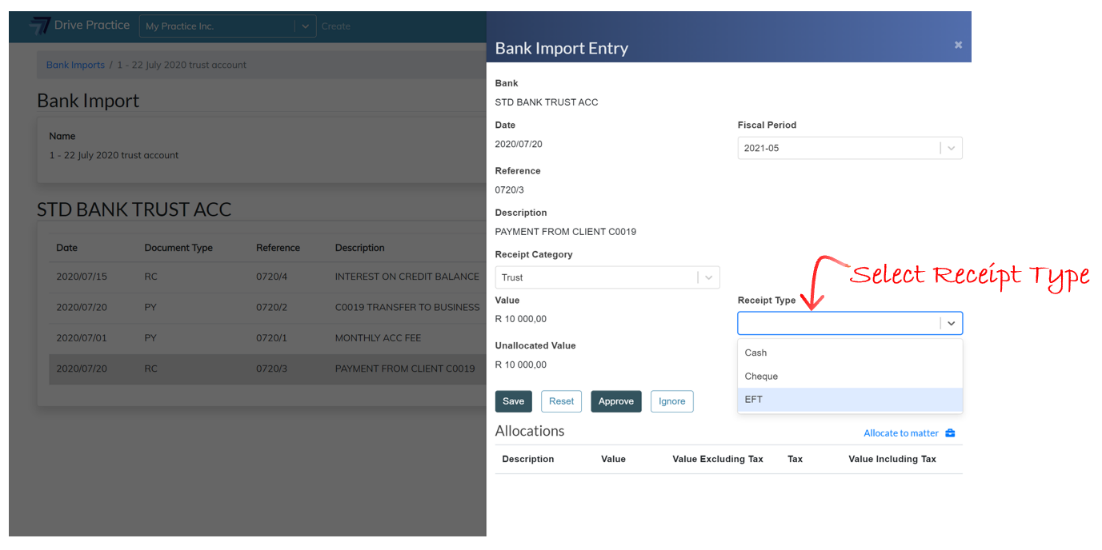
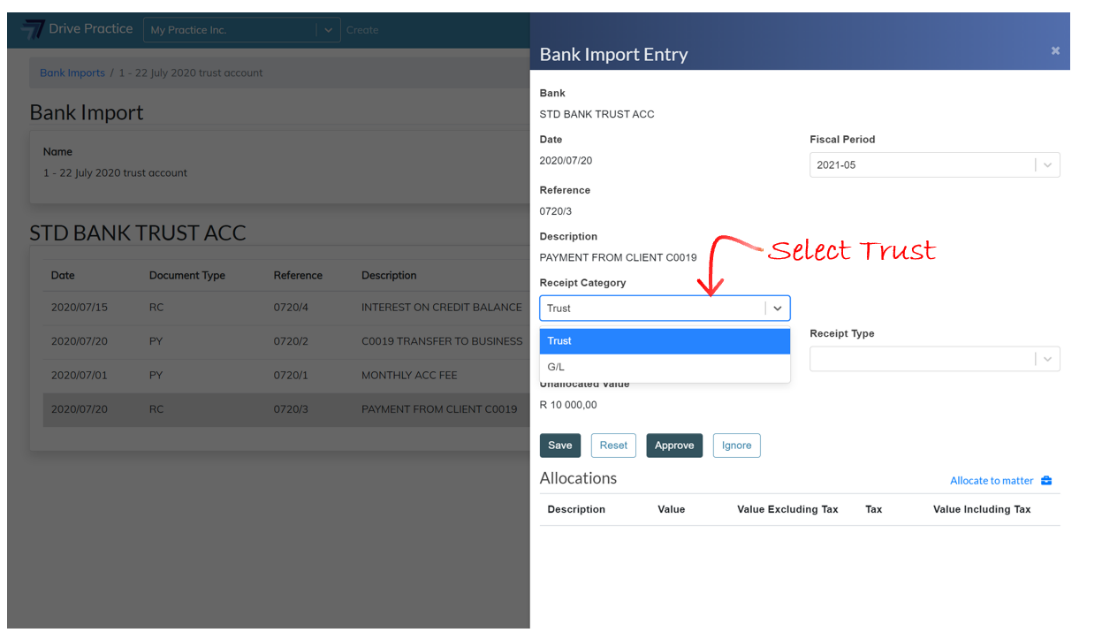
Trust Receipt
This example demonstrates how to allocate a receipt to a matter, which receipt could be a deposit from a Client, payment from the Client in settlement of an invoice or invoices raised on the Matter, or funds received for the Matter from parties related to the matter.
Click on the pencil icon on the right of the entry or double click the entry to open the Bank Import Entry panel on the right.
In the top section of the Bank Import Entry panel, the fields from the entry list columns describing the entry are presented to provide context for allocating the entry.
The Fiscal Period for the entry is defaulted from the entry date automatically but can be changed if required.
Click on the dropdown on the Receipt Category field and select Trust.

The Receipt Type field will appear on the right. Select the type of receipt from the dropdown list, which will display the receipt type options created for the Organisation in the Setup menu.
At this stage the Receipt Category and Receipt Type field labels will be yellow, indicating that the selections made have not been saved. Click on the Save button to save the selections. The Reset button will undo all selections and/or changes made.
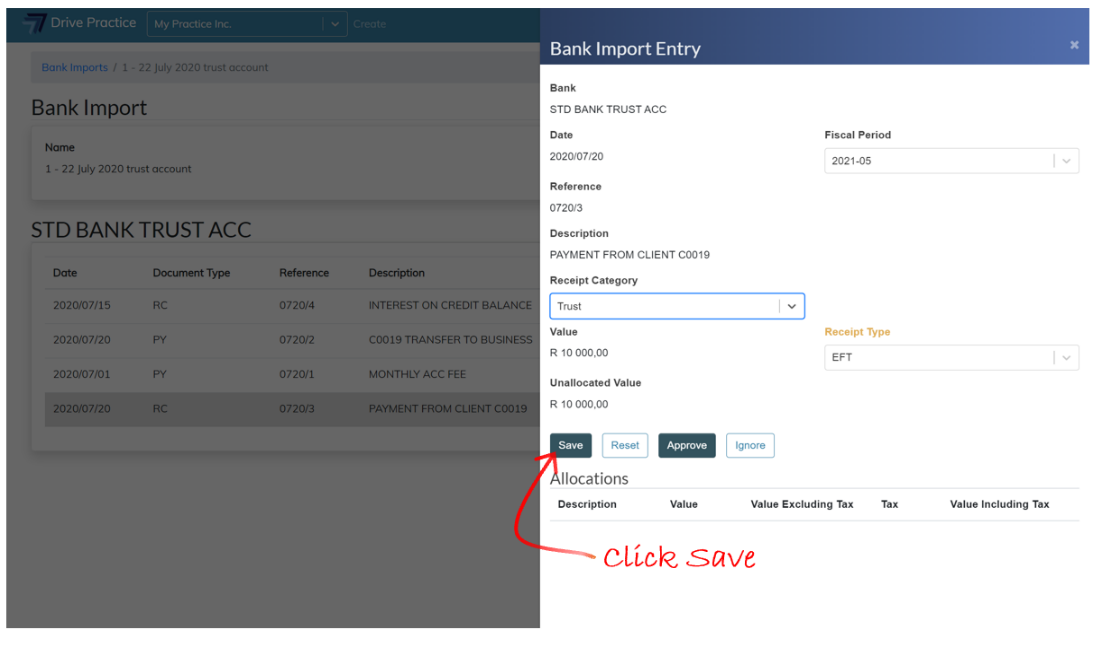
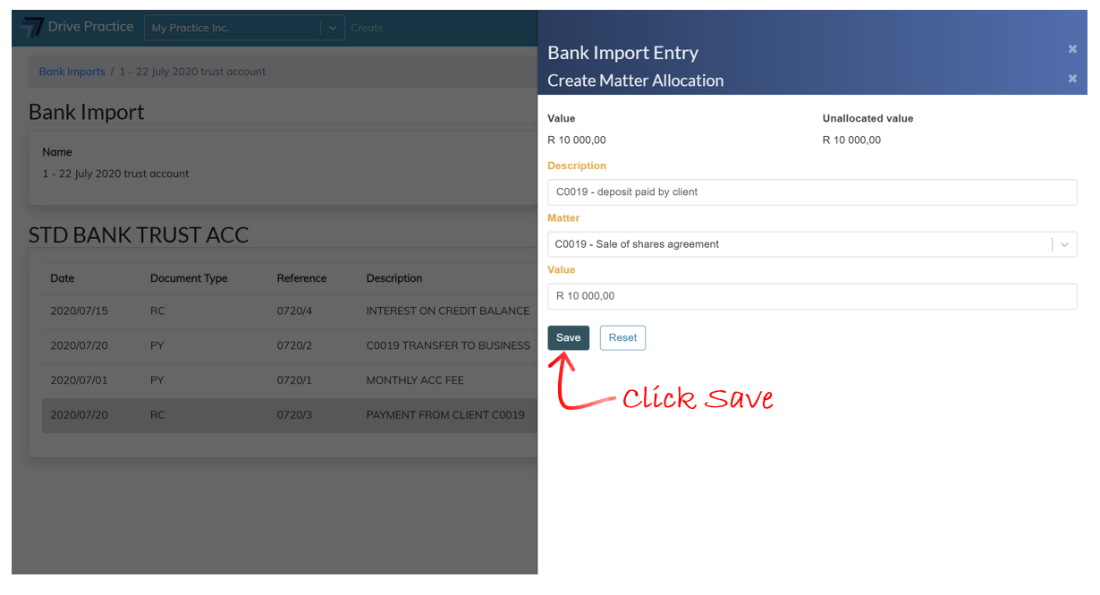
Once the selections have been saved, an Allocate to Matter button will appear on the right above the Allocations section.
The Allocate to Matter button, when clicked, will list an option to allocate to a matter. Click Allocate to matter.
The Create Matter Allocation panel will open, and the Value of the receipt and the Unallocated value will be displayed at the top of the panel. For a first allocation, the full value of the entry is the Unallocated value. Where there are multiple allocations, the Unallocated value will decrease to reflect the remaining balance of the entry.
Enter a description for the receipt into the Description field and select the matter to allocate the receipt to from the Client Invoice dropdown field.
The Value of the Allocation will default to the lesser of the value of the outstanding amount of the client invoice or the unallocated value of the receipt.
The Value field can be edited but cannot be more than the remaining Unallocated value of the entry.
Like with the previous panel, as fields are updated on the panel the field labels turn yellow, indicating that the data has not been saved.
Save the allocation by clicking Save.The Reset button will undo all the selections and/or changes made.
Clicking off the panel to the left or clicking on the “X” at the top of the Create Matter Allocation panel next to the Create Matter Allocation heading will close the allocation panel and the Bank Import Entry panel showing the allocation will be returned. If the receipt is to be allocated to multiple matters, click the gear icon to allocate to additional matters in the same manner as described above.
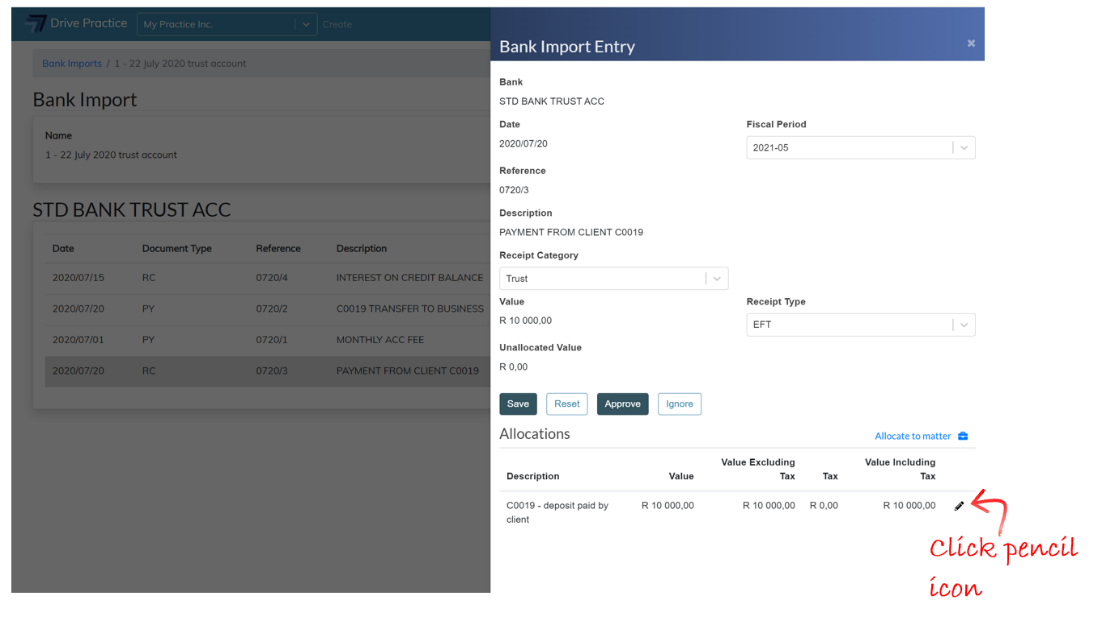
To edit an allocation, click on the pencil icon next to the allocation entry on the Entry panel.
Once the receipt is fully allocated, click off the entry panel to return to the Bank Import.
The pencil icon next to the allocated entry will turn green once the entry is fully allocated.
If the allocation is incomplete the pencil icon will turn yellow, and where there are unsaved changes, the pencil icon will be red.
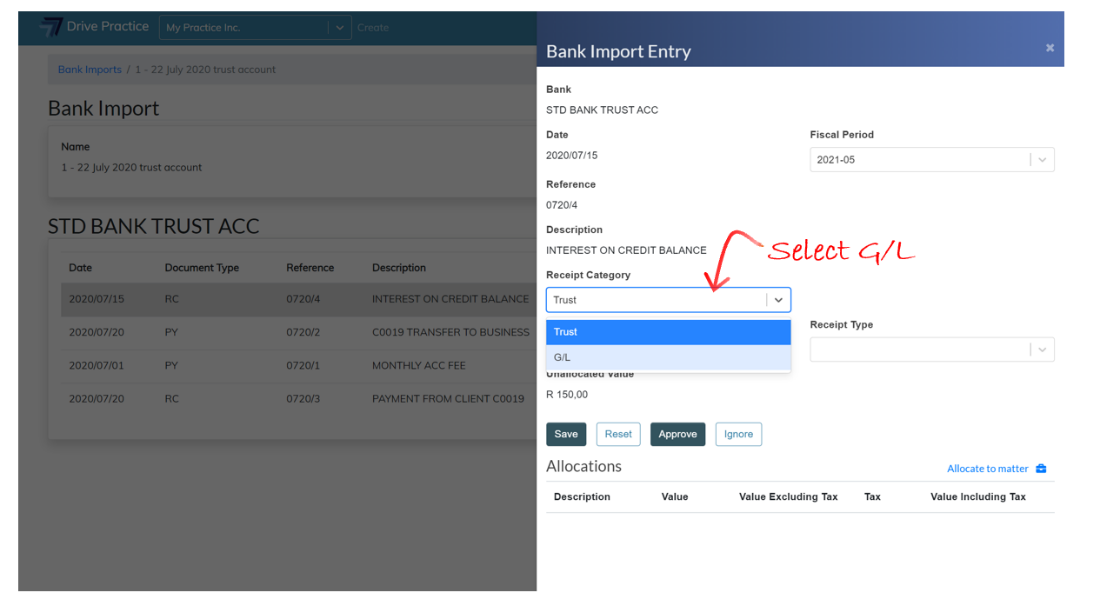
G/L Receipt
The next example demonstrates how to allocate a receipt to a G/L Account, which receipt could be a reversal of a bank charge, but most likely interest.
Click on the pencil icon on the right of the entry or double click the entry to open the Bank Import Entry panel on the right.
In the top section of the Bank Import Entry panel, the fields from the entry list columns describing the entry are presented to provide context for allocating the entry.
The Fiscal Period for the entry is defaulted from the entry date automatically but can be changed if required.
Click on the dropdown on the Receipt Category field and select G/L.
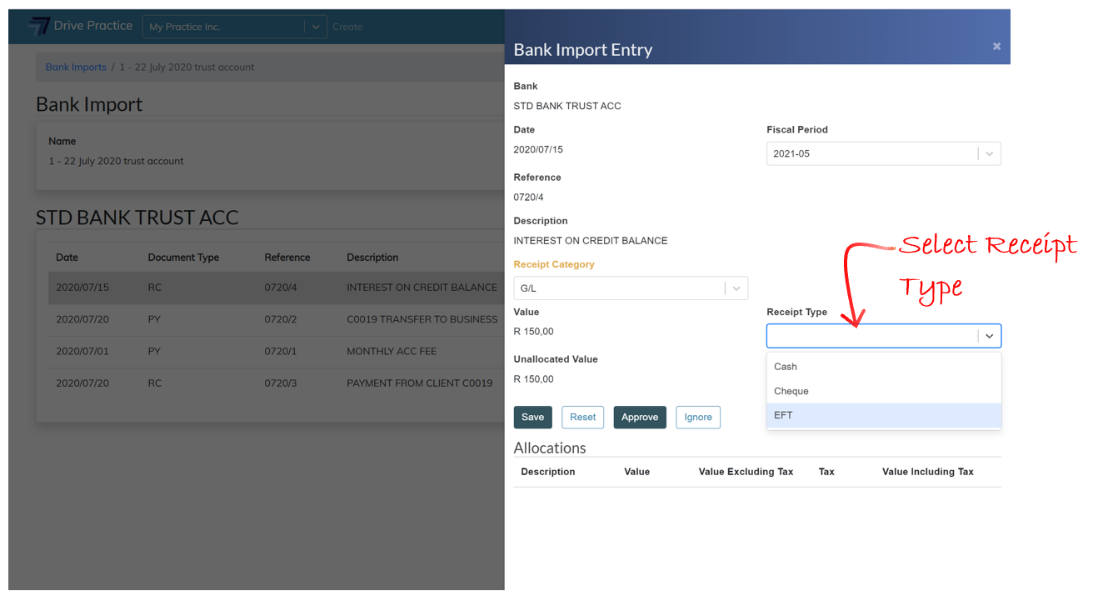
The Receipt Type field will appear on the right. Select the type of receipt from the dropdown list, which will display the receipt type options created for the Organisation in the Setup menu.
At this stage the Receipt Category and Receipt Type field labels will be yellow, indicating that the selections made have not been saved. Click on the Save button to save the selections. The Reset button will undo all selections and/or changes made.
Once the selections have been saved, an Allocate to G/L Account button will appear on the right above the Allocations section.
The Allocate to G/L Account button, when clicked, will list an option to allocate to a G/L account. Click the Allocate to G/L account button.
The Create G/L Account Allocation panel will open, and the Value of the receipt and the Unallocated value will be displayed at the top of the panel. For a first allocation, the full value of the entry is the Unallocated value. Where there are multiple allocations, the Unallocated value will decrease to reflect the remaining balance of the entry.
Enter a description for the allocation in the Description filed and then click on the G/L Account field to search for the G/L Account used to allocate interest received on a trust bank account. The search function searches on the account name or an account number.
The Value of the Allocation will default to the lesser of the value of the outstanding amount of the client invoice or the unallocated value of the receipt.
The Value field can be edited but cannot be more than the remaining Unallocated value of the entry.
Like with the previous panel, as fields are updated on the panel the field labels turn yellow, indicating that the data has not been saved.
Save the allocation by clicking Save.The Reset button will undo all the selections and/or changes made.

Clicking off the panel to the left or clicking on the “X” at the top of the Create G/L Account Allocation panel next to the Create G/L Account Allocation heading will close the allocation panel and the Bank Import Entry panel showing the allocation will be returned. If the receipt is to be allocated to multiple matters, click the gear icon to allocate to additional matters in the same manner as described above.
To edit an allocation, click on the pencil icon next to the allocation entry on the Entry panel.
Once the receipt is fully allocated, click off the entry panel to return to the Bank Import.
The pencil icon next to the allocated entry will turn green once the entry is fully allocated.
If the allocation is incomplete the pencil icon will turn yellow, and where there are unsaved changes, the pencil icon will be red.
Edit Allocations
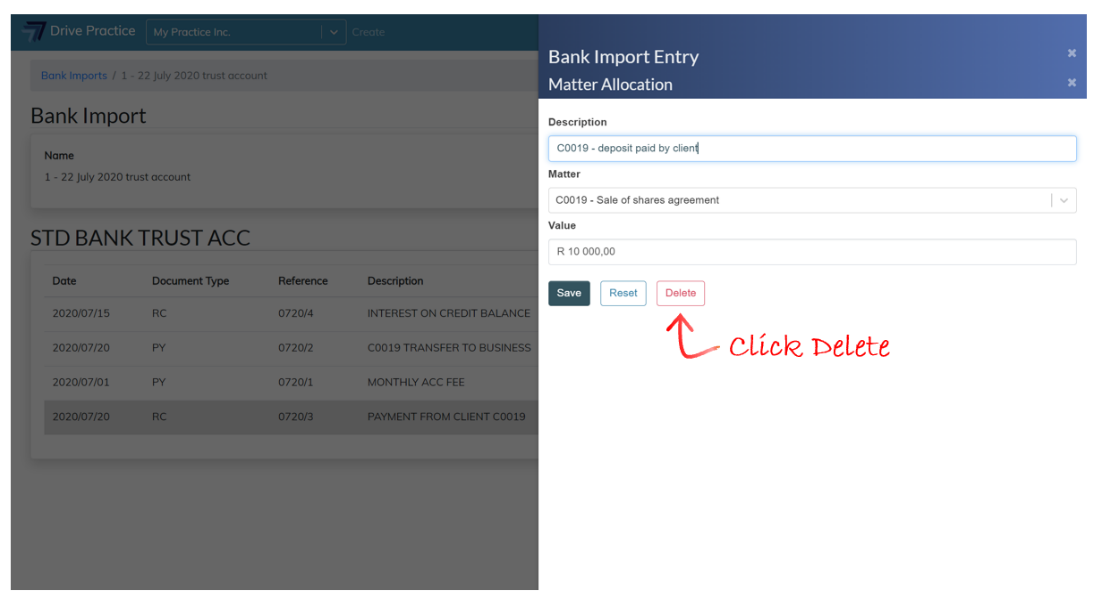
To edit an allocation, click on the pencil icon next to the entry in the Bank Import page.The Bank Import entry’s edit panel will open.Click on the pencil icon next to the allocation entry in the Allocations section.
To delete the allocation, click on the Delete button.
Approve Transaction
A transaction can be approved individually after the allocation has been completed. To approve a transaction, click on the Approve button in the Bank Import Entry Panel.
Once a transaction is approved the pencil icon in the details section will change to an eye icon to indicate that the transaction is approved and that it can no longer be edited from the bank import page. The approved transaction can be found in the payments or receipts lists pages as an approved transaction and will also appear as a reconciled transaction in the bank recon.
![]()
###