Client Invoice - Detail View
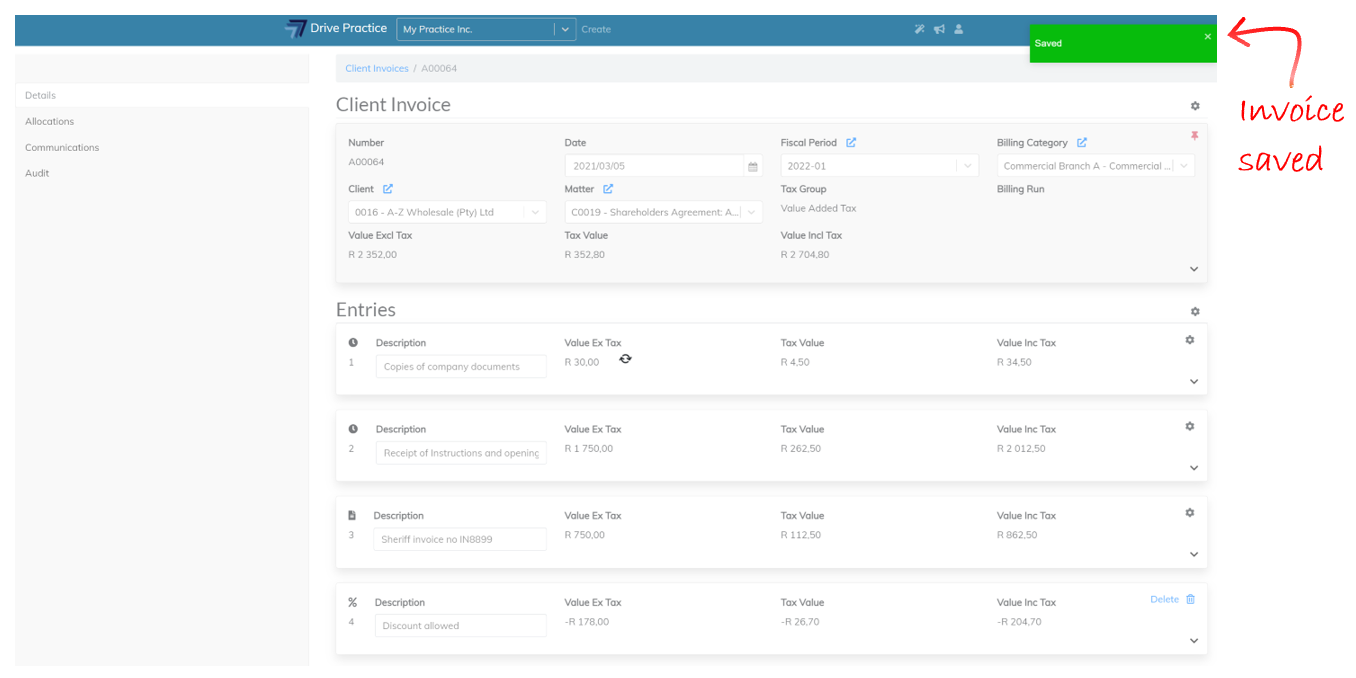
The Client Invoice will open once the Header fields have been captured and the Header is saved.
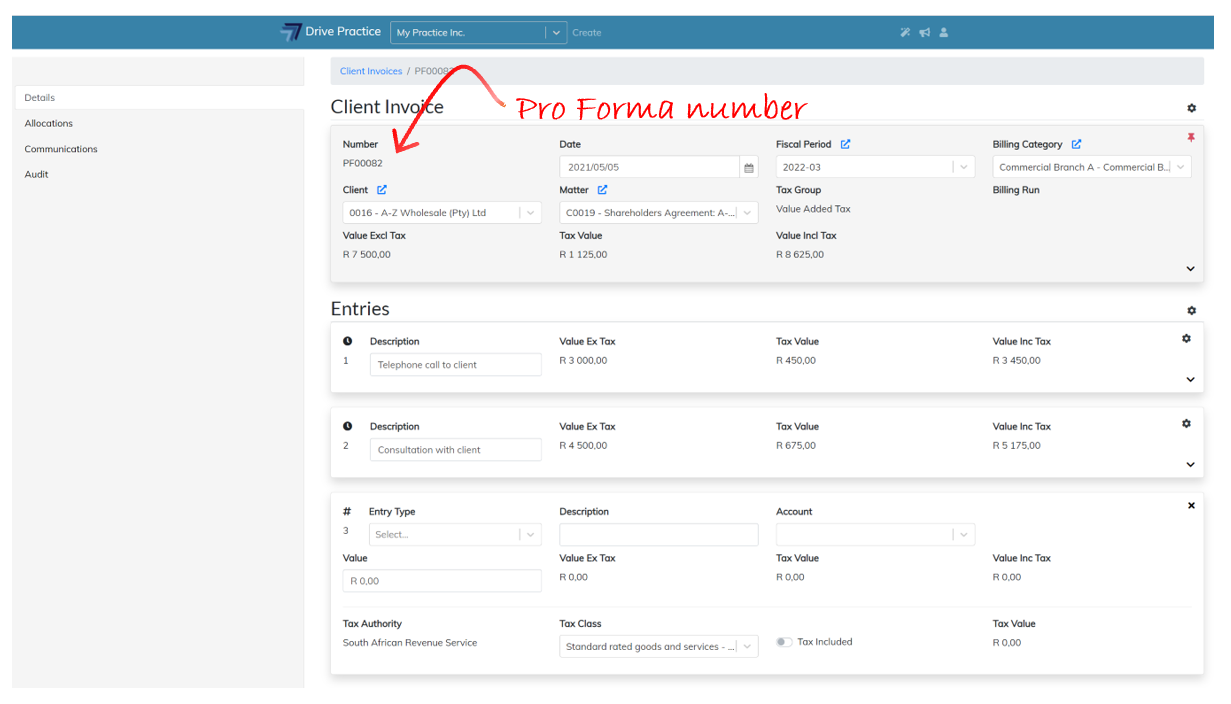
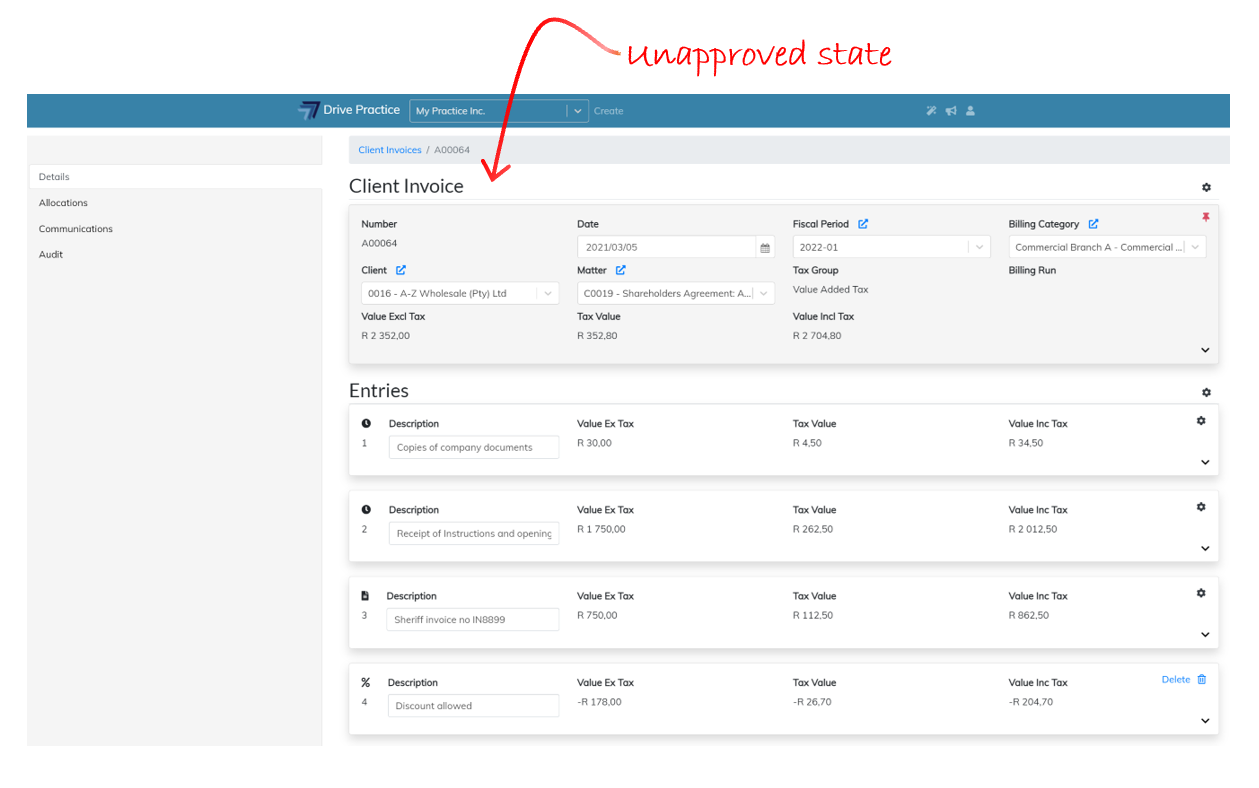
When creating an invoice, the invoice is in an Unapproved state and has been assigned a pro-forma invoice number from the pro-forma invoice number sequence.
If a user is opening an existing invoice from the Client Invoice list view, or from the invoices tab on a Matter or a Client, the user must have the Manage Client Invoices right allowed on their personal profile or inherited from a group profile to which they have been assigned.
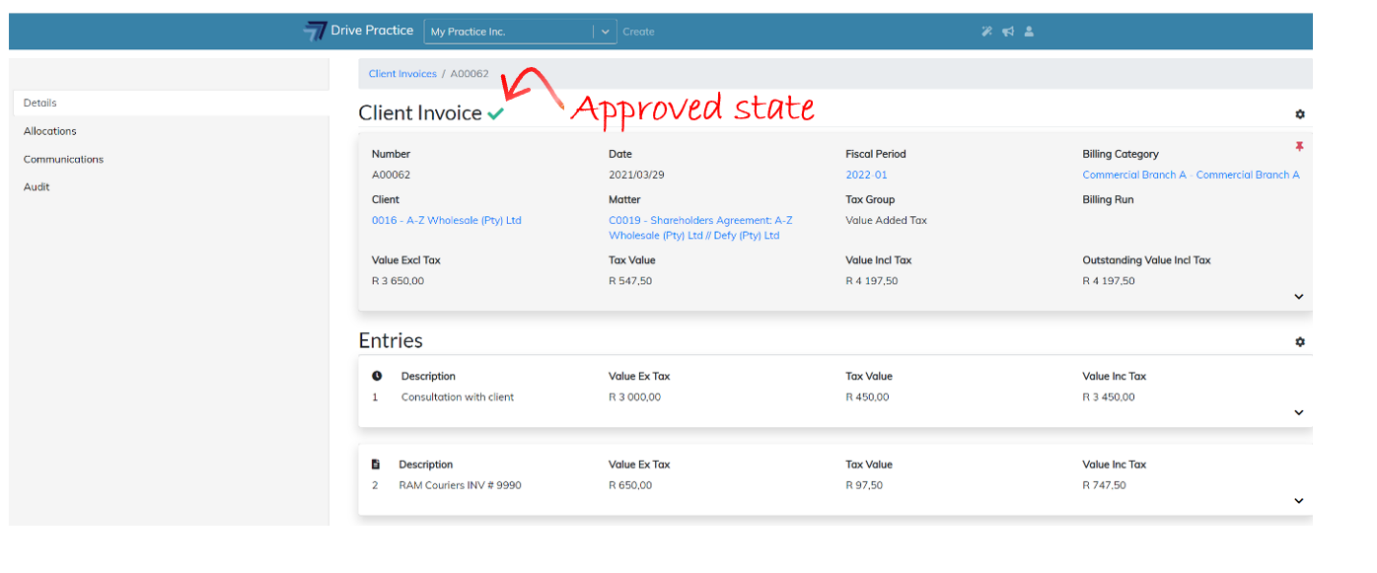
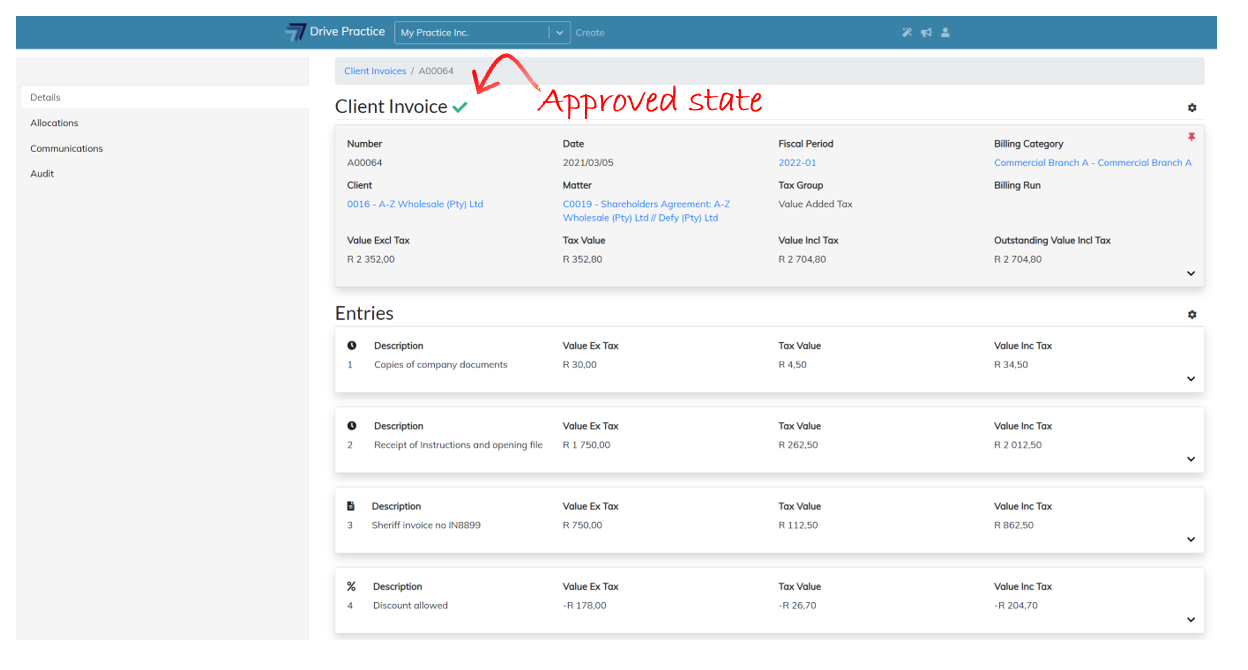
If an invoice is in an Approved state, it cannot be edited, even if the user has the Manage Client Invoices right allowed. Approved invoices have a green tick above the header indicating that the invoice is in an approved state.
Client Invoices, no matter their approved state, will always open by default with the Header section collapsed and pinned. In the collapsed state the Header will only show the most relevant information and will need to be expanded to show all the Header fields.
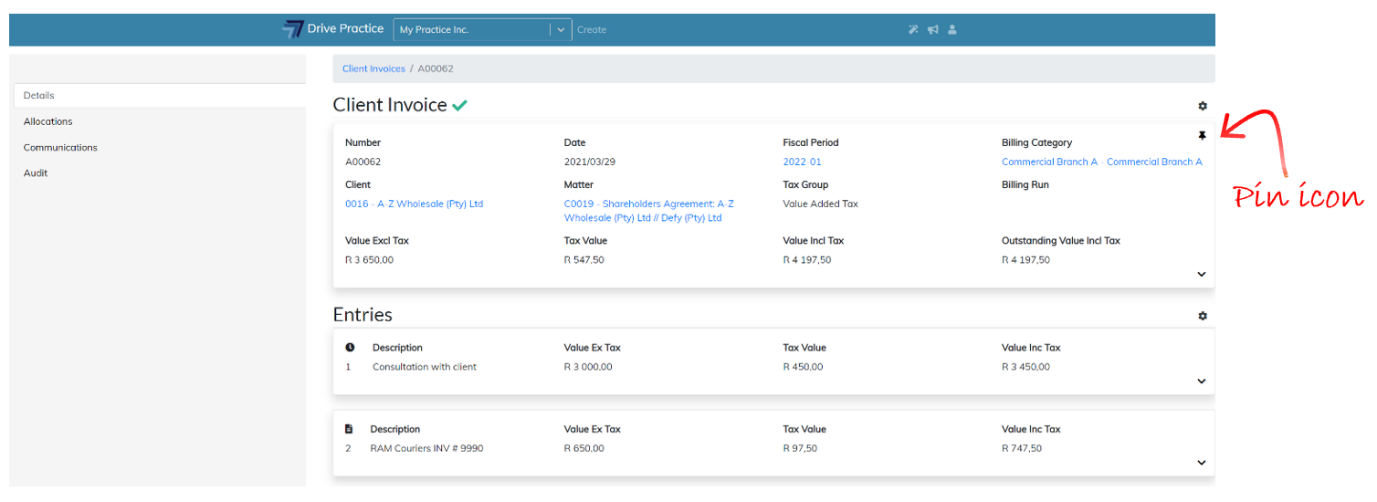
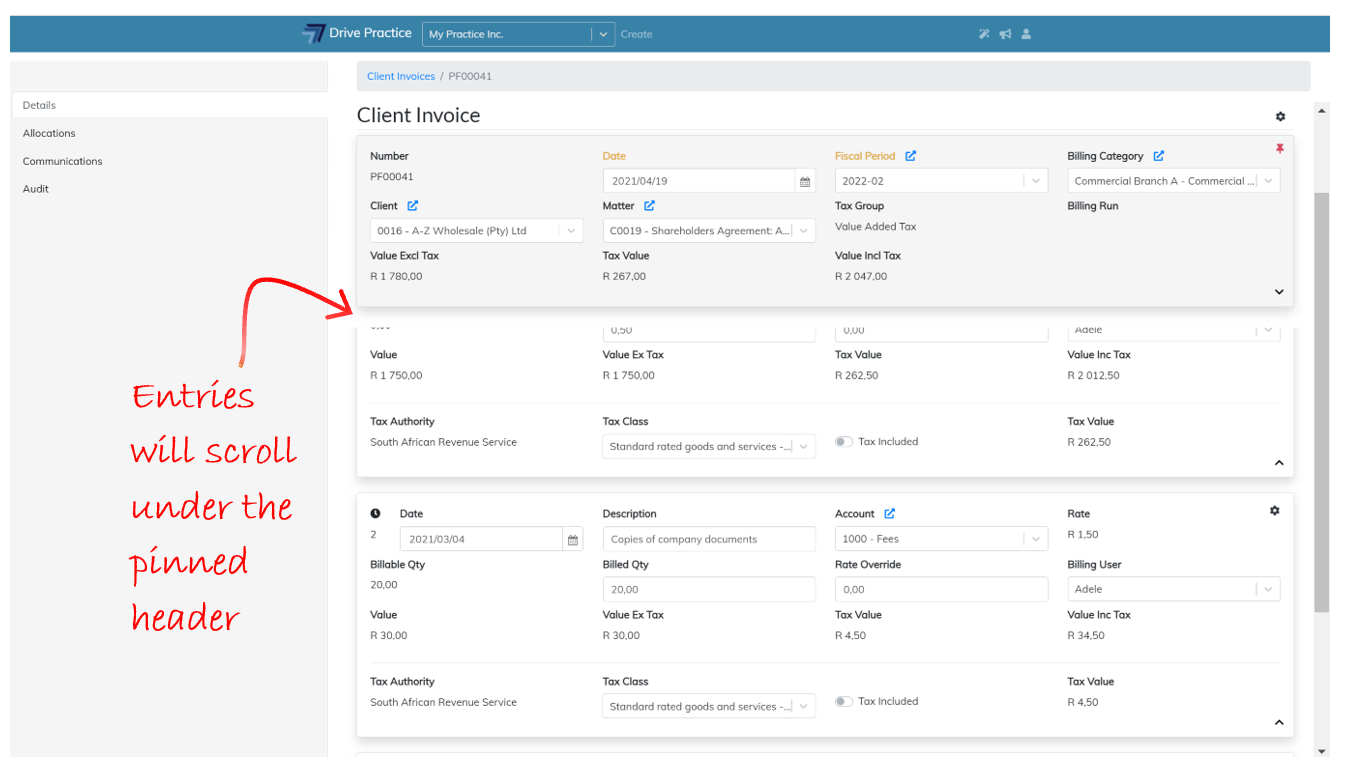
How to expand the Header is described below in the Edit Client Invoice Header section. When the Header section is pinned the Pin icon is red and the header is shaded and as you scroll through the Entries on the invoice, the Entries slide under the Header, keeping the Header visible at all times.

To unpin the Header, click on the Pin icon at the top right corner of the Header. The pin icon will change to black, and the Header will not be shaded.
Edit Client Invoice Header
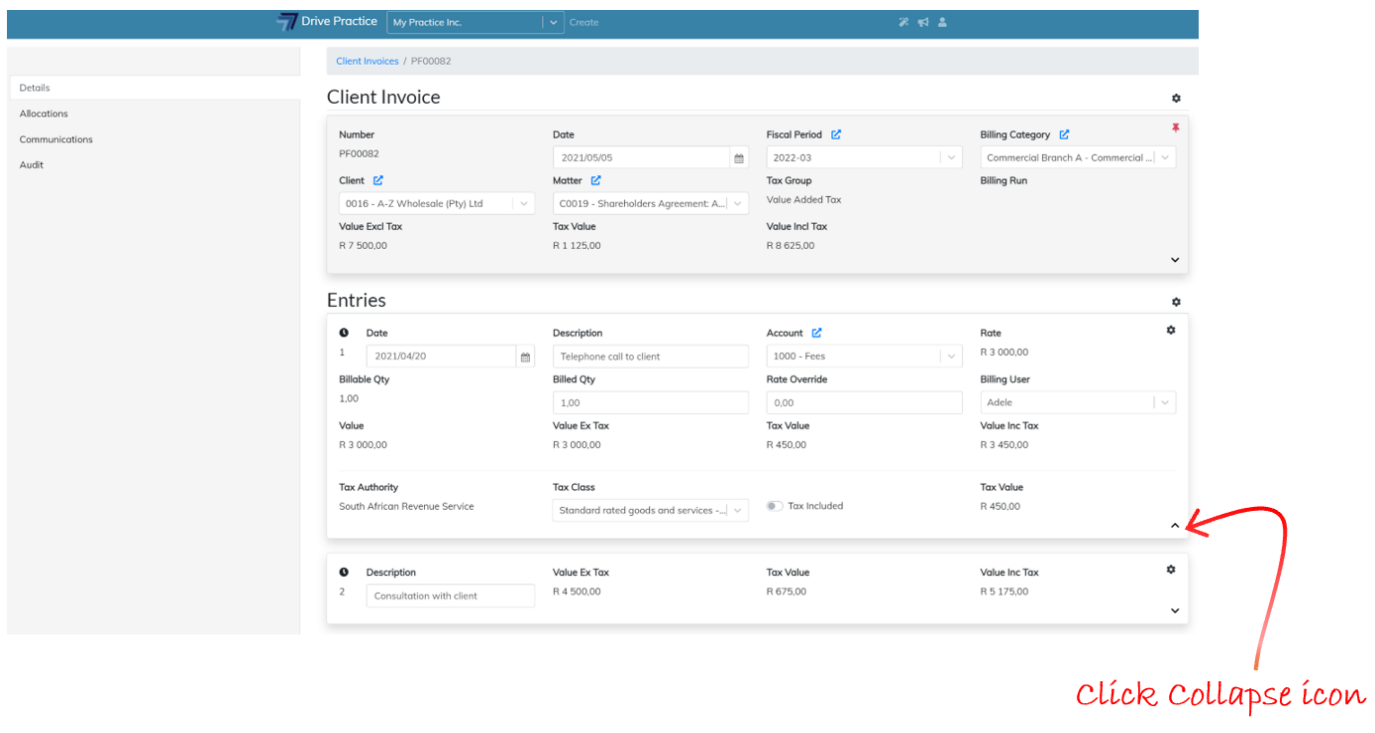
The Header of an Unapproved invoice may be edited while pinned. To edit the Header, click on the Expand icon at the bottom right of the Header card.
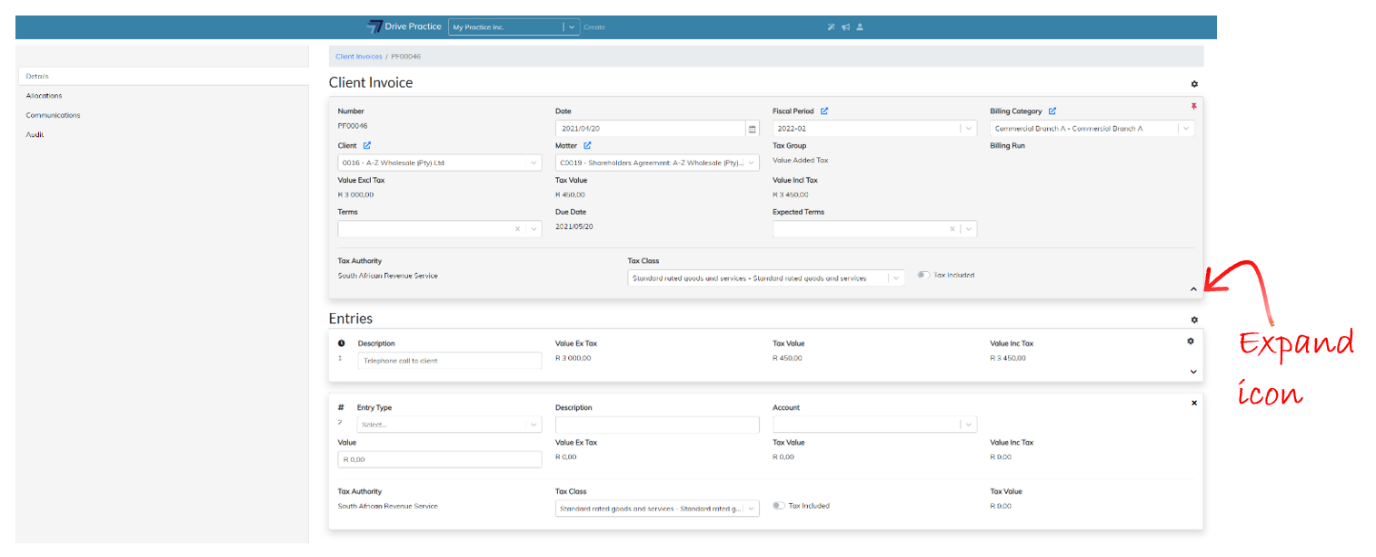
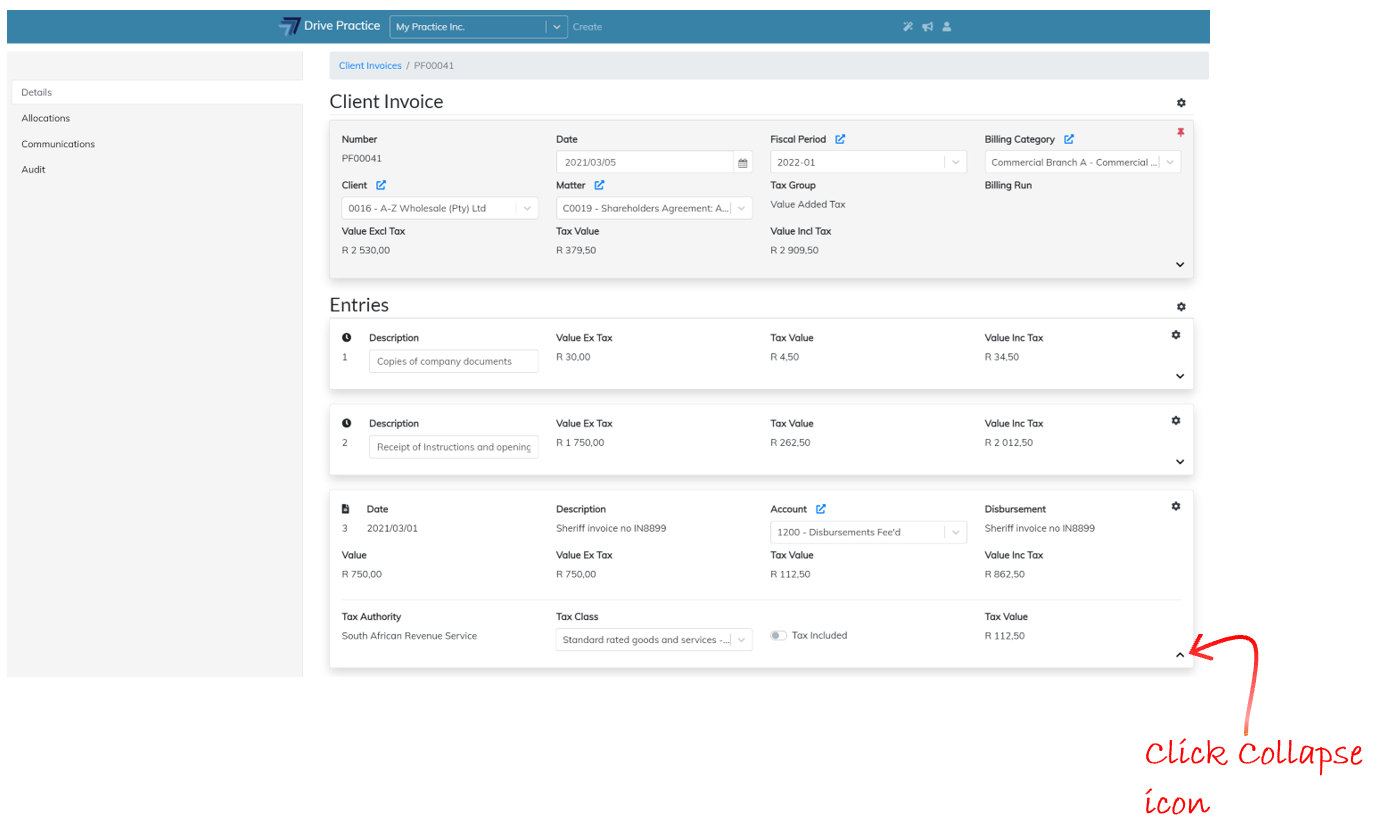
To collapse the Header, click on the Collapse icon on the bottom right of the Header card.
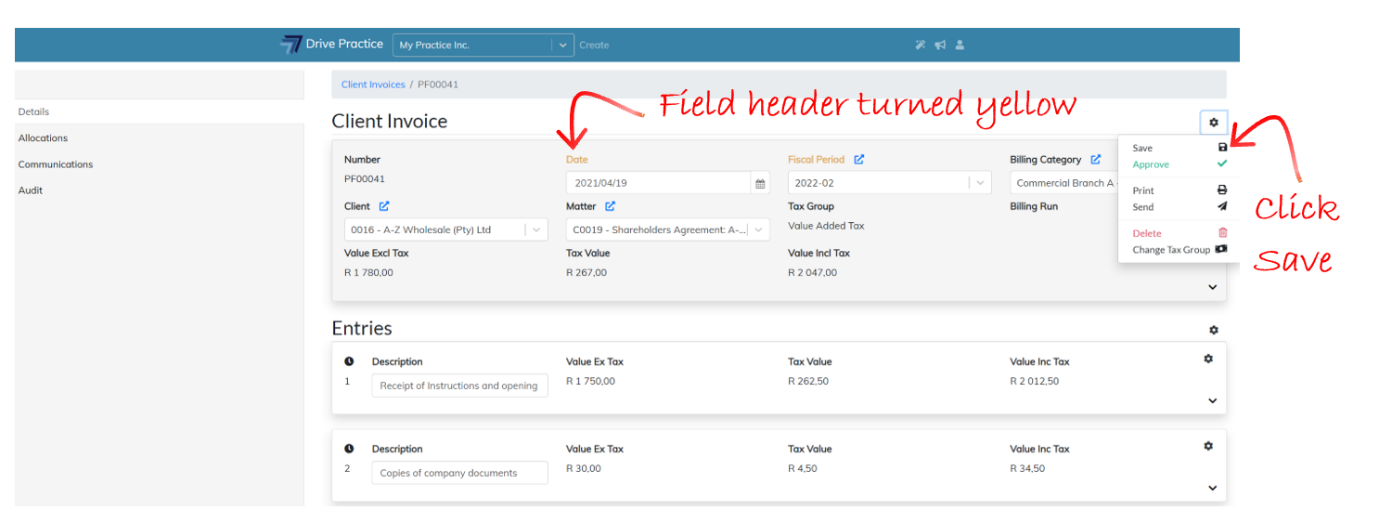
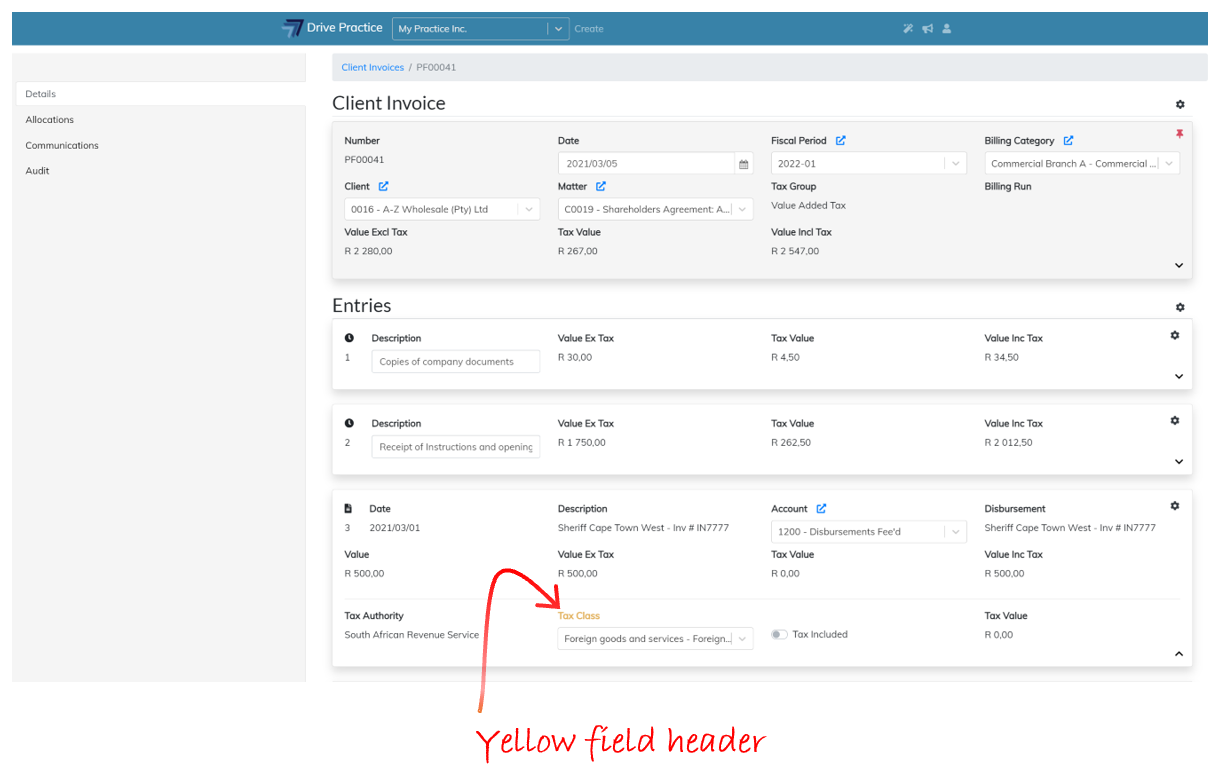
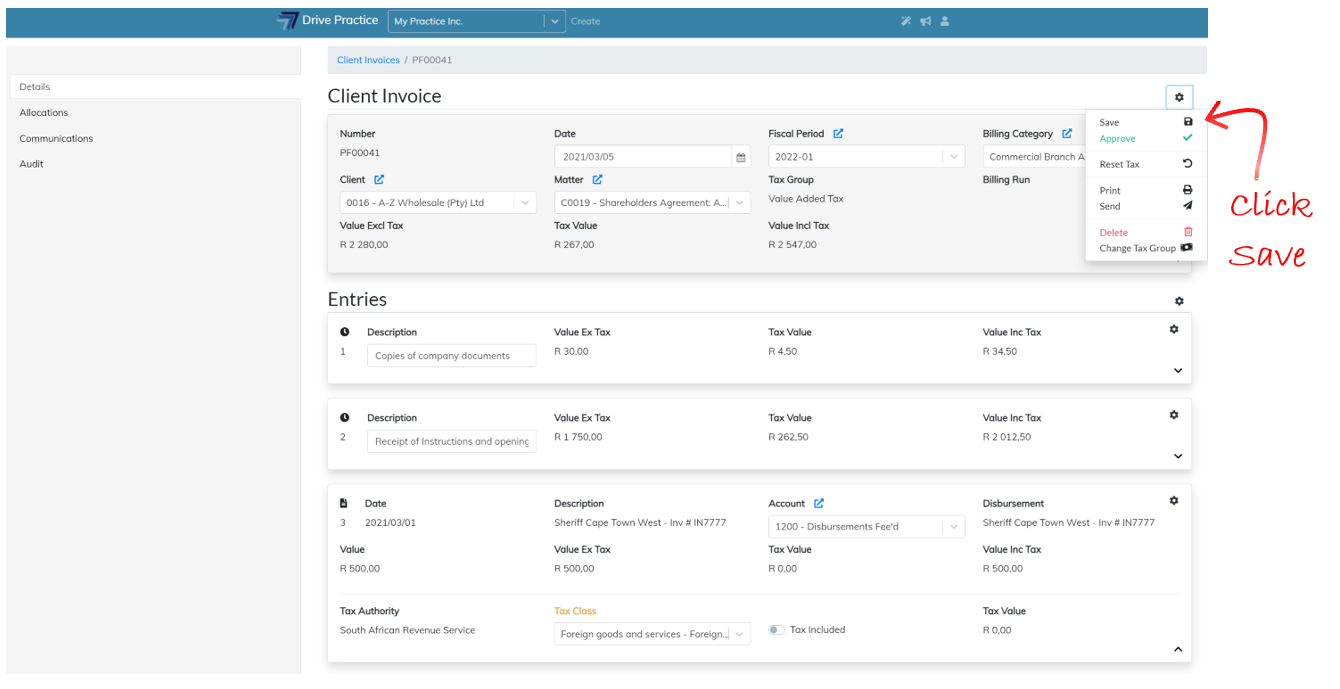
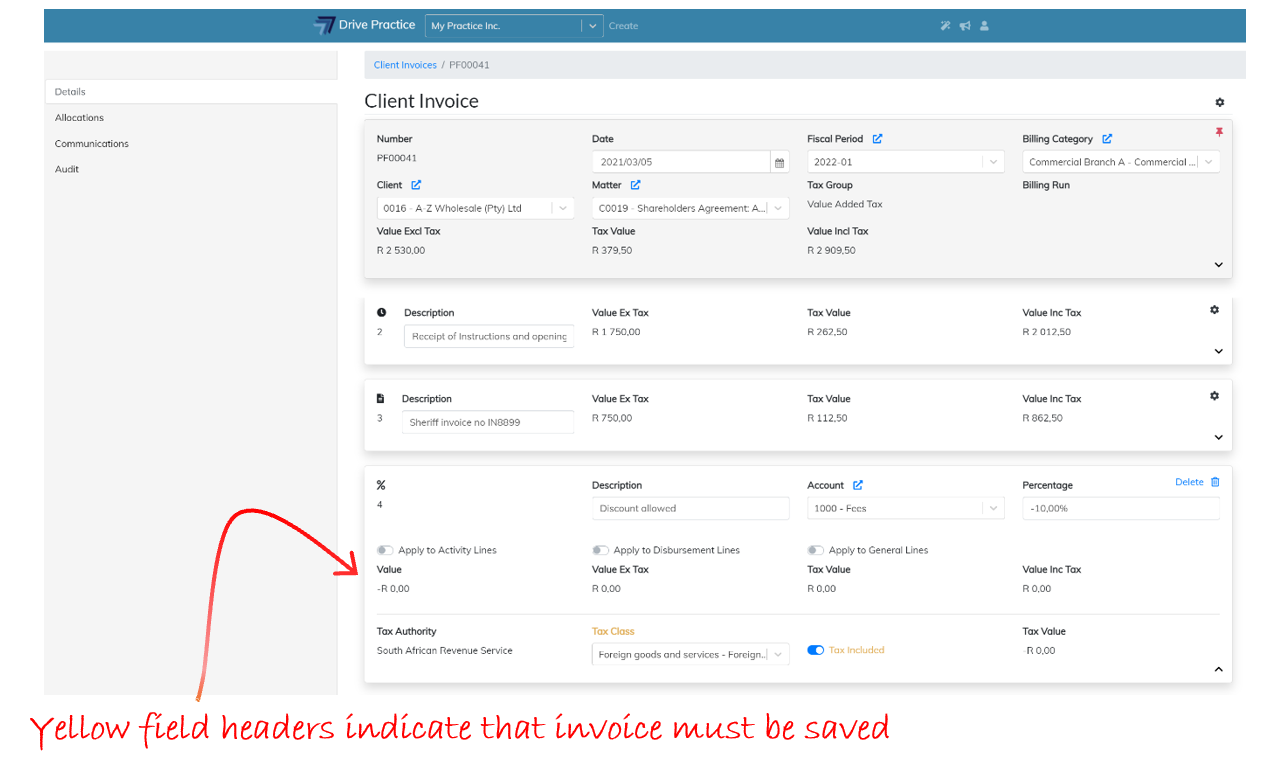
To edit the invoice header fields, click on any one of the fields, or use the Tab or Shift-Tab keys to move forwards or backwards through the fields. The field name(s) of the field(s) that have been edited turn yellow to indicate that they have been edited and that the document must be saved to save the changes. To save the changes, press Ctrl-Enter or click on the Gear icon on the top right-hand side of the invoice header to open the document menus and select Save.
Some of the Header fields cannot be edited. Each field is described below.
-
Number
This is the invoice number which was assigned when the invoice was created, from the Pro-Forma Client Invoice Sequence, or from the Client Invoice Number Sequence if the invoice has been approved. The Number field cannot be edited.
-
Date
The Date field can be edited. Changing the Date field may change the Fiscal Period, as the Date automatically prescribes the Fiscal Period. If it is required that the invoice Fiscal Period should be different to the period within which the Date falls, the Fiscal Period can be overridden in the Fiscal Period field.
To edit the Date either click on the calendar icon next to the Date field and pick a date, or type in the date in the YYYY/MM/DD format.
-
Billing Category
The Billing Category defaults from the Matter selected but could have been changed when the invoice was created. To edit the Billing Category, select a different Billing Category from the dropdown list by either clicking on a Billing Category in the list or using the up and down arrows and pressing enter or tab to select the Billing Category.
-
Tax Group
The Tax Group field is defaulted from the Client record and is not an editable field as changing the Tax Group affects all the entries on the invoice and a recalculation is required. To change the Tax Group, see the section Change Tax Group in this document.
-
Billing Run
The Billing Run field is not editable. If an invoice that is being edited is one that was generated on a billing run, the invoice will display the name of the Billing Run under this field. Invoices generated outside of a Billing Run as is described in this document can be added to a Billing Run, which is explained in the “Billing Run” document.
-
Value Excl Tax
The Value Excl Tax field is the calculated value of the invoice entries excluding tax and cannot be edited as it is calculated and updated from the entries on the invoice.
-
Tax Value
The Tax Value field is the calculated value of the tax on the invoice entries and cannot be edited as it is calculated and updated from the entries on the invoice.
-
Value Incl Tax
The Value Incl Tax field is the calculated value of the of the invoice entries including tax and cannot be edited as it is calculated and updated from the entries on the invoice.
-
Terms
The Terms field defaults according to the hierarchy default assigned in the configuration of the system and may be inherited from the Terms set globally for the Organization, from the Billing Category or as set on the Client itself. If the Terms field is blank, there are no terms defaults set on the hierarchy. If a term or terms has been created, The Terms field can be manually set on an invoice, and even if the Terms field has a default, this can be overridden by editing the Terms field on the invoice if so desired.
-
Due Date
The Due Date is a calculated field and cannot be edited. The Due Date is calculated from the date of the invoice and the terms applied to the invoice. If no terms have been applied to the invoice, the Due Date will be blank.
-
Expected Terms
The Expected Terms work like the Terms field and will default according to the hierarchy or be blank if no Expected Terms have been set in the hierarchy. Similarly, as with the Terms code, if Expected Terms are created, they can be applied to the invoice, and where an Expected Terms value is defaulted, it can be changed on the invoice.
The Terms and Expected Terms fields are used for cashflow forecasting.
The Tax Entries section of the Client Invoice Header section contains the fields that default from the Tax Group selected for the invoice. The fields are described below.
-
Tax Authority
The Tax Authority field is defaulted from the Tax Group on the invoice and cannot be changed on this section and is changed using the Change Tax Group function described in this document.
-
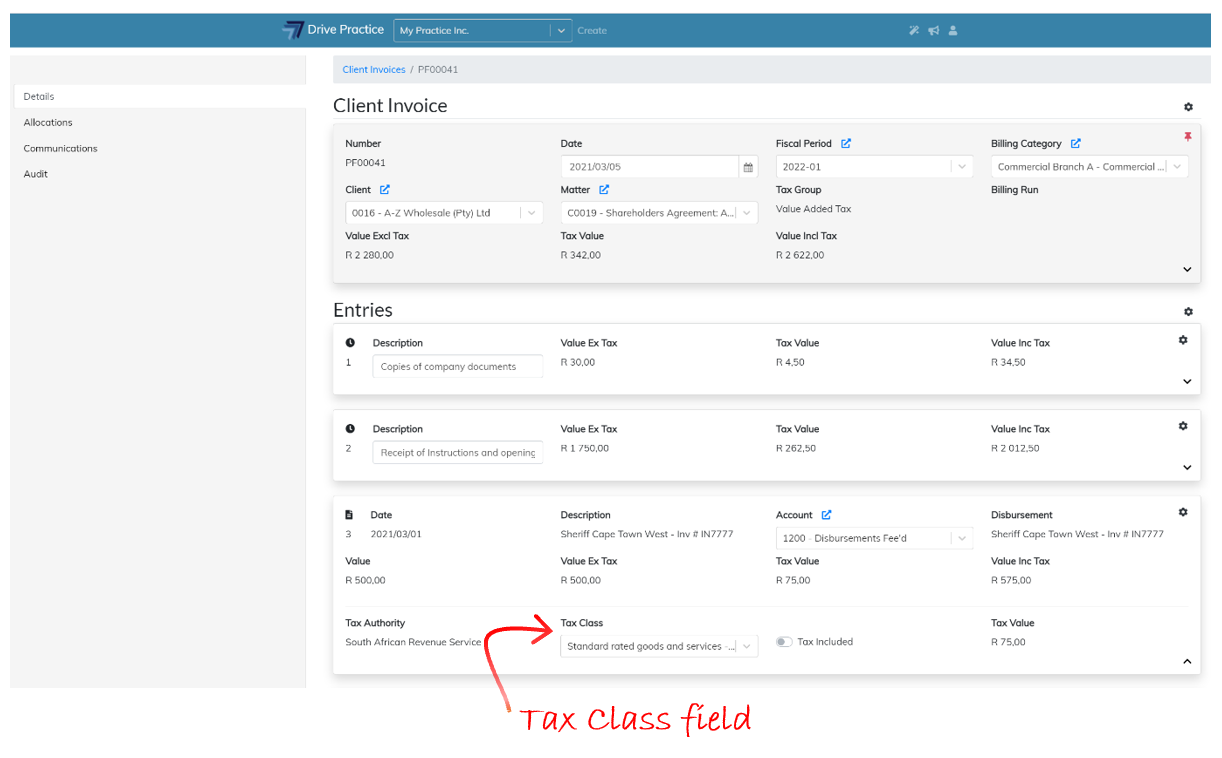
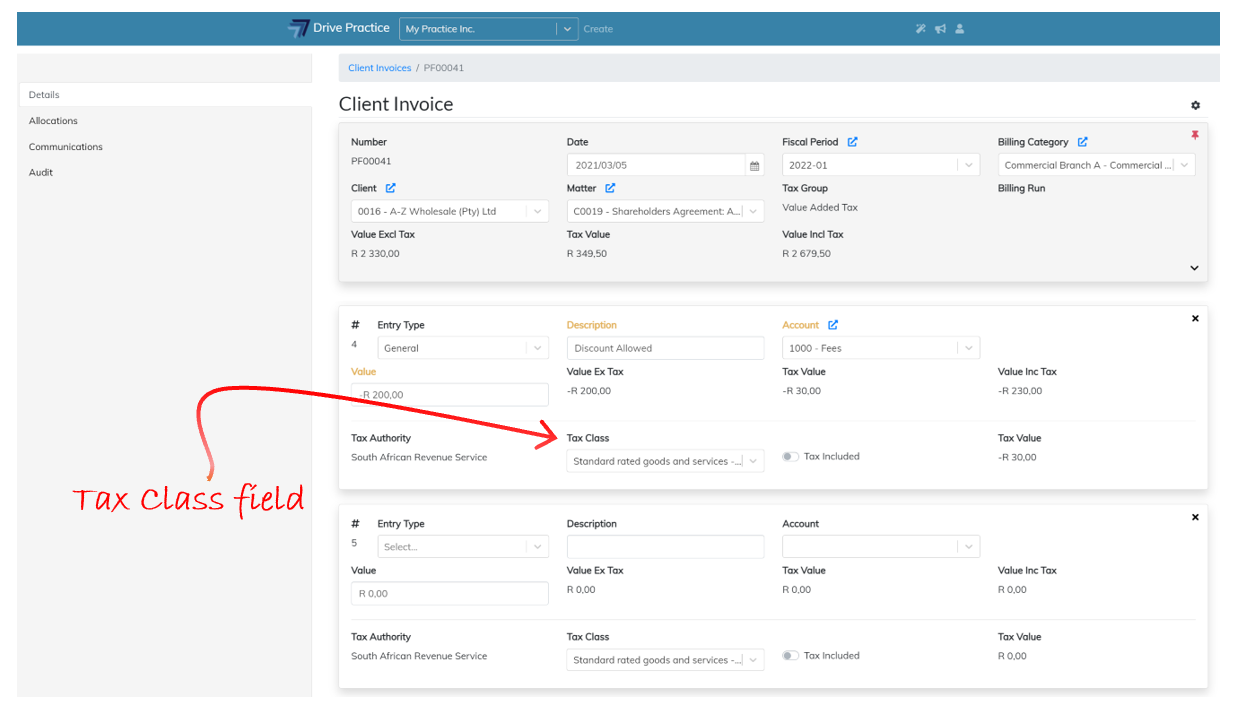
Tax Class
The Tax Class field is defaulted from the settings for the Client but can be changed on the invoice if required. To change the Tax Class, click on the dropdown field and click on the entry in the list, or use the up and down arrow keys to highlight the required class and press enter to select.
-
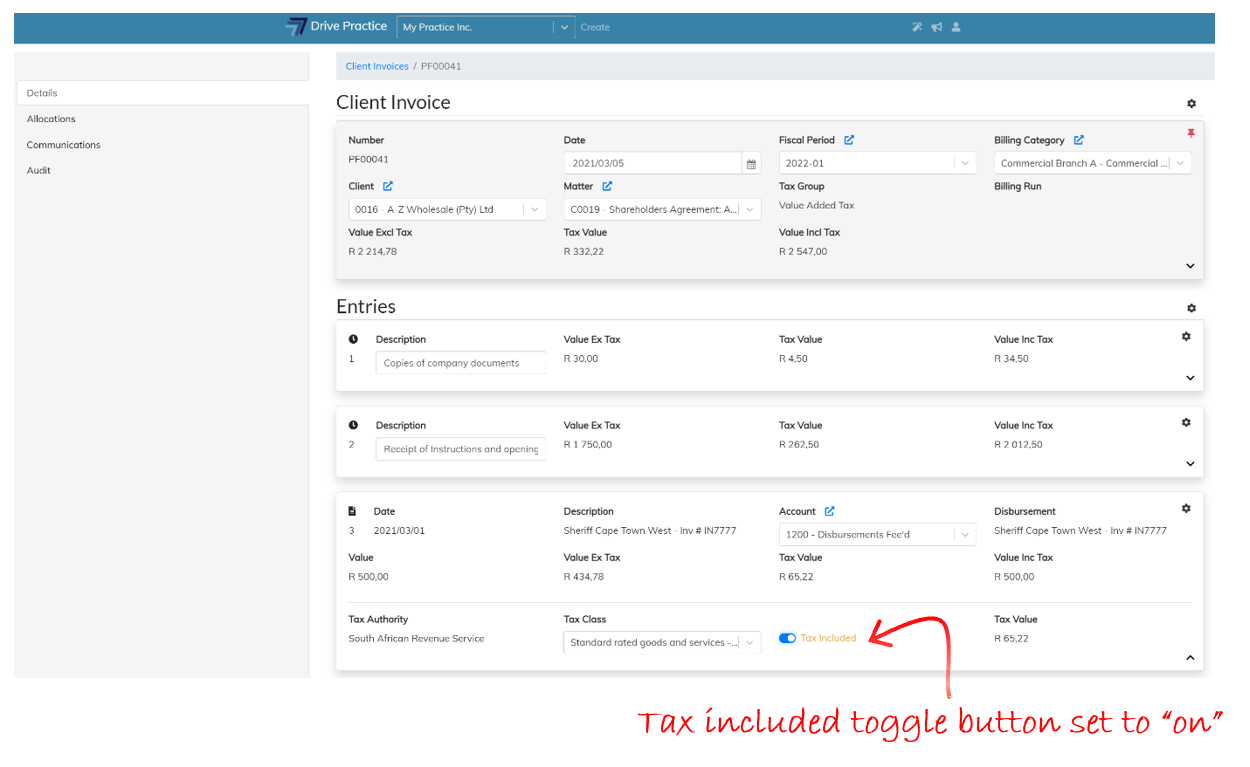
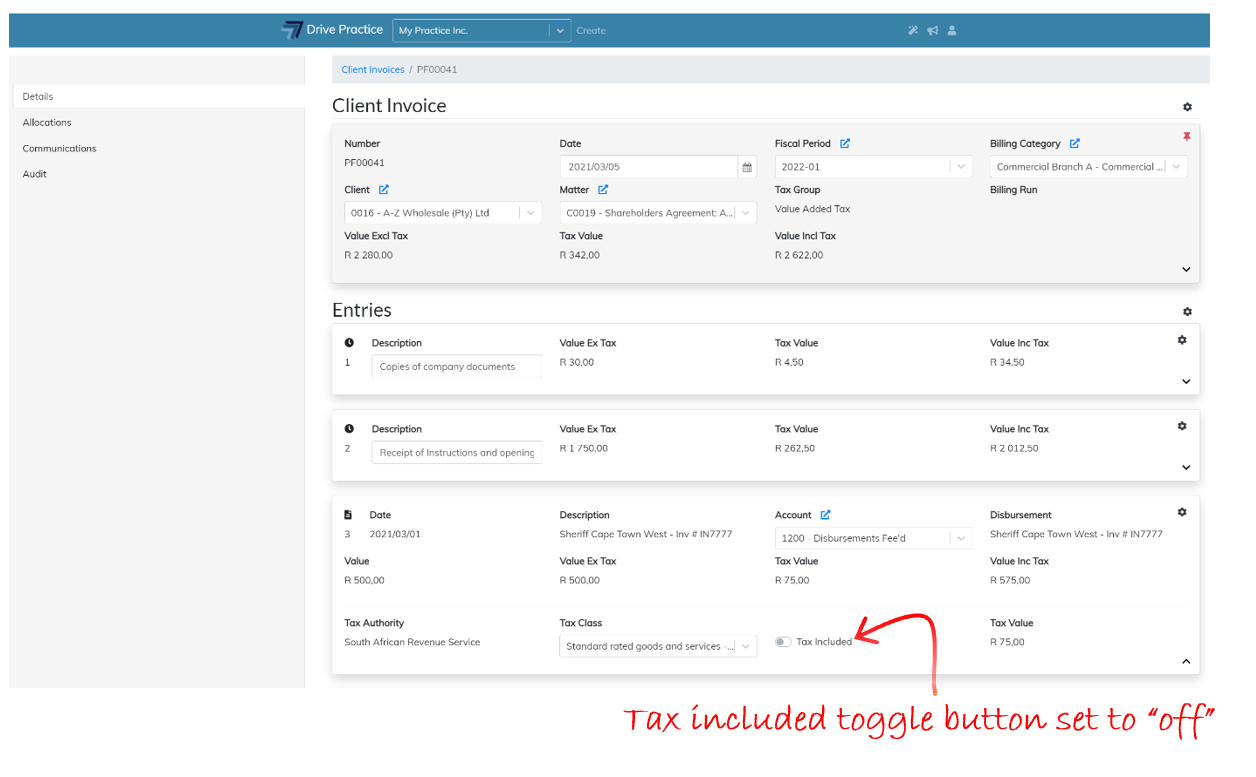
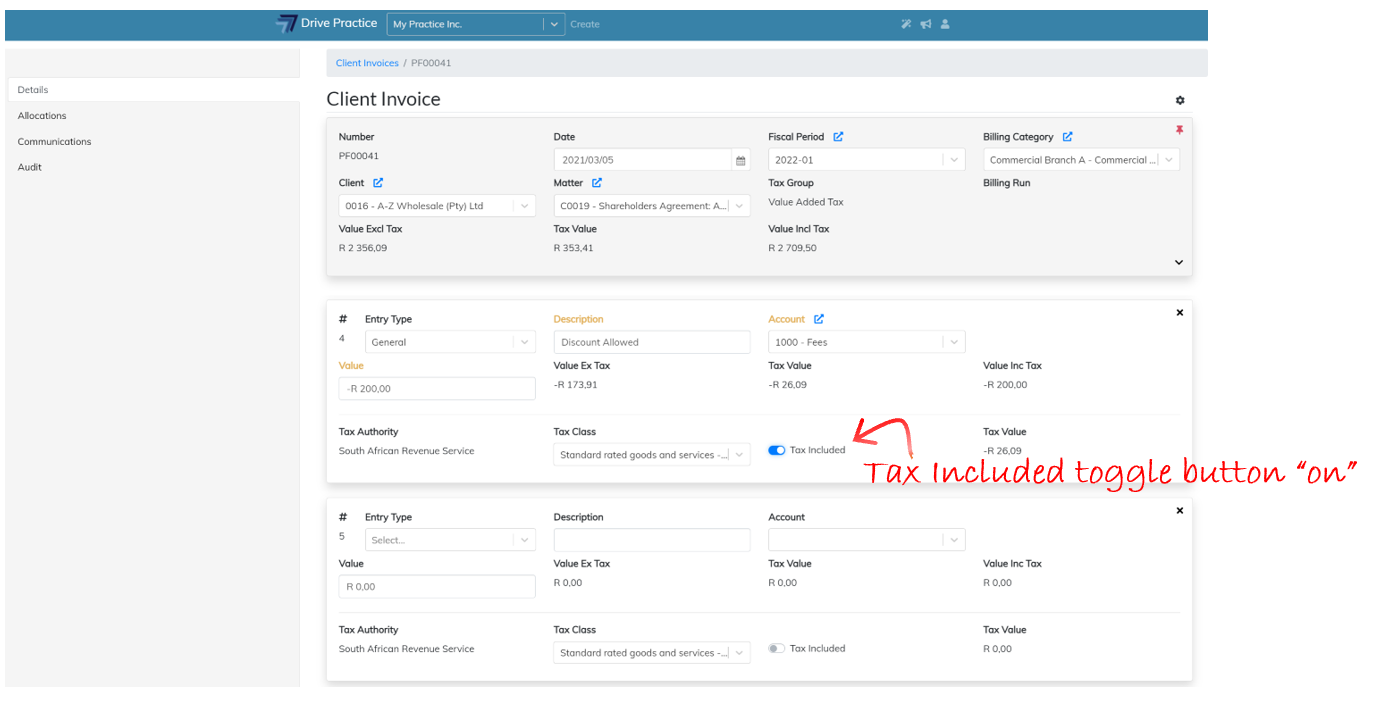
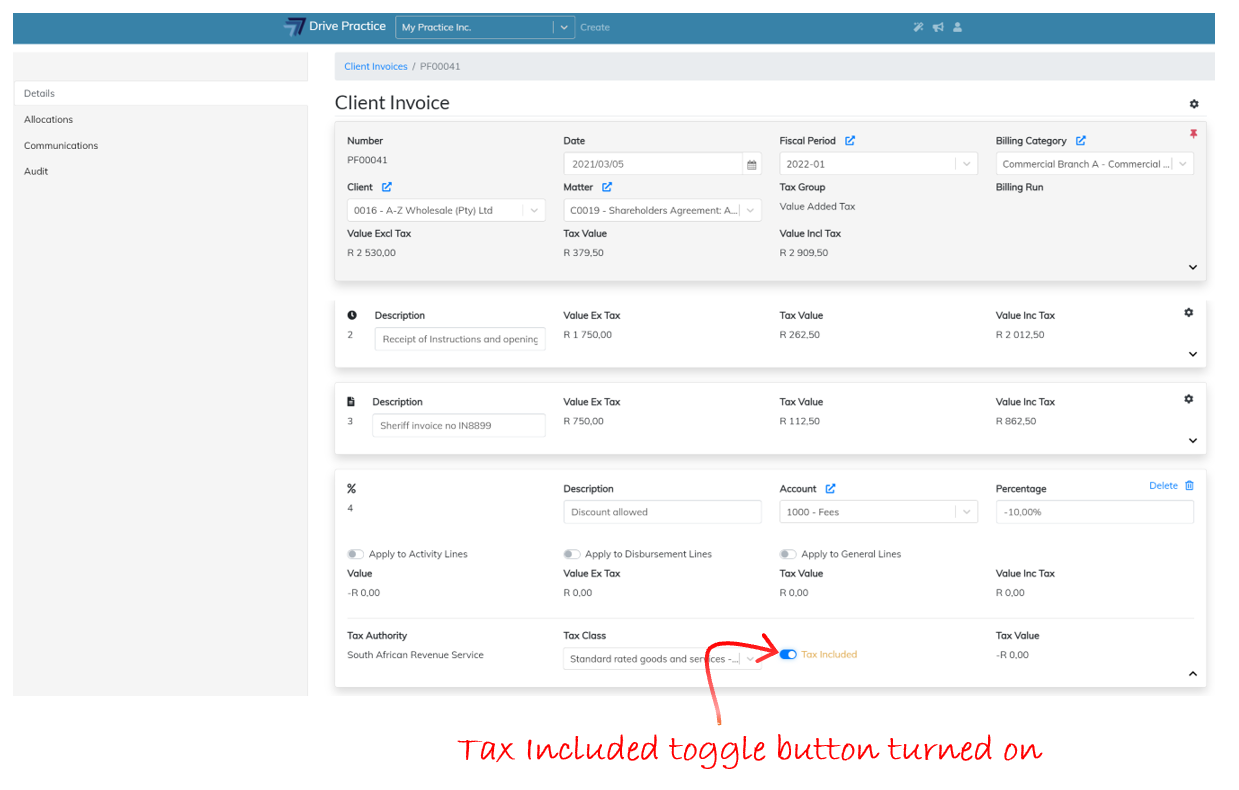
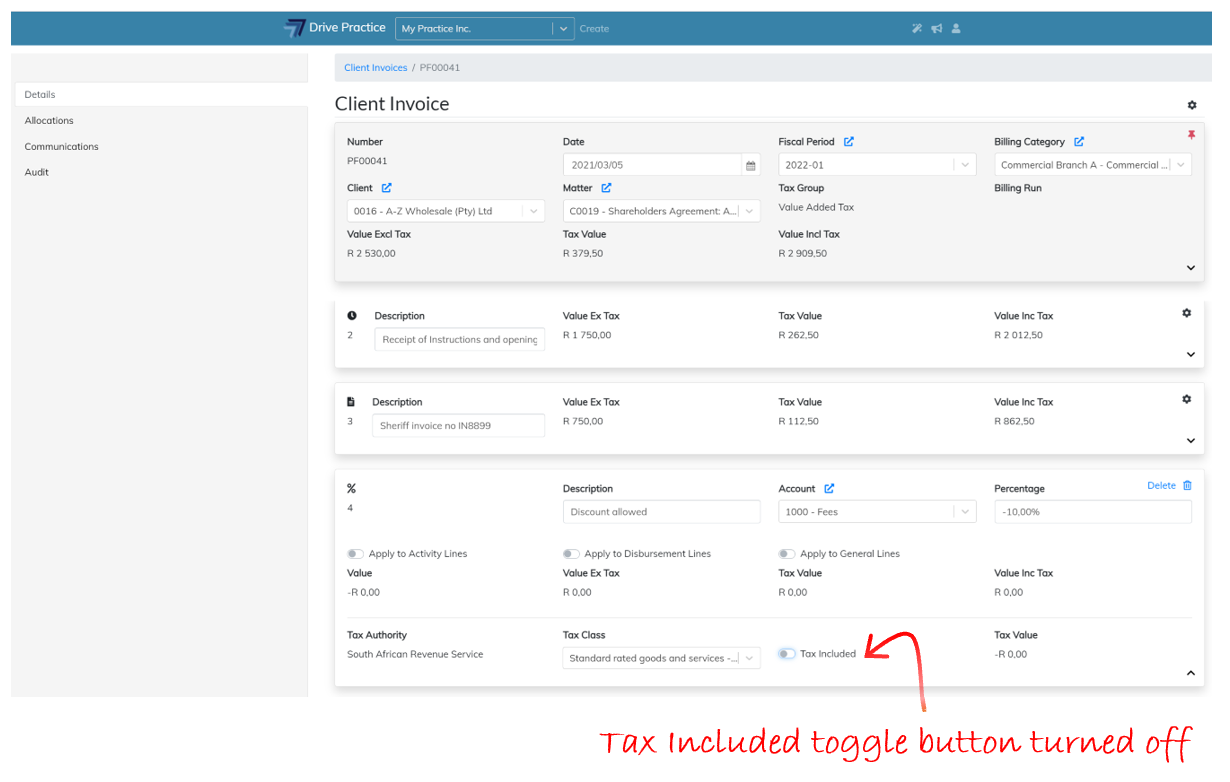
Tax Included
The Tax Included field is a toggle field that toggles tax inclusion on or off. To turn tax included on click on the right of the toggle and the field lights up in blue indicating that tax will be treated as included on the invoice entries. Clicking on the left of the toggle will turn off the calculation of tax as tax inclusive on the invoice entries.
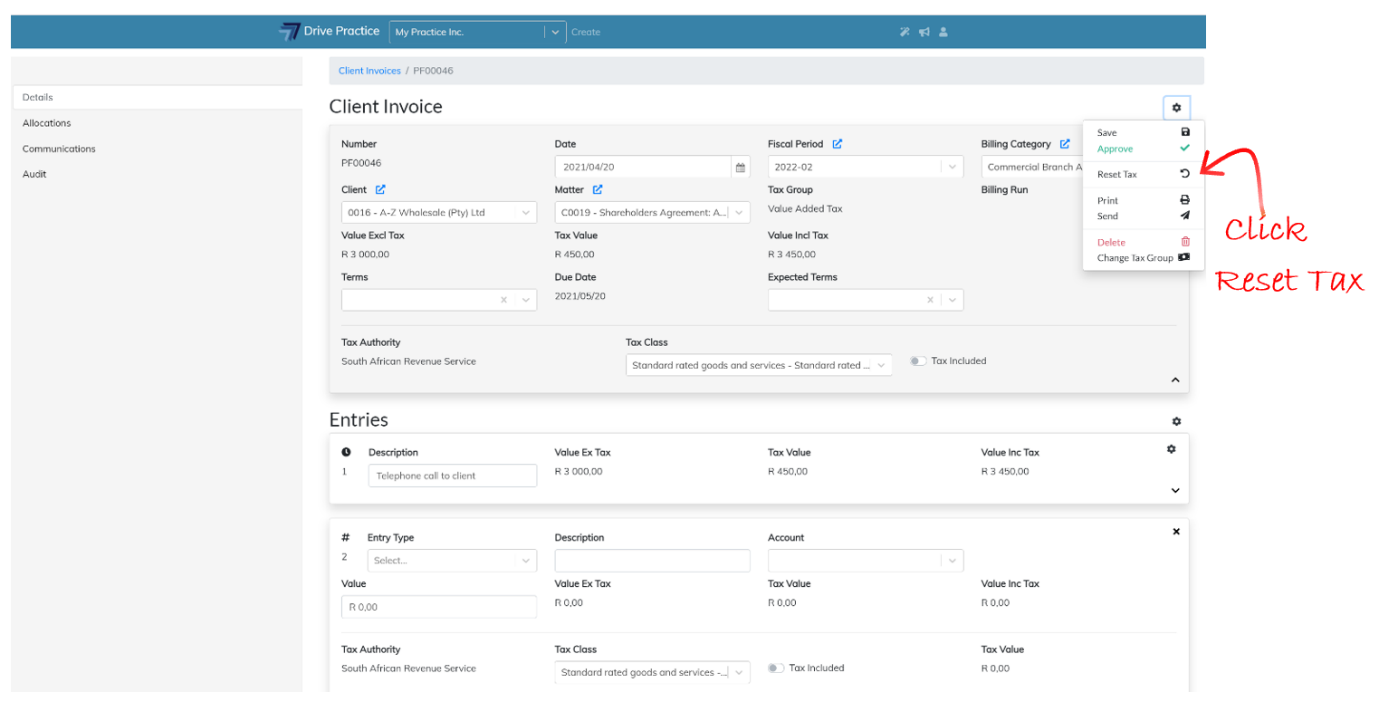
When changing the Tax Class or toggling on or off the Tax Included option select the Gear icon on the Client Invoice Header and select Reset Tax to ensure that the tax class and tax inclusive option selected have been properly applied to all lines of the invoice.
Add/Edit Client Invoice Entries
When an invoice is created, or opened, the Header and all the Entries on the invoice are collapsed, showing only meaningful summary information for each line.
The PgUp and PgDn keys can be used to scroll through the entries, the End key will take you to the last entry on the invoice and the Home key will take you to the first entry on the invoice.
If the Header is pinned, the entries will scroll under the header as you move down the list of entries.
There are four different entry types on Client Invoices, Activity Entries, Disbursement Entries, General Line Entries and % Line Entries.
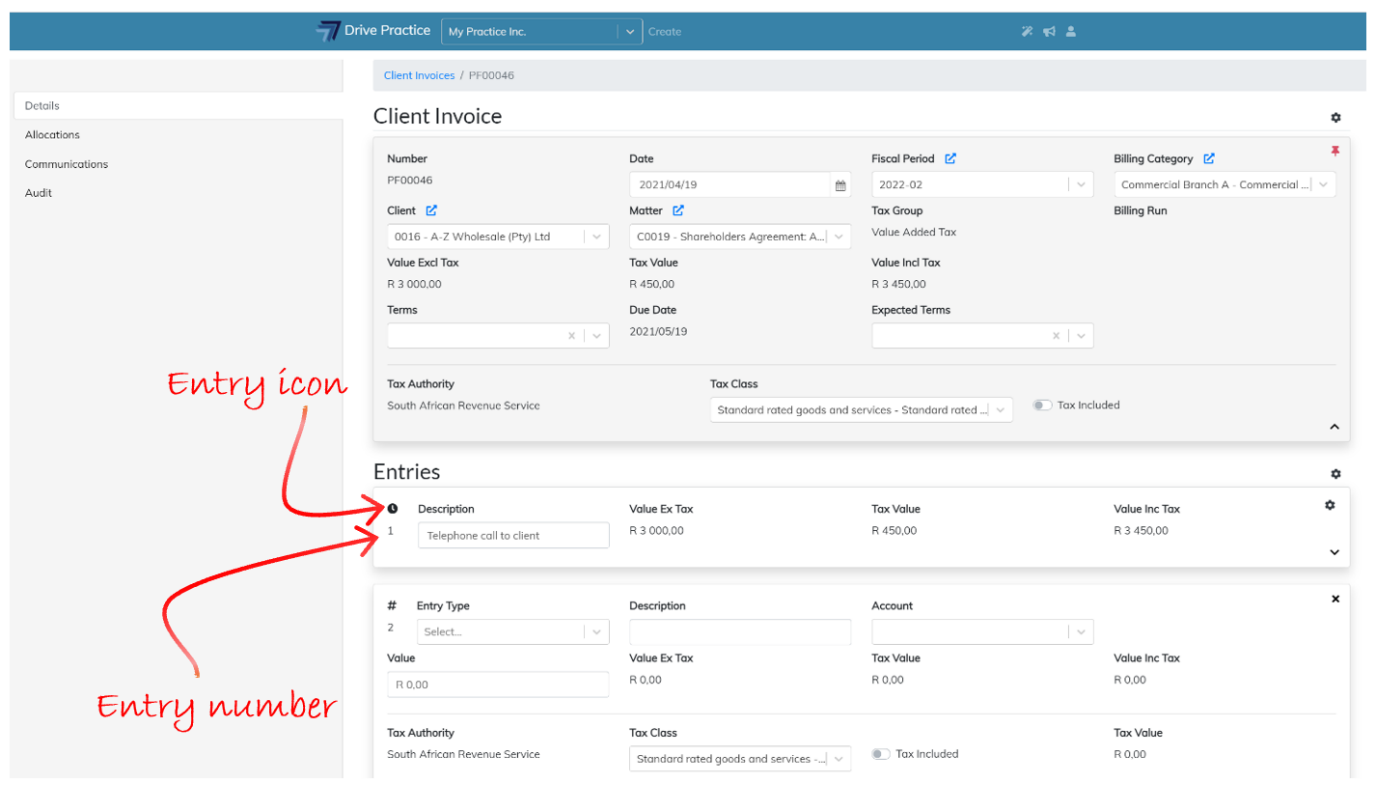
Each entry is numbered and is marked with an icon on the top left corner denoting the type of entry.
 Activity line entry
 Disbursement line entry
 General line entry
 Percentage line entry
Activity and Disbursement Entries are added automatically to invoices when creating invoices from the Client Invoice list screen and on the Client Unbilled Activities tab where there are unbilled activities and disbursements for the matter selected.
General Line Entries and % Line Entries can only be manually added to an invoice.
The default sort order of the lines when an invoice is created with Activity and Disbursement Entries is to list activity lines first in order of the activity date, listing disbursements entries thereafter, also in date order of the disbursement date.
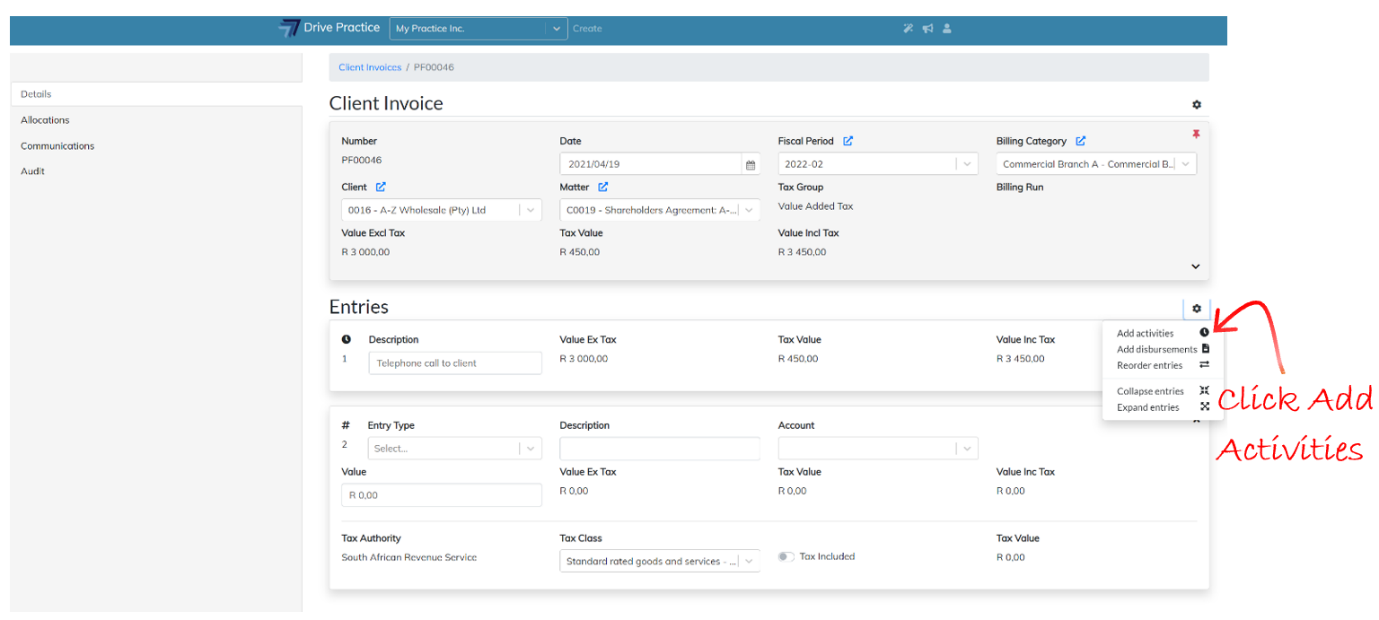
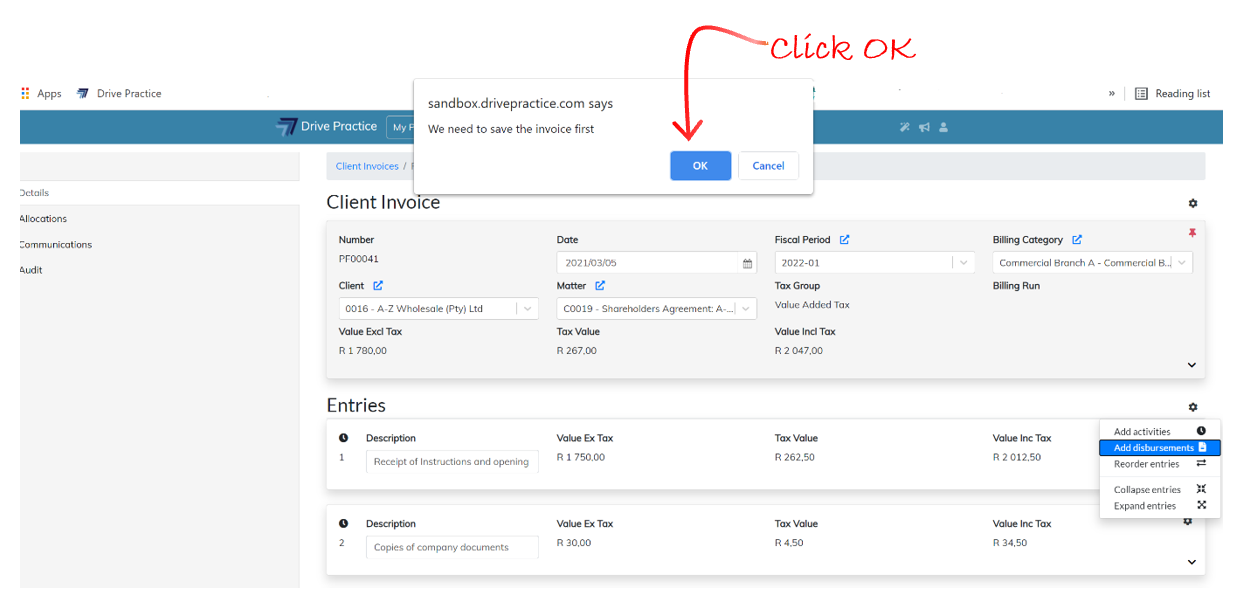
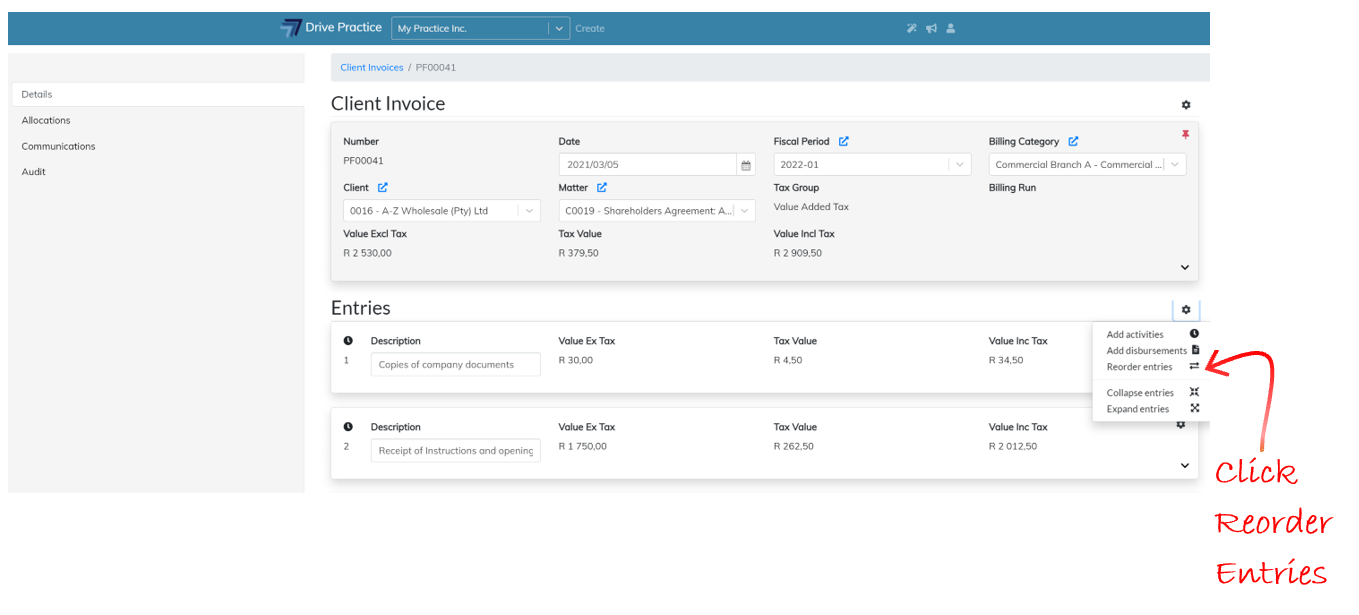
To the right of the Entries section heading on the client invoice is a Gear icon that provides functions to Add Activities, Add Disbursements and Reorder Entries. These functions are described below.
Add Activities to Client Invoice
When creating an invoice manually using any of the methods described in the Create Client Invoice section above (not using the Billing Runs function which is explained in the Billing Runs document), all, or the selected unbilled activities on a matter are added to the invoice and will be listed as the first entries on the invoice in date order. Unbilled activities will only be included on an invoice where these activities are dated on or before the invoice date.
If there are additional activities captured to a matter that are required to reflect on the invoice, or to check if there are additional activities, click on the Gear icon above the first entry on the right and select Add Activities.
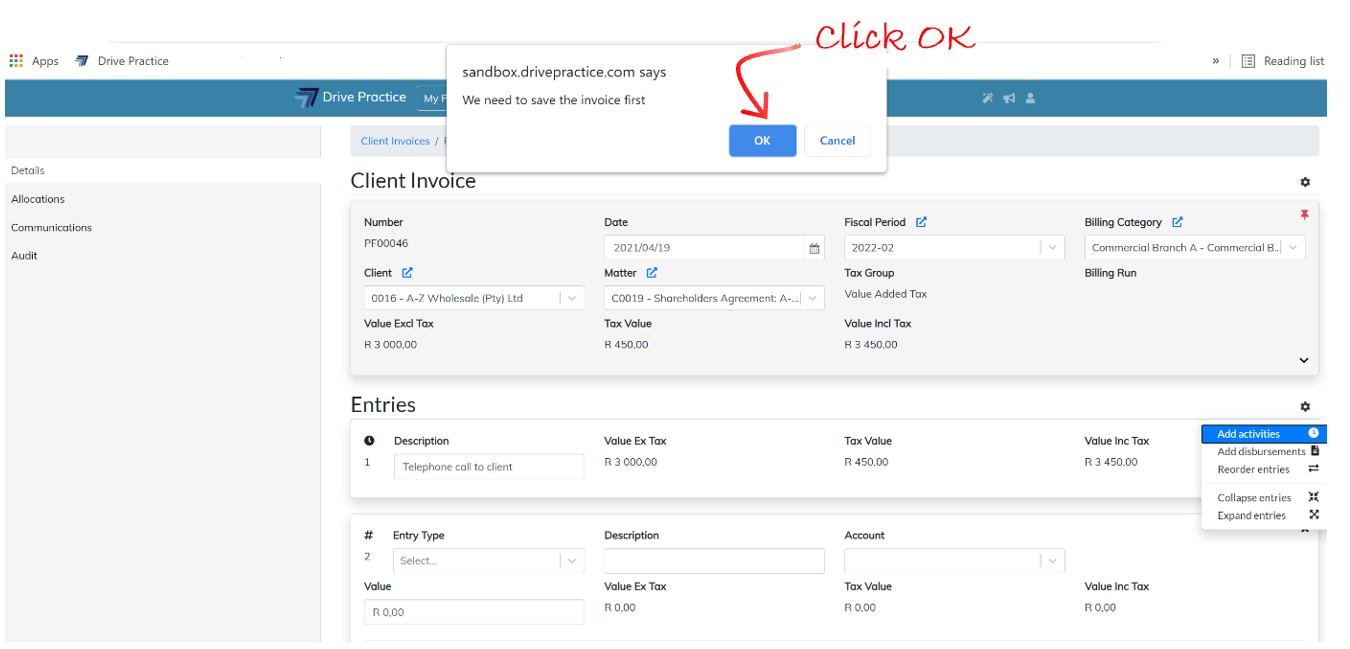
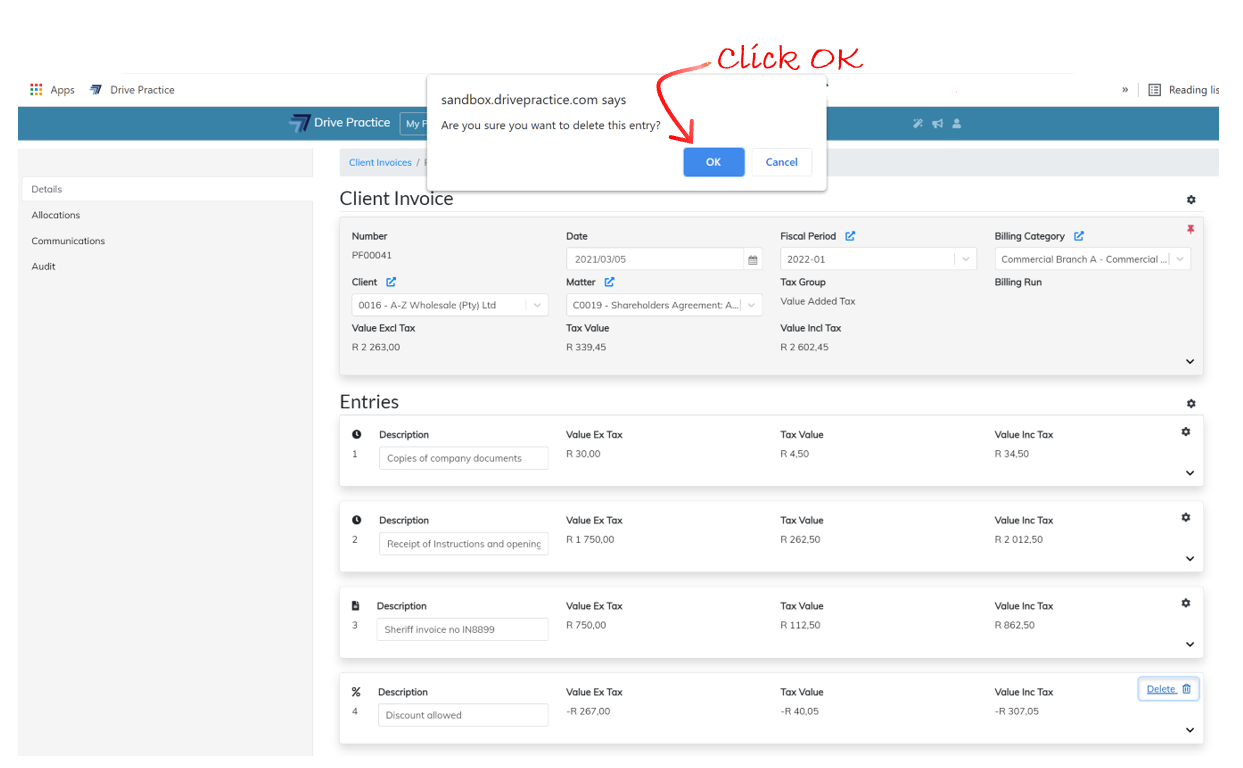
A message indicating that the invoice needs to be saved before loading the list of unbilled activities will pop up at the top center of the screen. Select OK to save the invoice and load the unbilled activities or Cancel to return to the invoice.
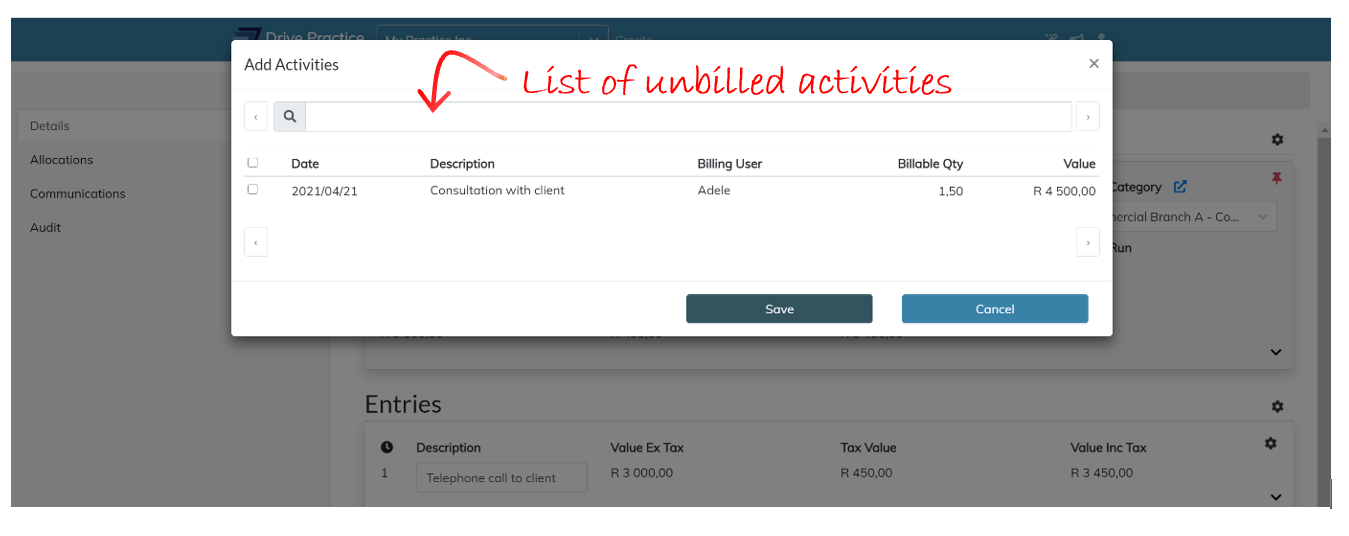
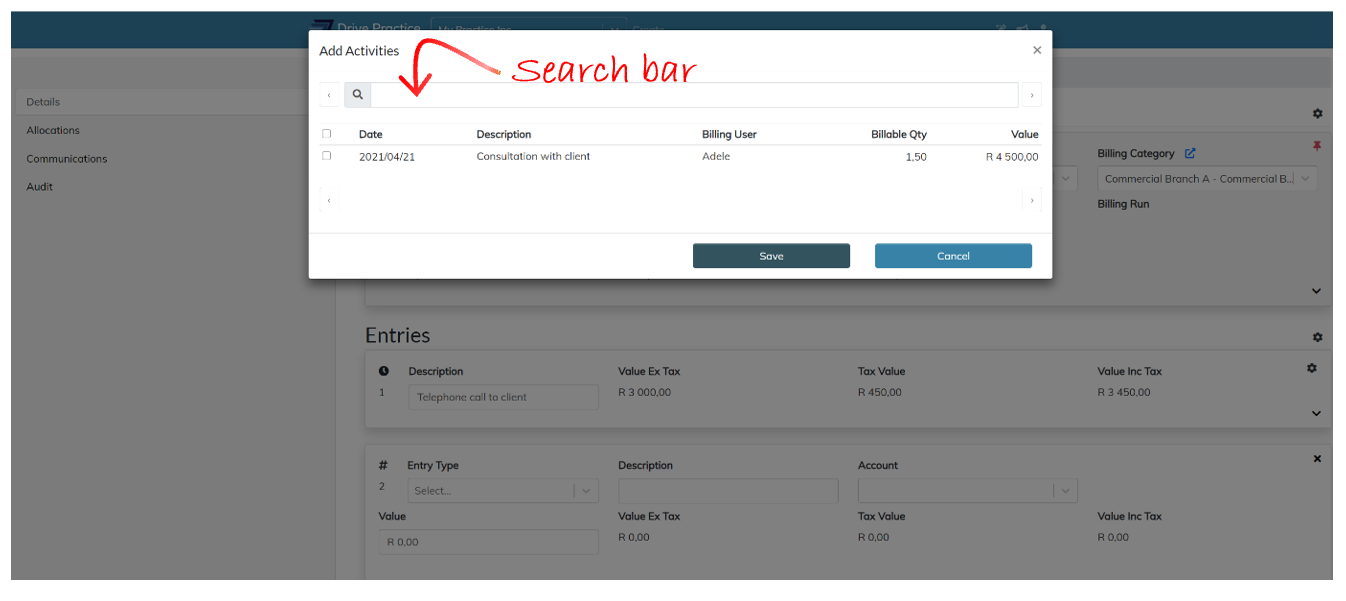
If OK is selected the Add Activities screen will pop up with the list of unbilled activities for the matter. The list will be empty if there are no unbilled activities dated on or before the invoice date. Activities dated after the invoice date can only be added by changing the invoice date so that activities up to and including the new invoice dated can be listed for selection to add to the invoice.
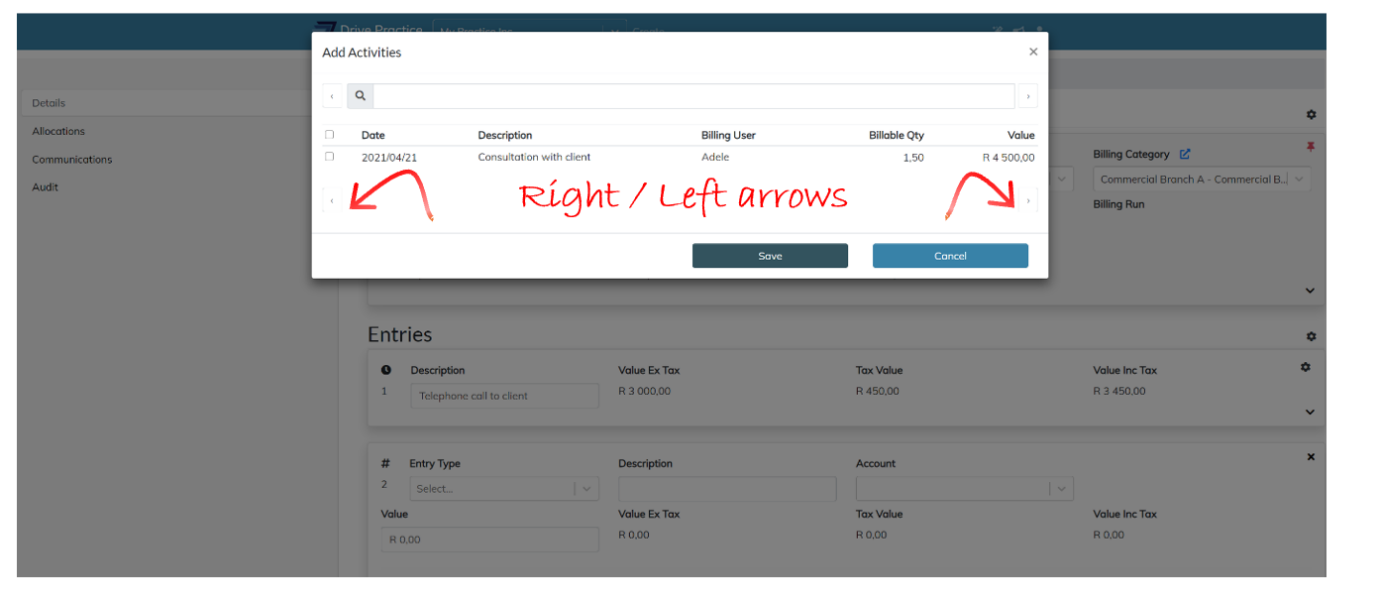
Unbilled activities for the matter will be listed in date order and the right and left arrows at the bottom of the list or on either side of the search bar can be used to page through the entries.
Use the search bar to search for any string of data in the description field of the unbilled activities in the list to find specific entries.
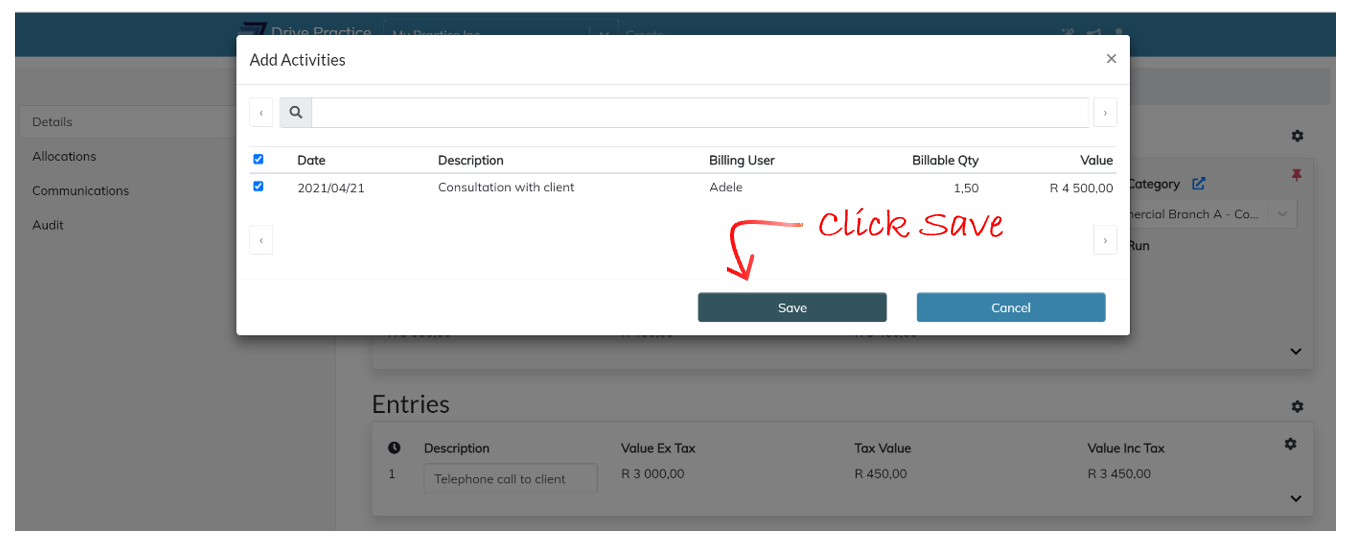
Click on the check box next to an activity to select the activity entry/entries to be added to the invoice or click on the checkbox in the header line to select all entries.
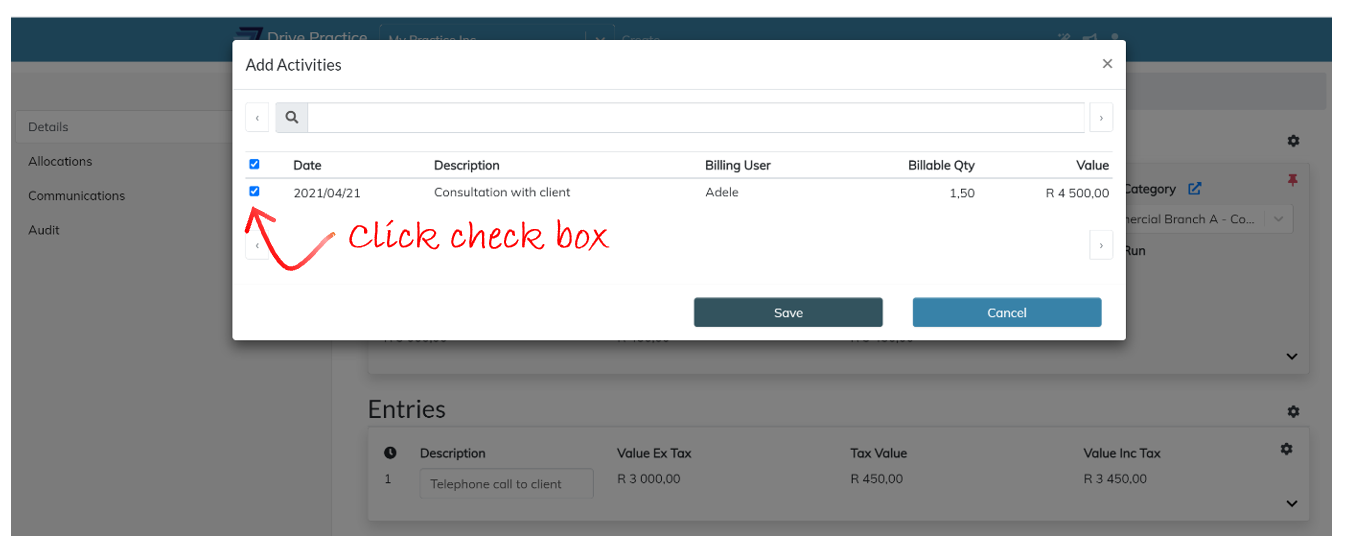
Click Save to add the entries or Cancel to close the popup window and return to the invoice.
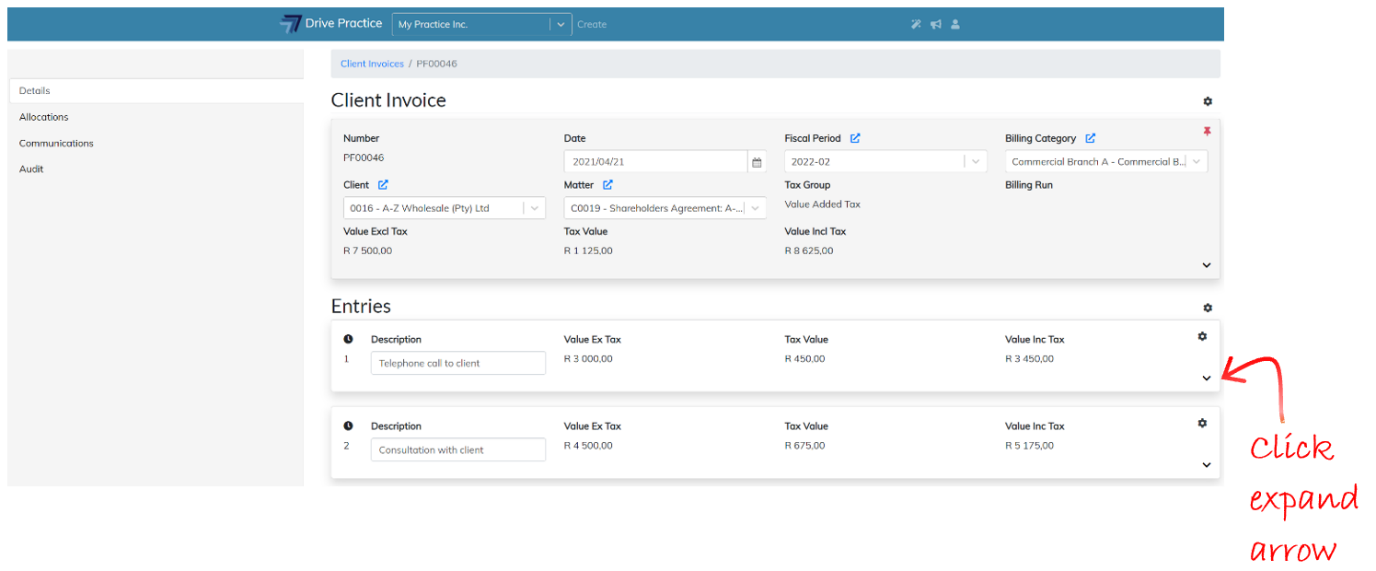
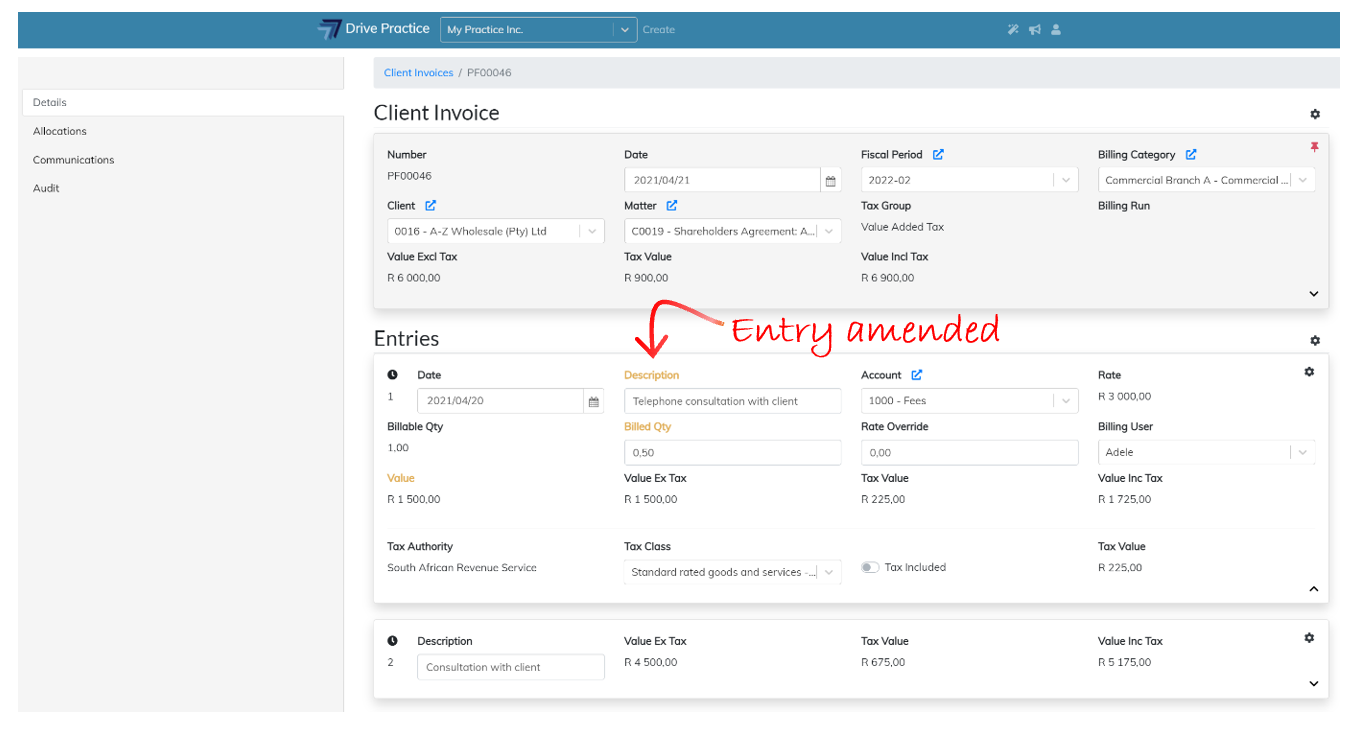
Edit Activity Entry
To edit an Activity entry, click on the Expand arrow on the bottom right of the entry card.
To edit the fields in the expanded view, click on any one of the fields or use the Tab and Shift-Tab keys to move back and forward between the fields on the entry. The field name of each entry that is modified turns yellow to indicate that any changes that may have been made need to be saved to avoid losing the amendments.
Click on the Gear icon on the Client Invoice Header and select Save to save the changes or use the Ctrl-Enter shortcut key. A brief notification will appear at the top right of the screen indicating whether the save was successful or failed.
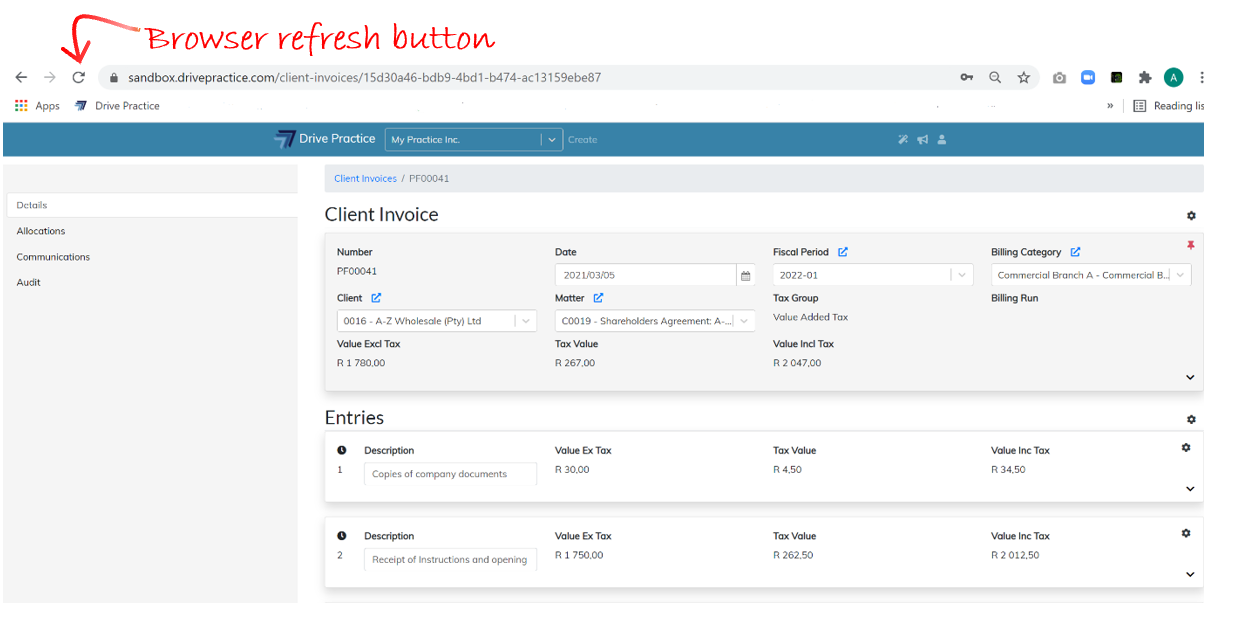
Saving can fail if there has been an extended period of no activity and the user has been automatically logged out, when connection to the internet has been lost, or when another user has updated the record in another browser. If a save fails, refresh the page, or login again and re-do the edits and execute the save again.

The fields on an Activity entry and how to edit them are described below.
-
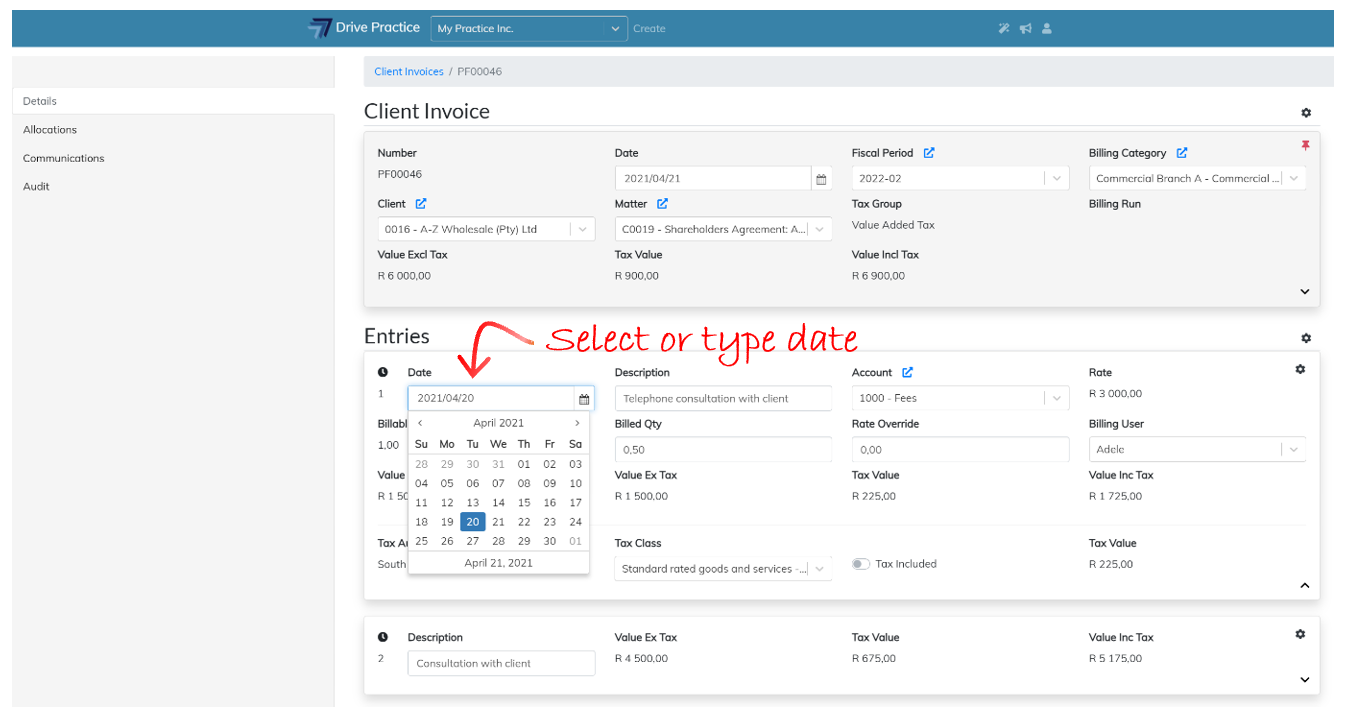
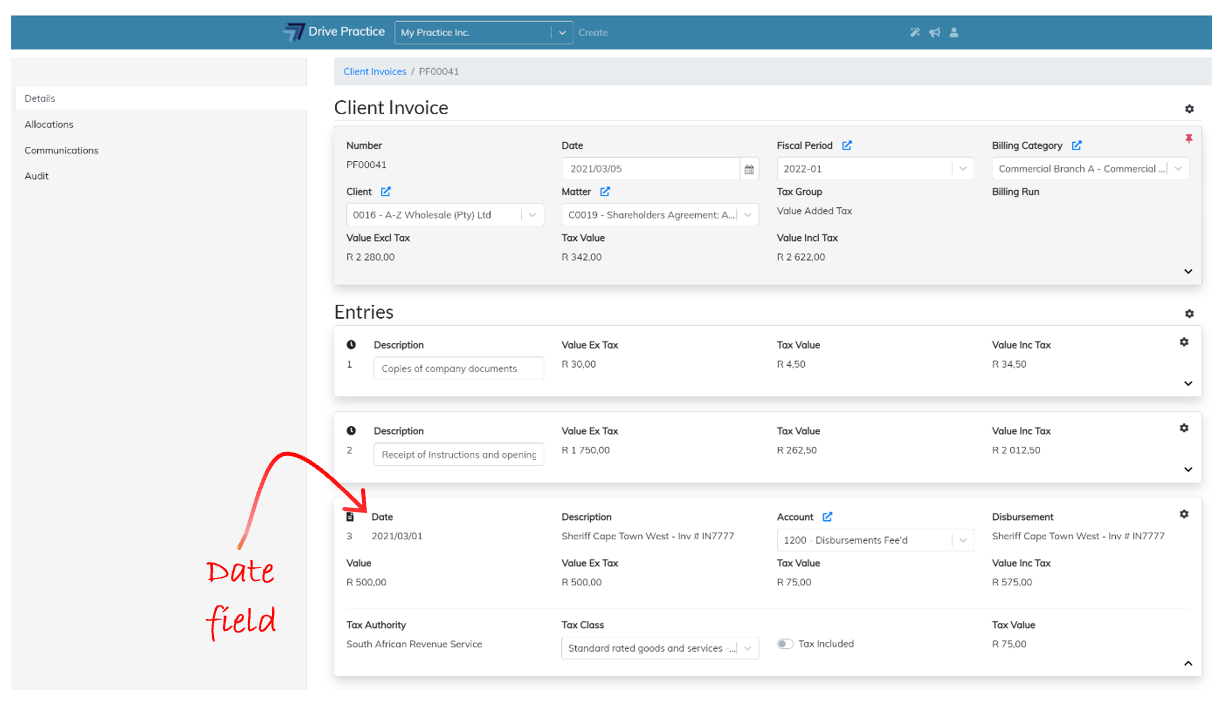
Date
This field contains the date of the activity given by default to the day on which the activity was captured or the date set for the activity by the fee earner who captured the activity.
The date of an activity entry should always be a date before or as at the date of the invoice to avoid queries from a client as to why future dated activities are being billed to them.
To amend the date either type in a new date in the YYYYMMDD format or click on the calendar icon next to the field and click on the date to select.
-
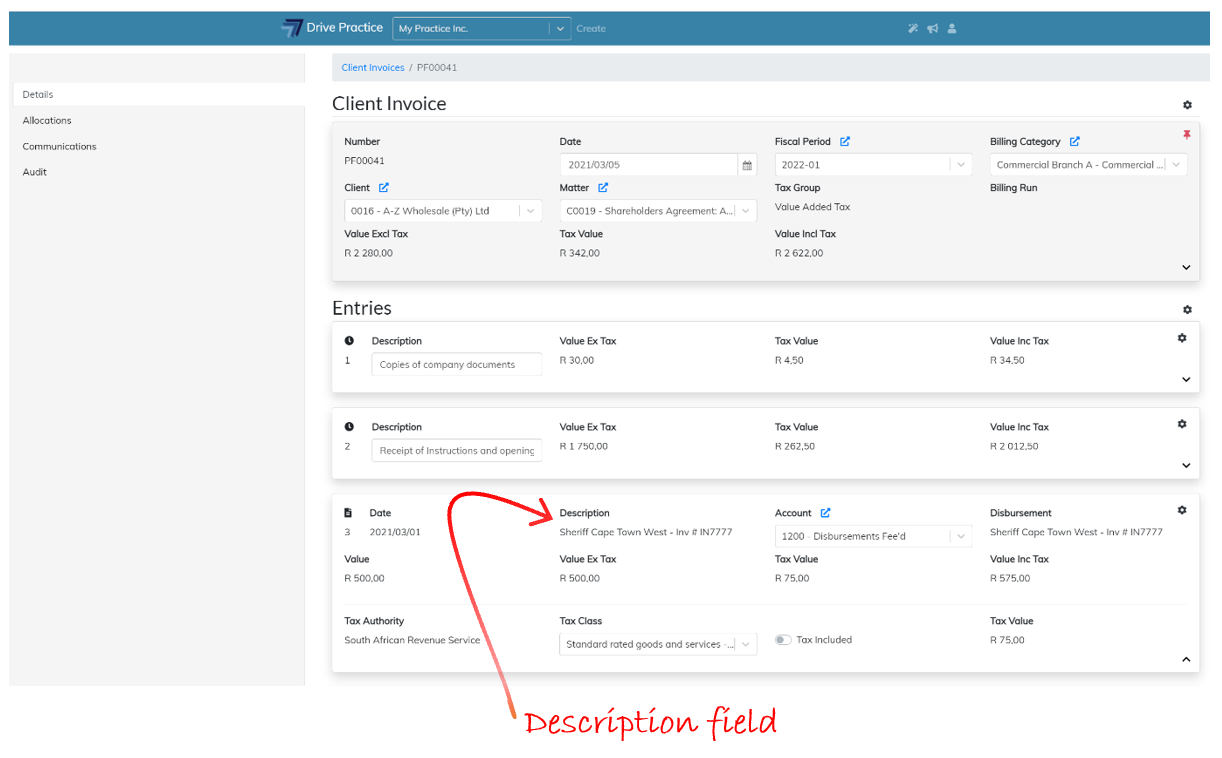
Description
The Description of the activity is either the default description as set on the Activity Type itself, or the description as entered by the fee earner who captured the activity.
The description can be edited and can be any number of characters in length. Spelling mistakes are highlighted as in any text editor with a red squiggly line under the incorrectly spelled text and right clicking on the spelling error pops up a browser menu with suggested spelling corrections which can be selected, or the error can be manually corrected.

-
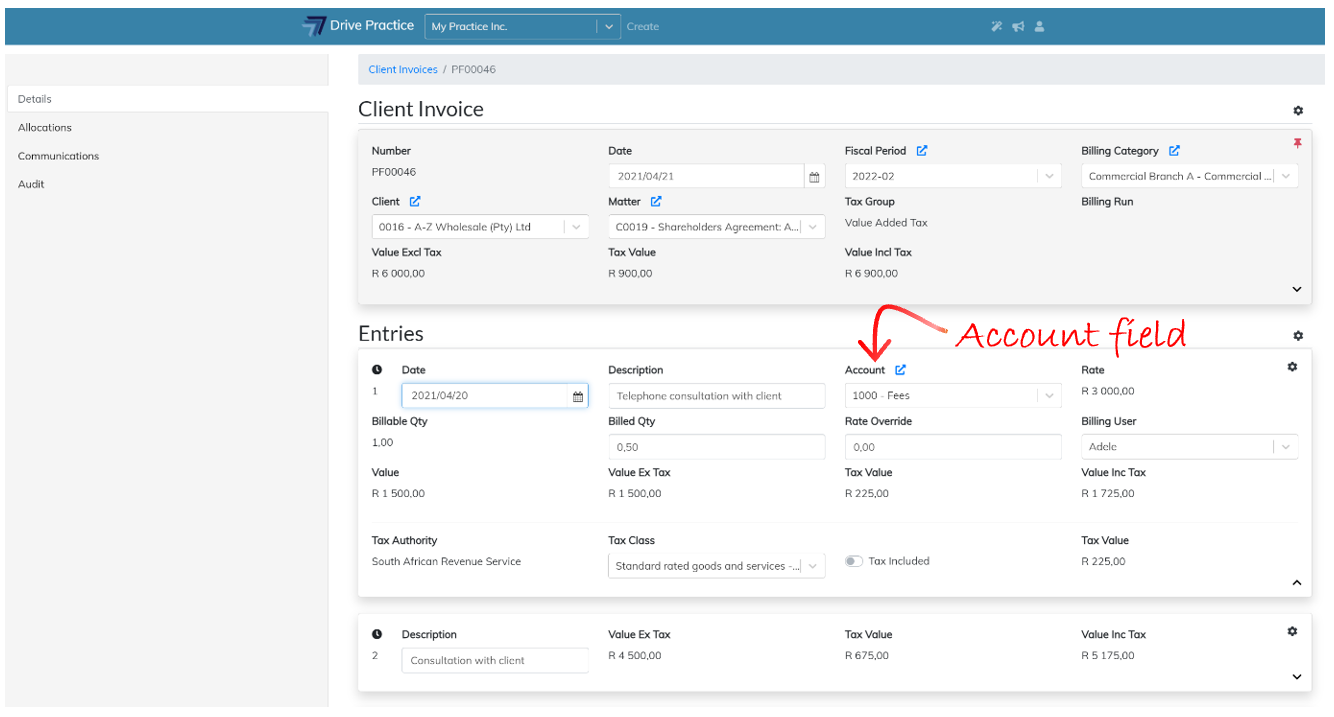
Account
The Account field is the general ledger account to which the activity fee will be posted when the invoice is approved.
The Account field defaults from the Activity Type selected or from the global G/L Configuration setting in the Organization Setup.
While the general ledger account can be amended when editing an Activity entry, it is only recommended to be amended by a user who understands the accounting implication of the amendment.
To amend the field either type in all or part of the account number or name to filter the list and use the up or down arrows to select the desired account and press enter or click on the entry in the list to select it.
-
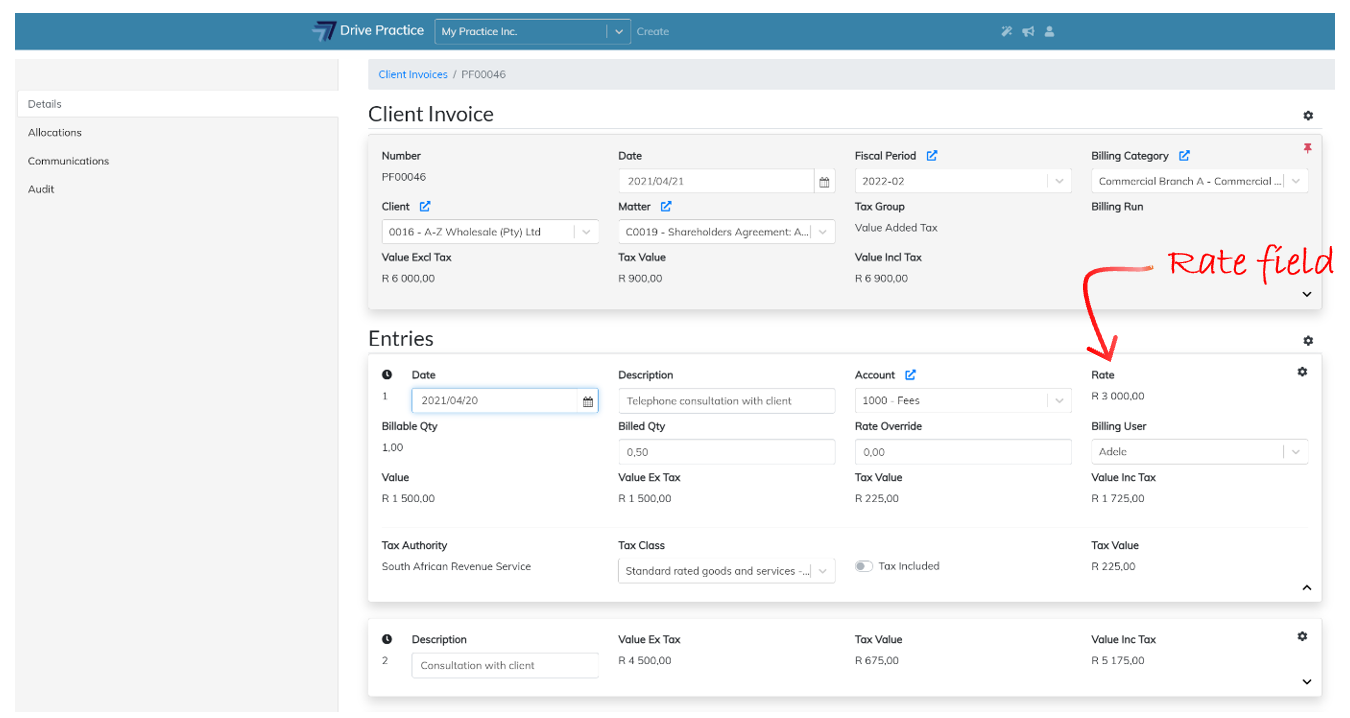
Rate
The Rate field is not editable as it is derived from the Activity Type and Unit selected when the activity was captured. The rate can be overridden using the Rate Override field which is available for editing on the Activity entry as described below.
-
Billable Qty
The Billable Qty field cannot be edited on a Client Invoice. To alter the billed quantity of a unit, edit the Billed Qty field described below.
The Billable Qty can only be edited in Unbilled Activities on the Matter or by the fee earner using the My Weekly Activities.
-
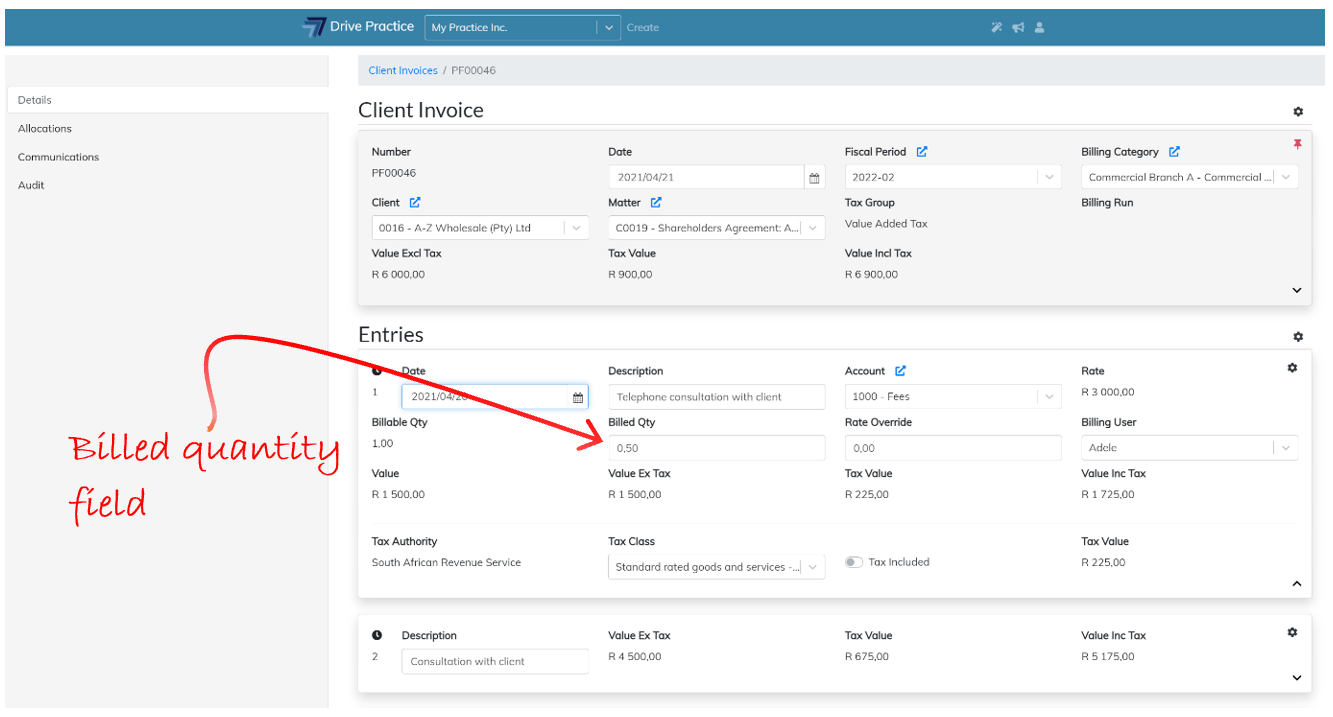
Billed Qty
The Billed Qty field can be edited and the Billable Qty which populates the field by default can be increased or decreased as required.
-
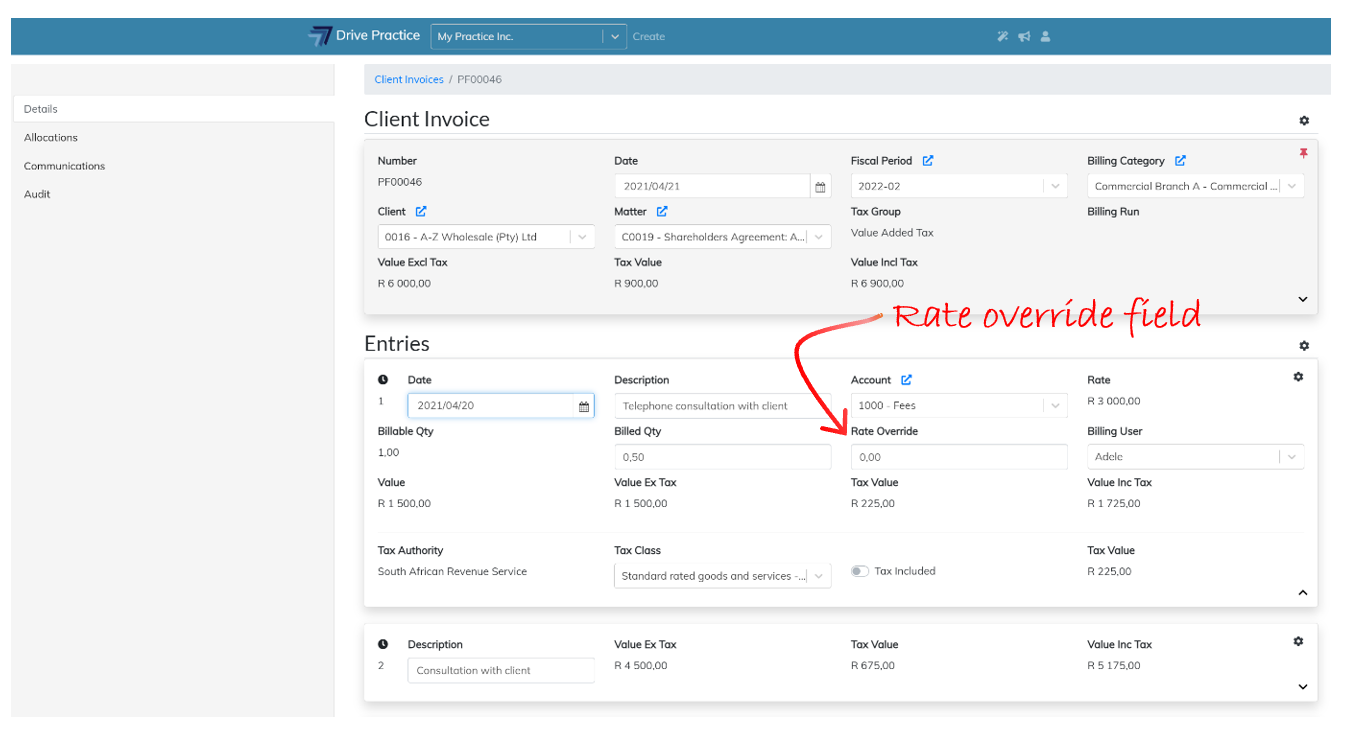
Rate Override
The Rate Override field is used to override the rate derived from the Activity Type. Enter the rate to be applied to the activity’s billed quantity to update the amount billed if required.
-
Billing User
The Billing User is the fee earner to which the fee is allocated. To change the fee earner, click on the field and either type in some characters of the fee earners name, or use the up and down arrows or the mouse to scroll the list of fee earners and press enter or select the fee earner required.
Note that if the fee earner to which the activity has been allocated has a different rate than the original fee earner for this Activity Type, the Rate and the Value fields will be updated when the change is saved.

-
Value
The Value field is a calculated field and cannot be edited, and is the calculated value of the activity entry derived from multiplying the Billed Qty and the Rate (or the Rate Override if it is used) and is the value of the fee that will be posted for this activity.
-
Value ex Tax
This field contains the amount of the entry excluding tax and is a calculated field and cannot be edited. If the tax settings are set to Include Tax, the Value ex Tax will be different to the Value field and if the tax settings are set to not be tax inclusive, the Value ex Tax field will be the same as the Value field.
-
Tax Value
The Tax Value field is the tax calculated on the entry based on the tax settings for the invoice, and the entry if the entry tax settings differ from the invoice settings. The Tax Value field cannot be edited.
-
Value Inc Tax
This field is a calculated field based on the tax settings for the invoice, or for the entry if the tax settings differ on the entry to the tax settings on the invoice. The amount in the field is the calculated value of the entry including tax and as a calculated field, cannot be edited.
-
Tax Authority
The Tax Authority field cannot be edited as it is derived from the Tax Group set for the invoice. To change the Tax Authority, read the Change Tax Group instructions.
-
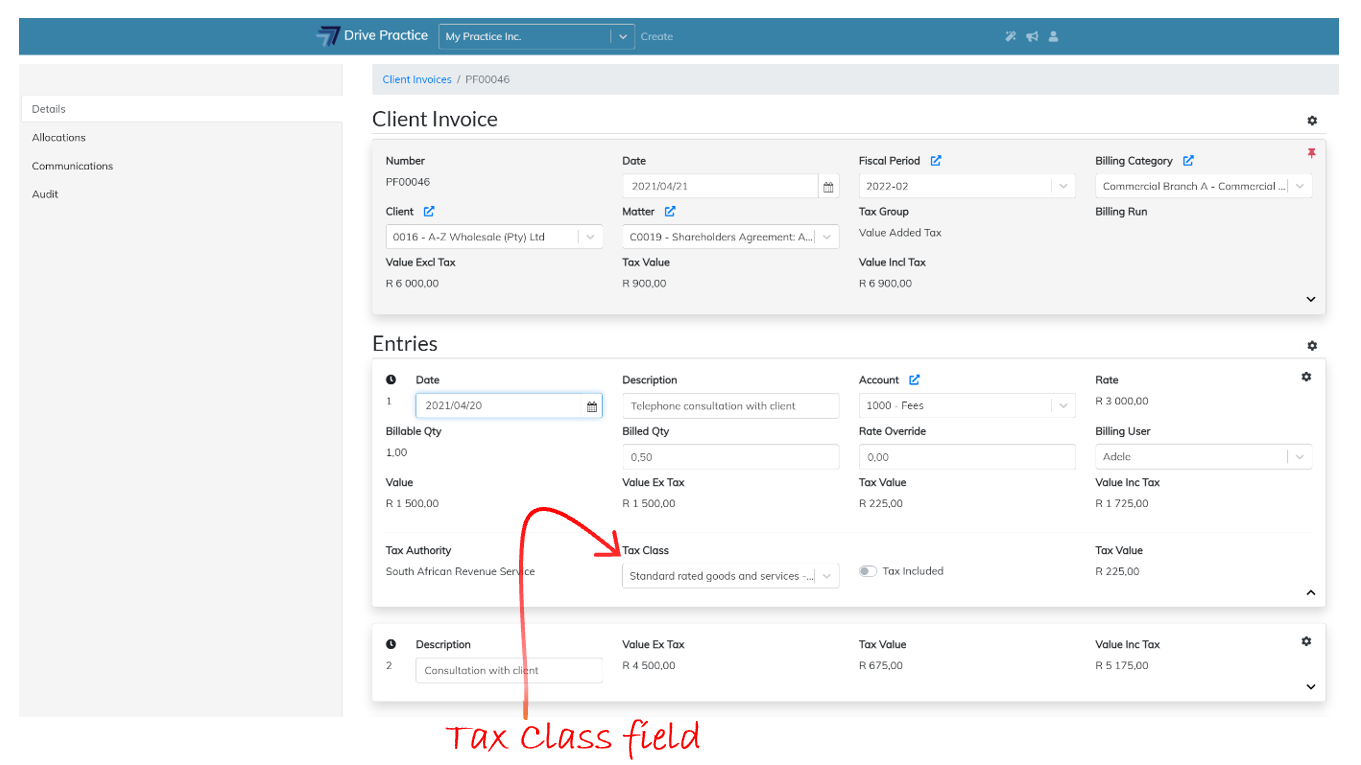
Tax Class
The Tax Class is inherited from the Tax Group settings on the invoice and can be edited on the entry. To change the Tax Class selected click on or tab to the Tax Class field and use the up and down arrows to select the required Tax Class and press enter to select or click on the required entry to select it.
-
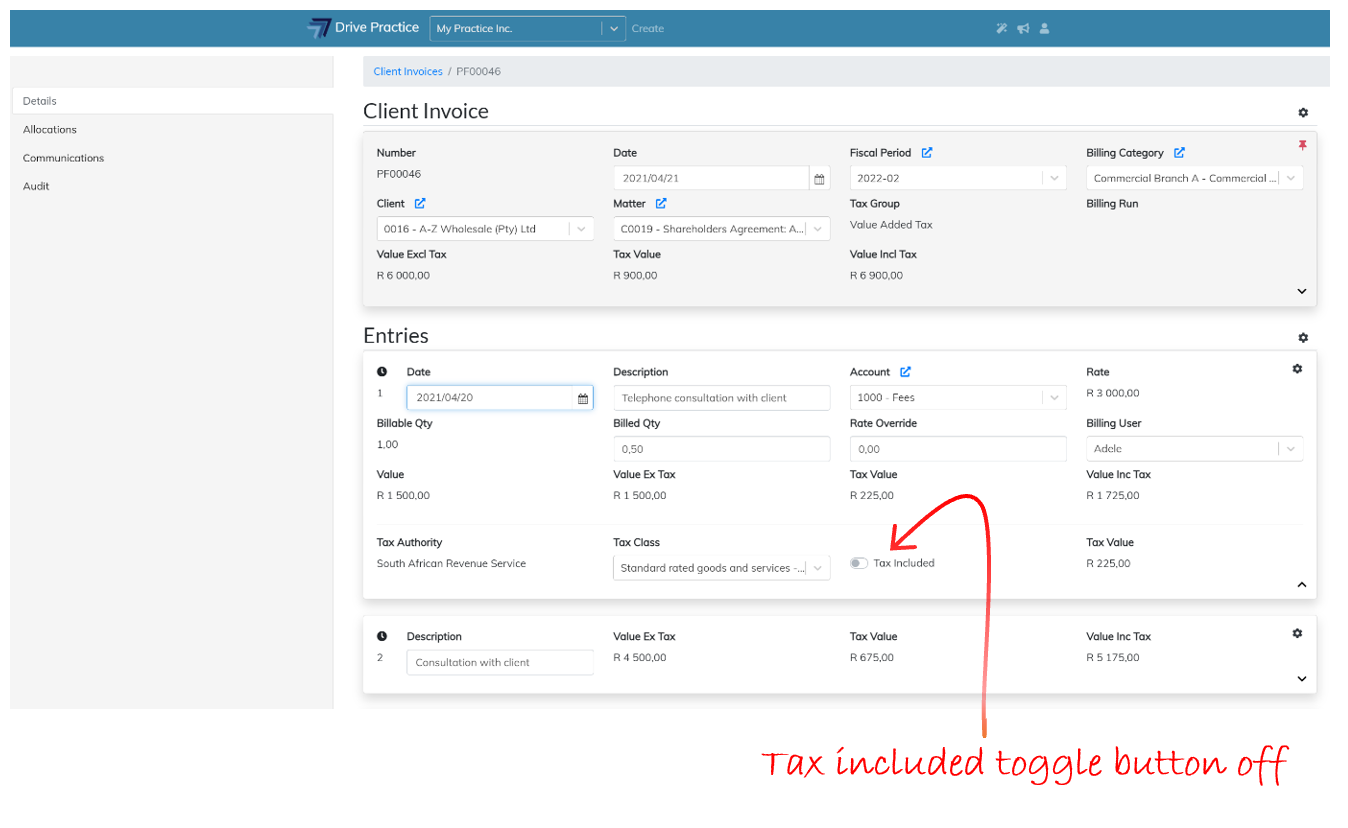
Tax Included
This field is a toggle button to turn Tax Included on or off. To change the calculation of tax from tax excluded to tax included, click on the right of the toggle to turn on Tax Included for the entry.
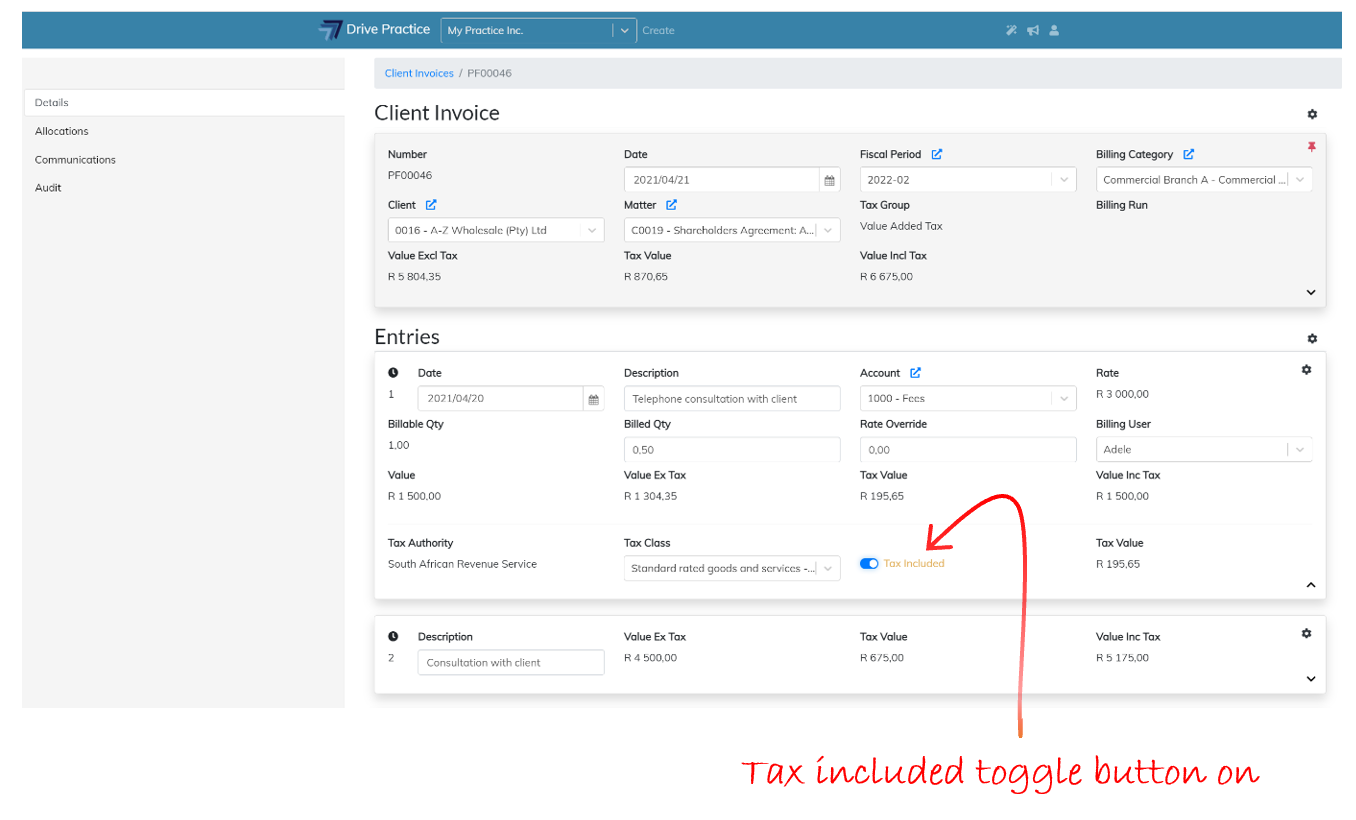
To turn off tax inclusion, click on the left of the toggle to set Tax Included off.
-
Tax Value
This field is a calculated field and cannot be edited and contains the value of the tax calculated for the entry based on the invoice tax settings or the entry tax settings if the entry tax settings differ to those of the invoice.
Delete Activity Entry
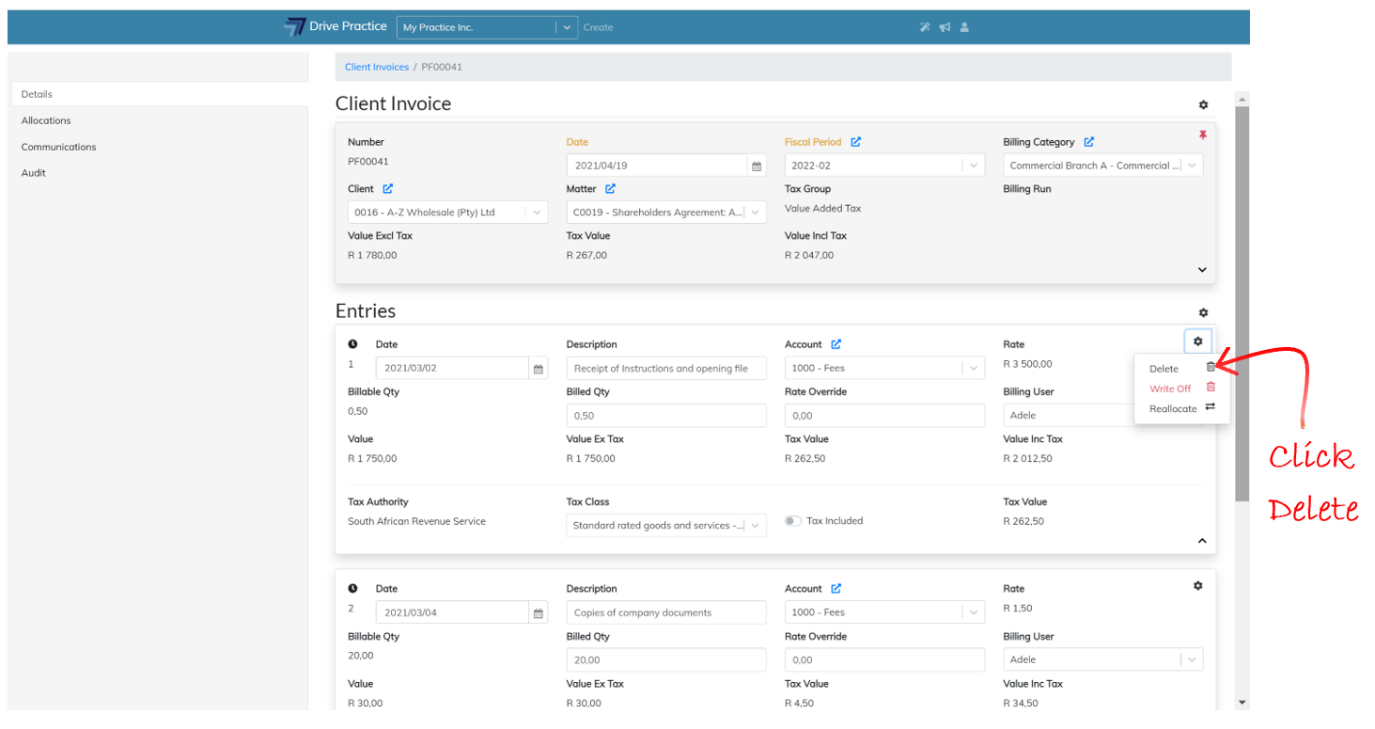
To delete an activity entry from the invoice, click on the Gear icon on the top right-hand side of the Entry card and select Delete.
Deleting the activity from the invoice will put the activity back into unbilled activities on the Matter when the invoice is saved. If the activity was deleted from the invoice in error, see how to use the Add Activities function here to add the entry back to the invoice.
Write Off Activity Entry
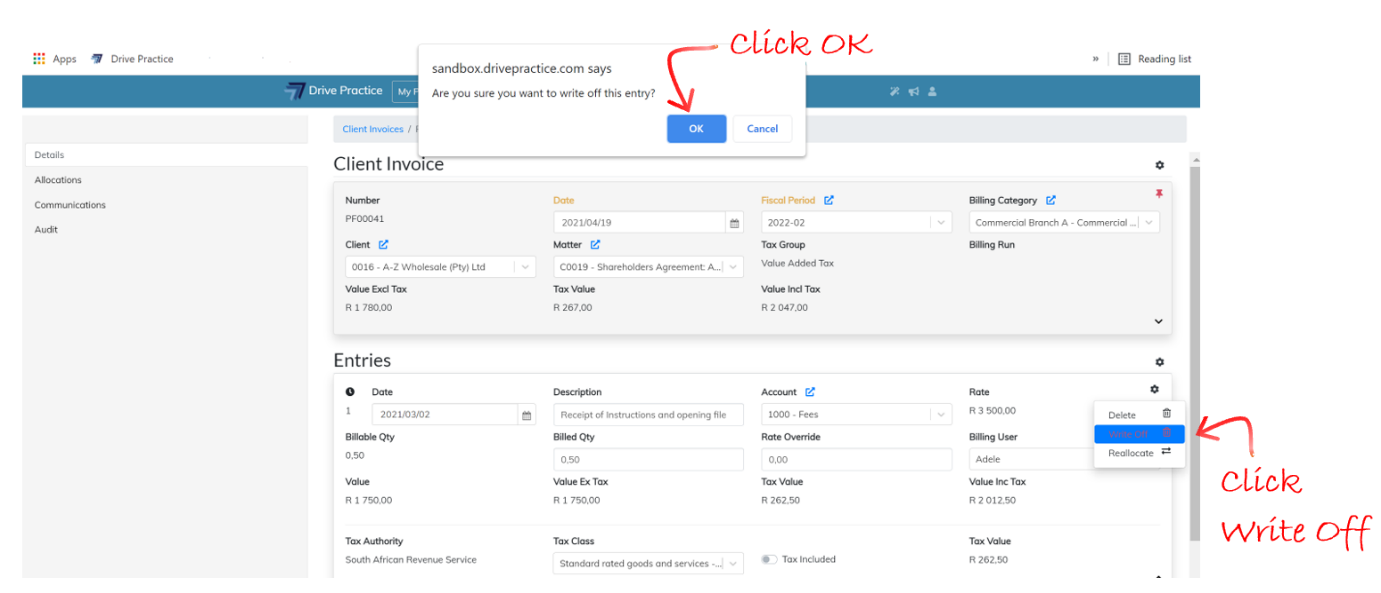
To write off an entry from the invoice, click on the Gear icon on the top right-hand side of the Entry card and select Write Off.
A dialogue box will open at the top of the screen to confirm that the entry must be written off. Click OK to write off the activity or Cancel to keep the activity entry.
The Write Off function will not put the activity back into unbilled activities on the Matter when the invoice is saved, and the activity will no longer be available to bill.
Reallocate Activity Entry
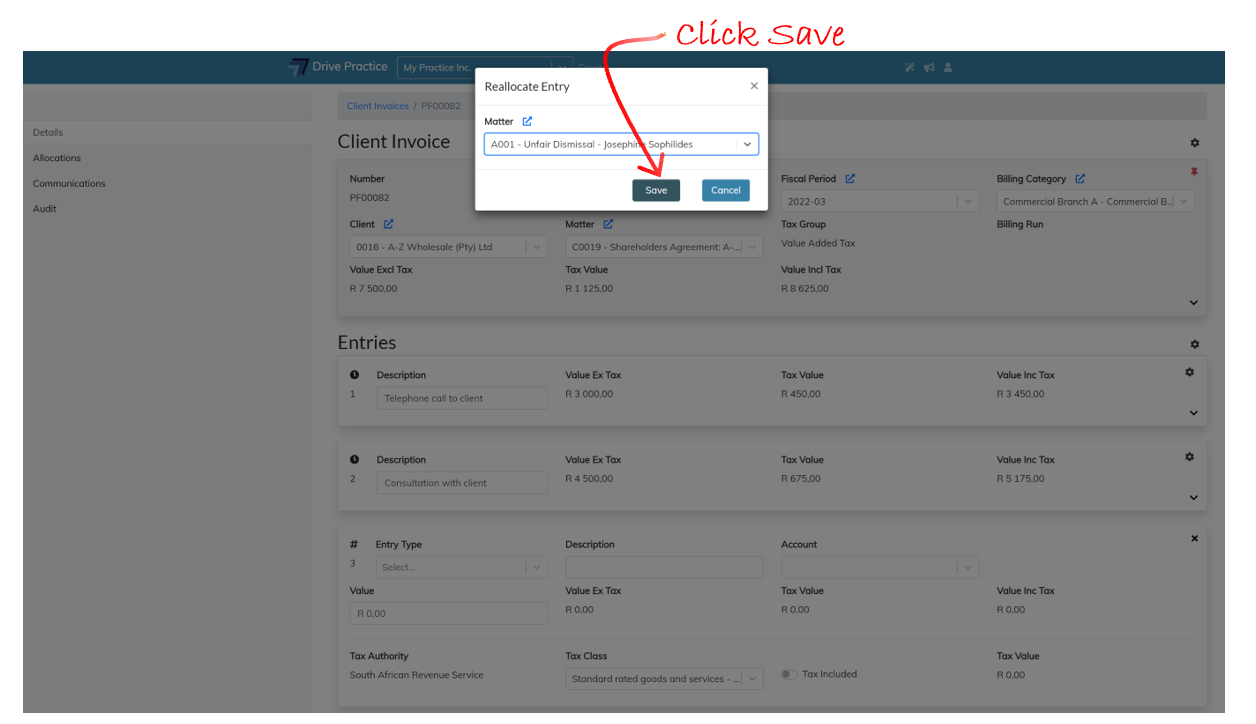
The Reallocate function is used to move an activity to another Matter. Click on the Gear icon on the top right-hand side of the Entry card and select Reallocate.

A dialogue box will open at the top of the screen where the new matter can be selected. Click on the Matter field and type in some characters of the matter/client name or number and use the up or down arrow keys to select the matter to which the activity should be reallocated to, or click on the matter to select the matter.
Click on Save to save the matter to which the activity should be allocated to or Cancel to not reallocate the activity to another matter.
Collapse Activity Entry
To Collapse an Activity entry, click on the Collapse icon on the bottom right-hand side of the entry card.
Add Disbursements to Client Invoice
When creating an invoice manually using any of the methods described in the Create Client Invoice section above, all the unbilled disbursements on a matter are added to the invoice and are listed below the activity entries on the invoice in date order. Unbilled disbursements will only be included on an invoice where these activities are dated on or before the invoice date.
If there are additional disbursements captured to a matter after the invoice was created that are required to reflect on the invoice, or to check if there are additional disbursements, click on the Gear icon above the first entry on the right and select Add Disbursements.

A message indicating that the invoice needs to be saved before loading the list of unbilled disbursements will pop up at the top center of the screen. Select OK to save the invoice and load the list of unbilled disbursements or Cancel to return to the invoice.
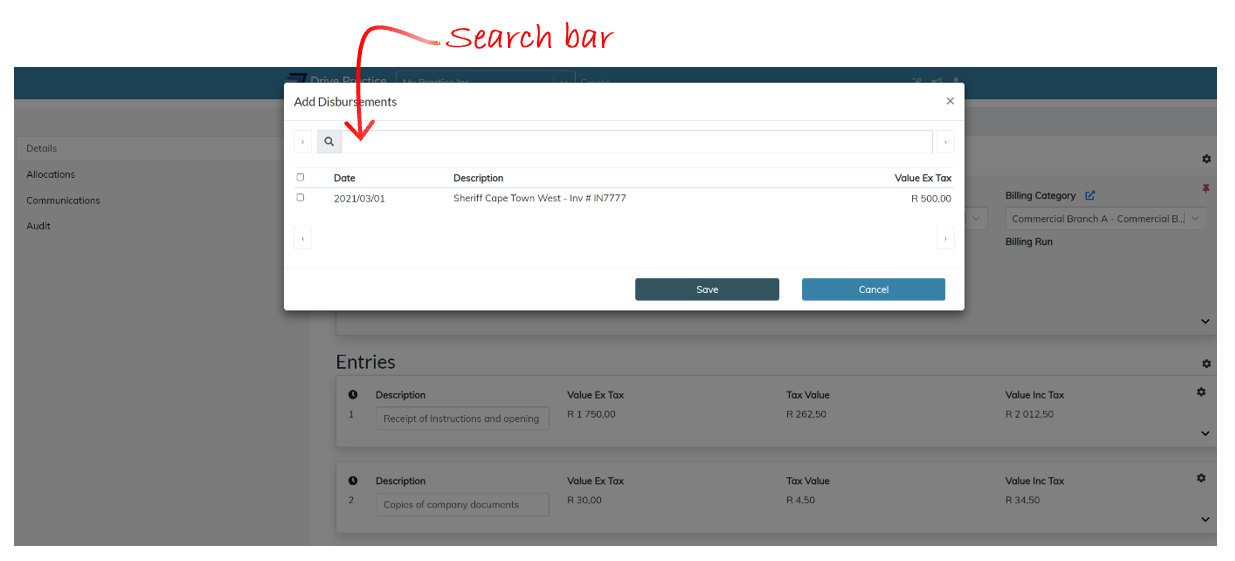
If OK is selected the Add Disbursements screen will pop up with the list of unbilled disbursements for the matter. The list will be empty if there are no unbilled disbursements dated on or before the invoice date.
Disbursements dated after the invoice date can only be added by changing the invoice date so that disbursements up to and including the new invoice dated can be listed for selection to add to the invoice.
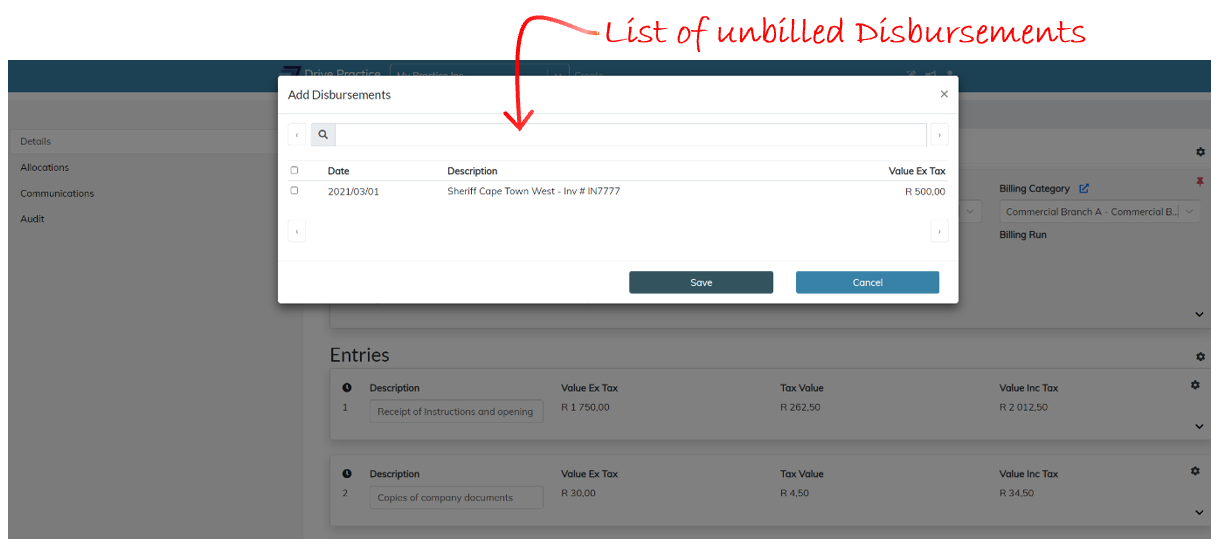
Unbilled disbursements for the matter will be listed in date order and the right and left arrows at the bottom of the list or on either side of the search bar can be used to page through the entries.
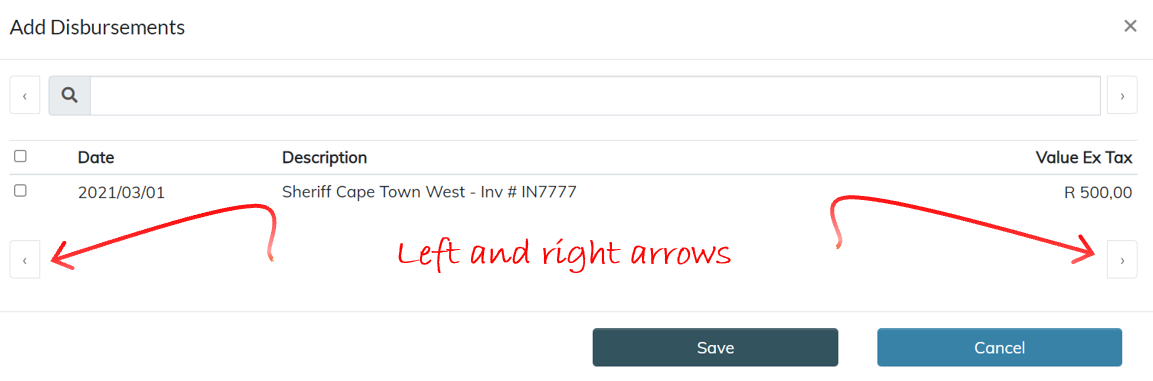
Use the search bar to search for any string of data in the description field of the unbilled disbursement in the list to find specific entries.
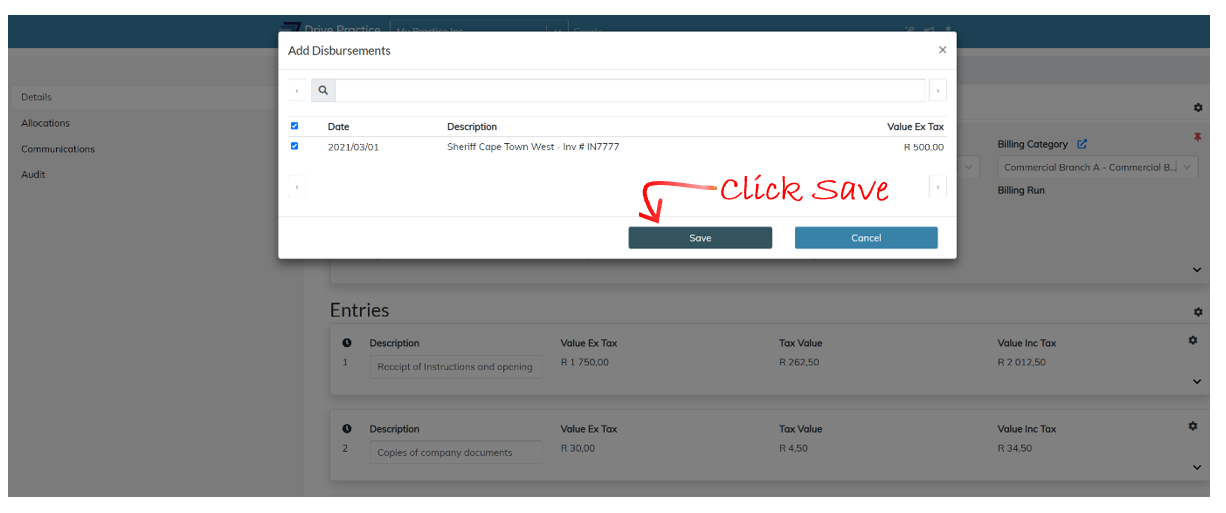
Click on the check box next to a disbursement to select the disbursement entry/entries to be added to the invoice or click on the checkbox in the header line to select all the entries.
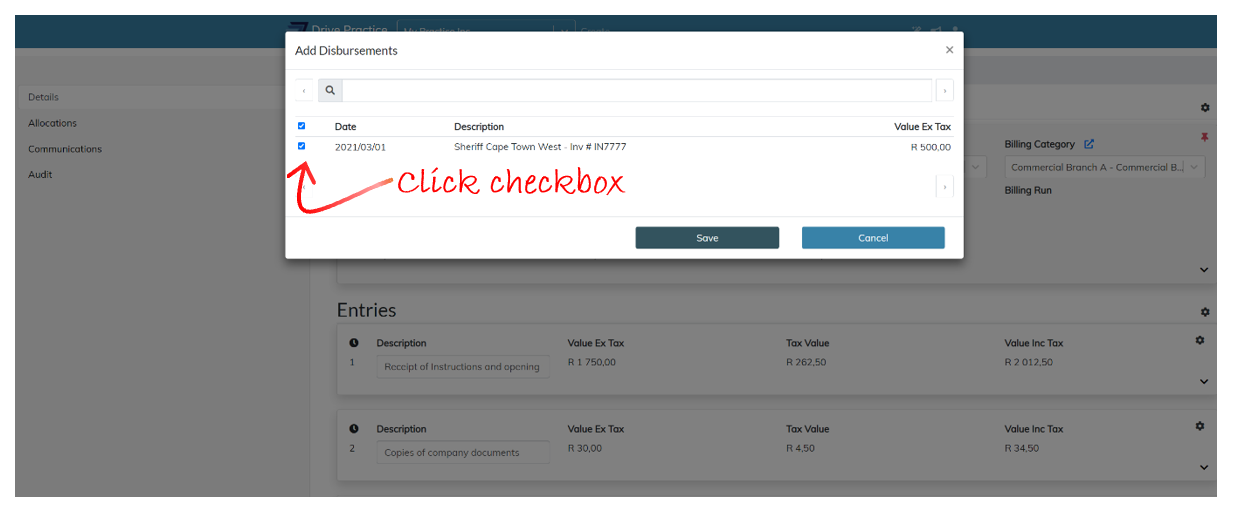
Click Save to add the entries or Cancel to close the popup window and return to the invoice.
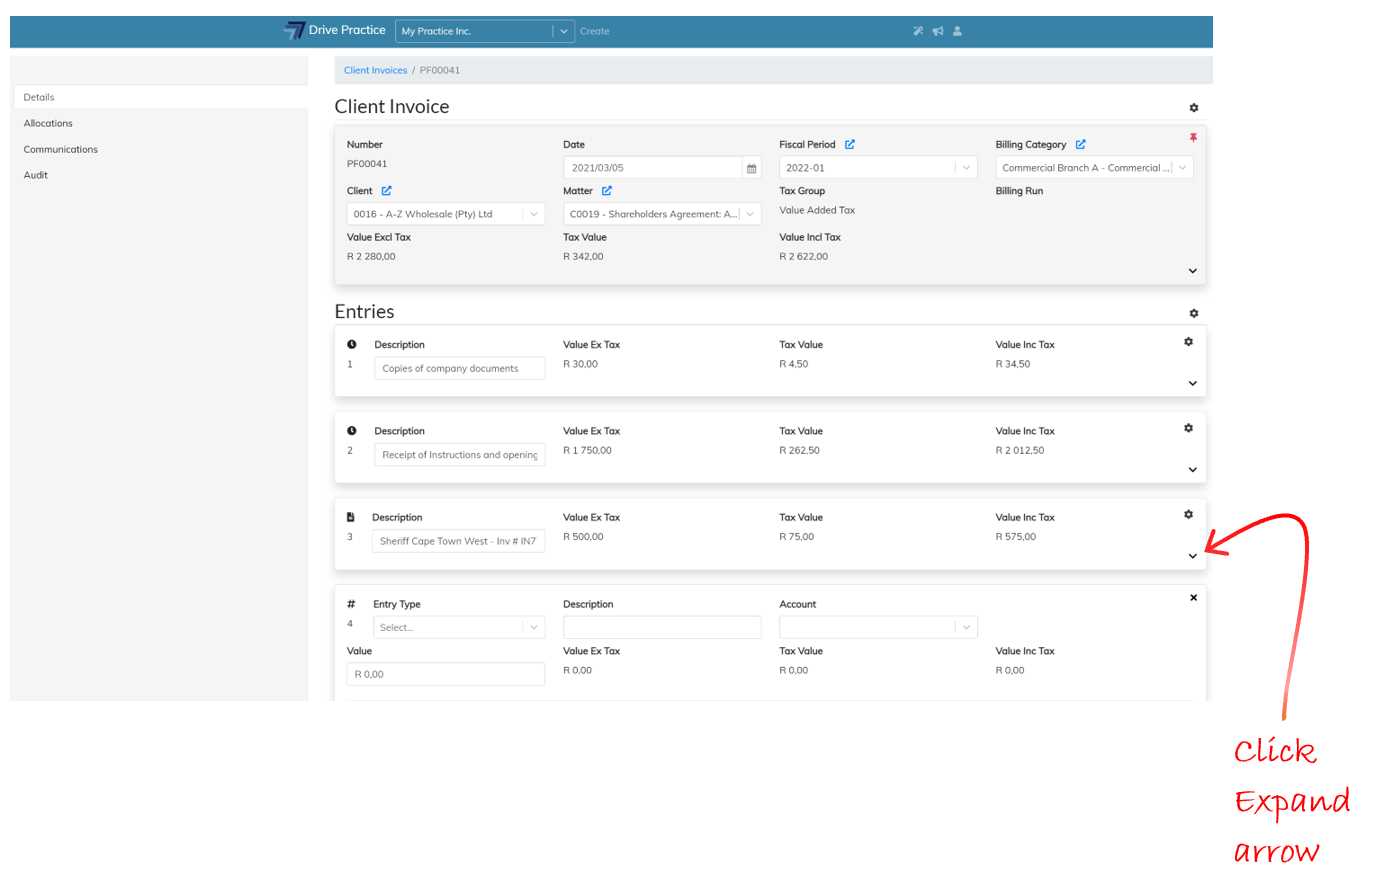
Edit Disbursement Entry
To edit a Disbursement entry, click on the Expand arrow on the bottom right of the entry card.
To edit the fields in the expanded view, click on any one of the fields or use the Tab and Shift-Tab keys to move back and forward between the fields on the entry. The field name of each entry that is modified turns yellow to indicate that any changes that may have been made need to be saved to avoid losing the amendments.
Click on the Gear icon on the Client Invoice Header and select Save to save the changes or use the Ctrl-Enter shortcut key. A brief notification will appear at the top right of the screen indicating whether the save was successful or failed.
Saving can fail if there has been an extended period of no activity and the user has been automatically logged out, when connection to the internet has been lost, or when another user has updated the record in another browser. If a save fails, refresh the page using the browsers refresh button or by pressing the F5 function key, or login again and re-do the edits and execute the save again.
The fields on a Disbursement entry and how to edit them are described below.
-
Date
This field contains the date of the disbursement derived from the date of the supplier’s invoice from which the disbursement was generated. The date of a disbursement cannot be edited on a disbursement entry.
-
Description
The Description of the disbursement is the description given on the supplier’s invoice. The description of a disbursement cannot be edited on a disbursement entry.
-
Value
The Value field is the amount of the supplier’s invoice and cannot be edited.
-
Value ex Tax
This field contains the amount of the entry excluding tax as it is on the supplier’s invoice and cannot be edited.
-
Tax Value
The Tax Value field is the tax as it is on the supplier’s invoice, unless the tax amount is greater than zero and the client is not taxable, whereupon it will be set to zero. The Tax Value field cannot be edited.
-
Value Inc Tax
This field is the value including tax as it is on the supplier’s invoice, unless the tax amount is greater than zero and the client is not taxable, whereupon it will be set to the value excluding tax. The Value Inc Tax field cannot be edited.
-
Tax Authority
The Tax Authority field cannot be edited as it is derived from the Tax Group set for the invoice. To change the Tax Authority, read the Change Tax Group instructions.
-
Tax Class
The Tax Class is inherited from the Tax Group settings on the invoice and can be edited on the entry. To change the Tax Class selected click on or tab to the Tax Class field and use the up and down arrows to select the required Tax Class and press enter to select or click on the required entry to select it.
-
Tax Included
This field is a toggle button to turn Tax Included on or off. To change the calculation of tax from tax excluded to tax included, click on the right of the toggle to turn on Tax Included for the entry.
To turn off tax inclusion, click on the left of the toggle to set Tax Included off.
-
Tax Value
This field is a calculated field and cannot be edited and contains the value of the tax calculated for the entry based on the invoice tax settings or the entry tax settings if the entry tax settings differ to those of the invoice.
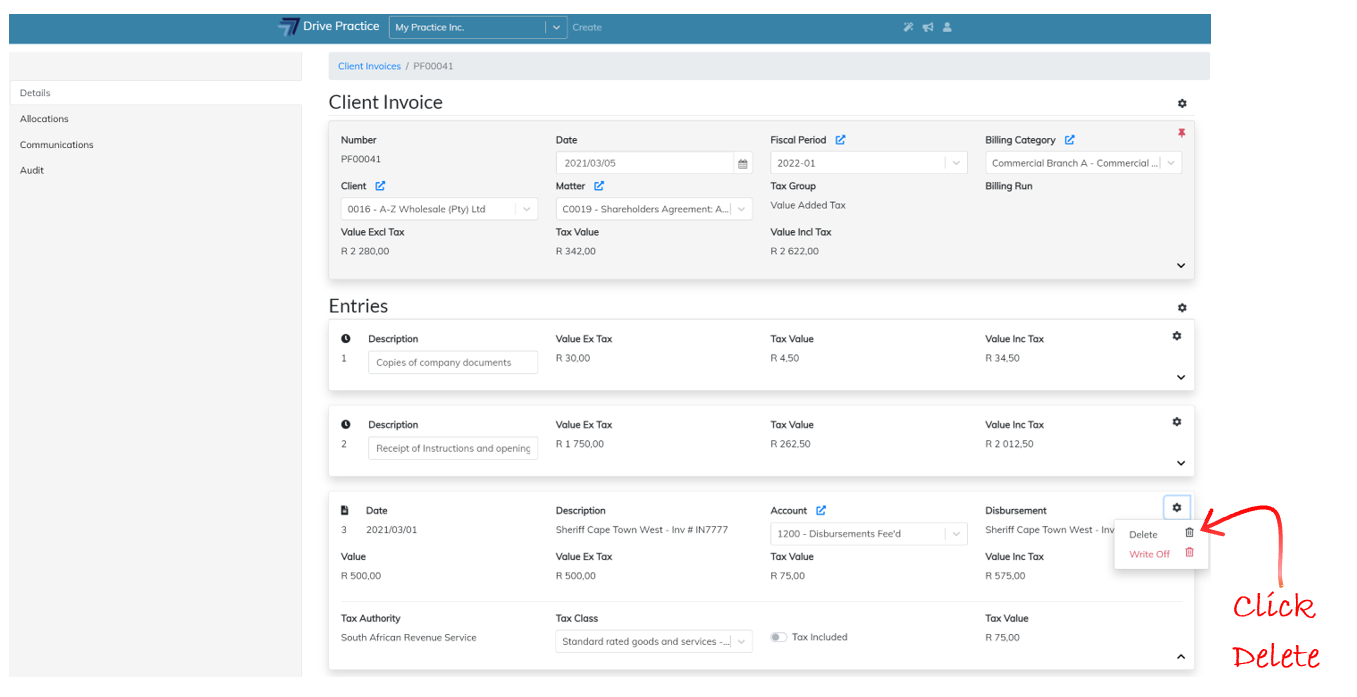
Delete Disbursement Entry
To delete a disbursement entry from the invoice, click on the Gear icon on the top right-hand side of the Entry card and select Delete.
Deleting the disbursement from the invoice remove the “Invoiced On” invoice number from the disbursement on the Matter when the invoice is saved.
If the disbursement was deleted from the invoice in error, see how to use the Add Disbursements function here to add the entry back to the invoice.
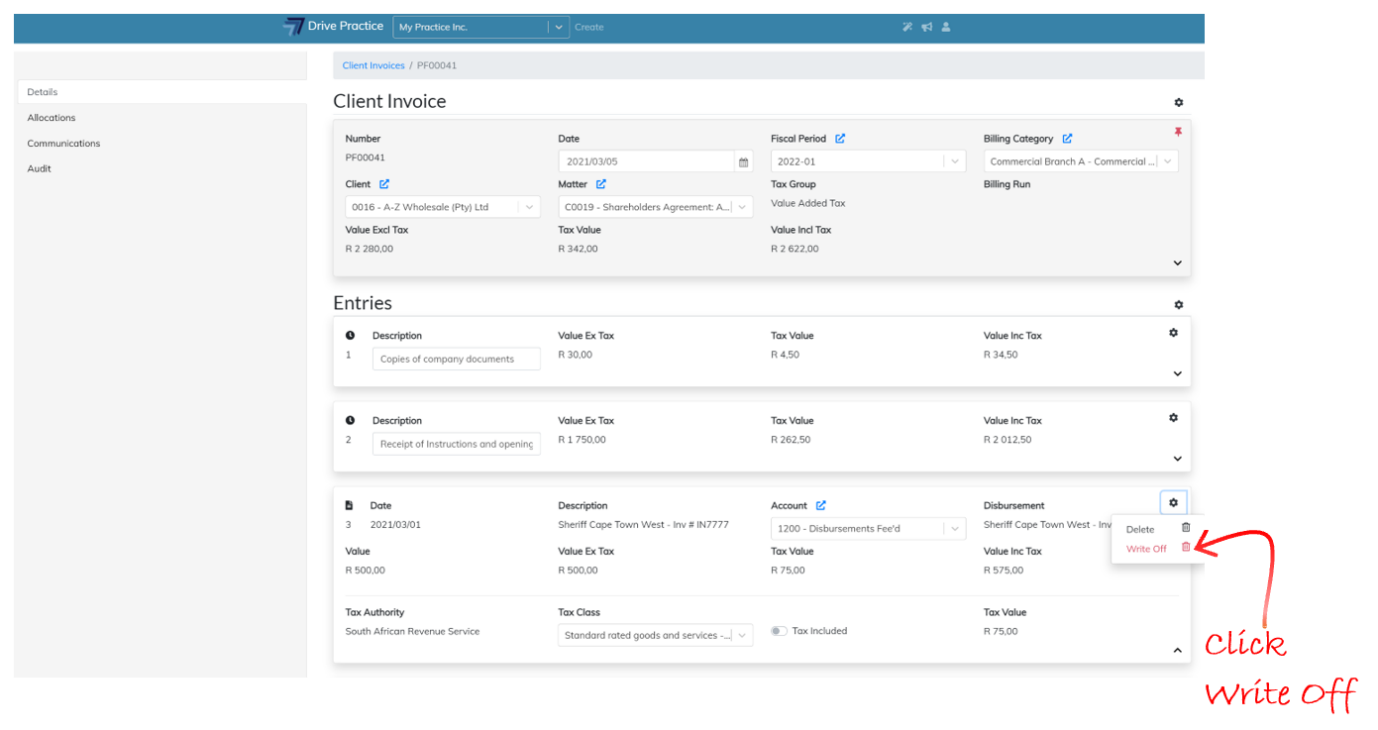
Write off Disbursement Entry
To write off a disbursement entry, click on the Gear icon on the top right-hand side of the Entry card and select Write Off.
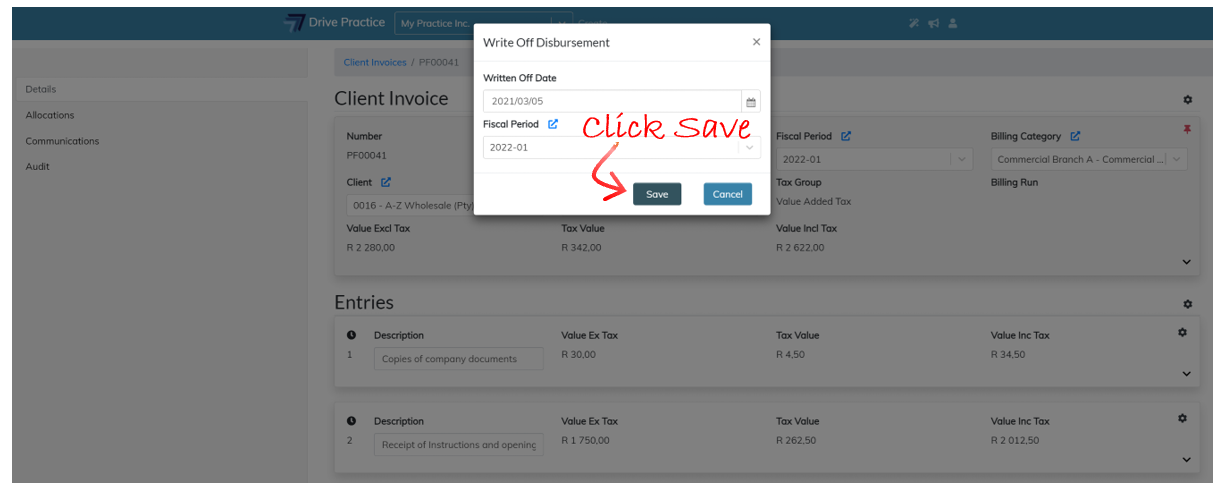
A dialogue box will open at the top of the screen to confirm the Date and Fiscal Period for the journal created to expense the disbursement that the entry must be written off. Click Save to write off the disbursement or Cancel to keep the disbursement entry.
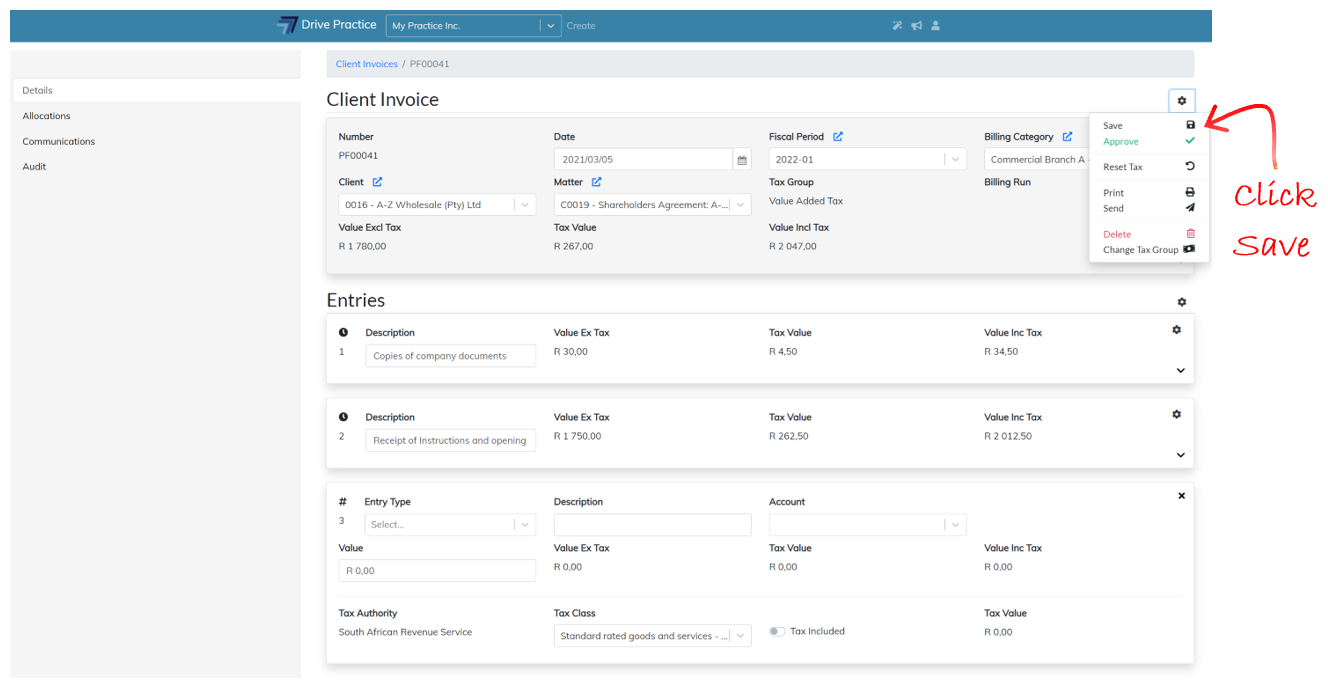
Save the invoice to permanently write off the entry by clicking on the Gear icon at the top right-hand side of the Header and select Save or use the shortcut Ctrl-Enter key.
Saving can fail if there has been an extended period of no activity and the user has been automatically logged out, when connection to the internet has been lost, or when another user has updated the record in another browser. If a save fails, refresh the page using the browsers refresh button or by pressing the F5 function key, or login again and redo the delete and execute the save again.
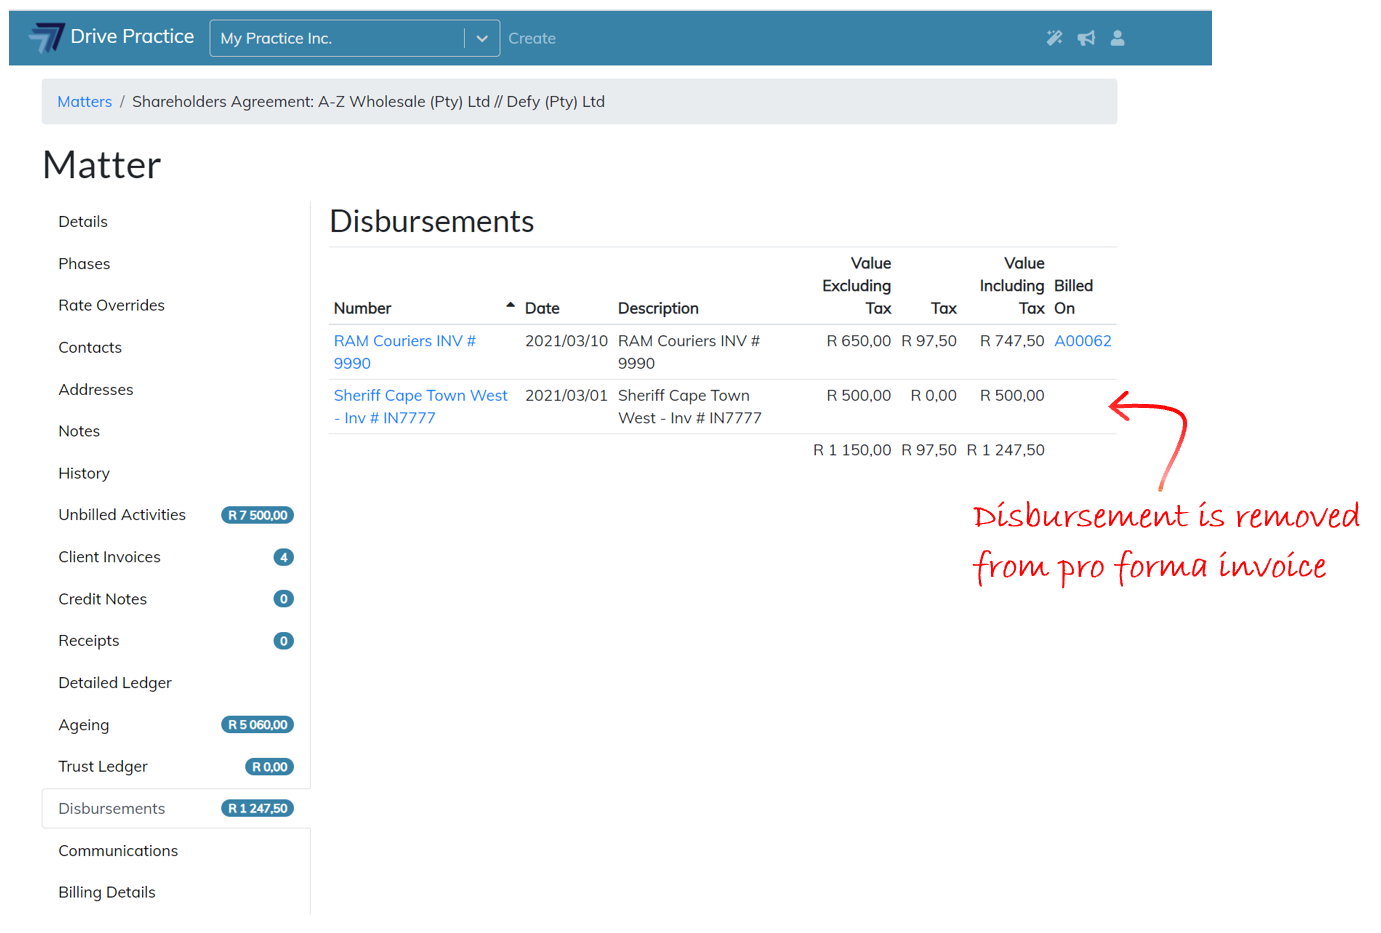
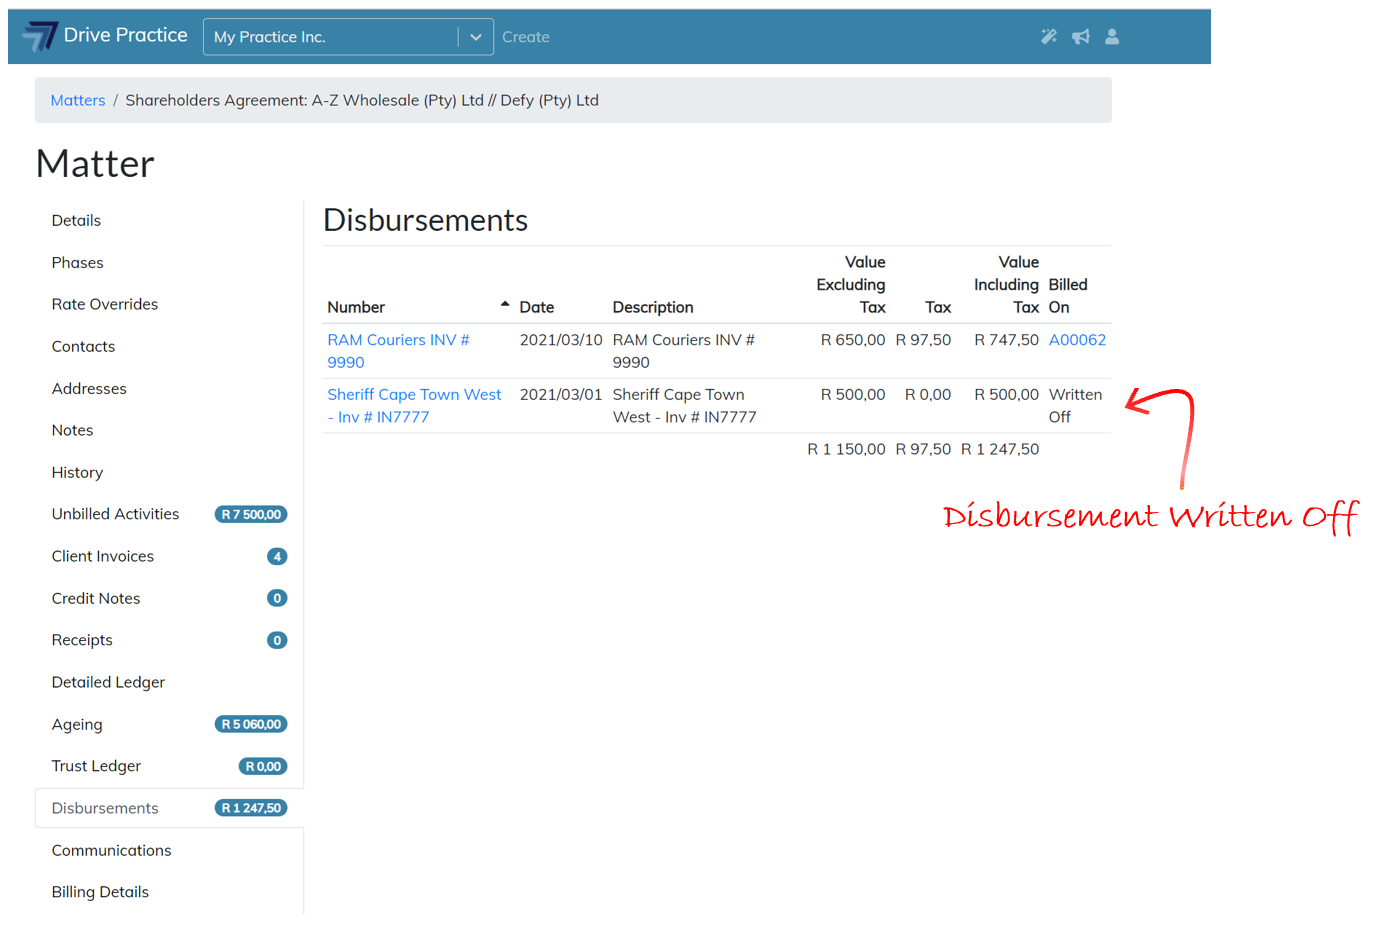
The Write Off function will replace the invoice number on the “Billed On” field on the Disbursements tab of the Matter with “Written Off” when the invoice is saved. The disbursement will no longer be available to bill.
Collapse Disbursement Entry
To Collapse a Disbursement entry, click on the Collapse icon on the bottom right-hand side of the entry card.
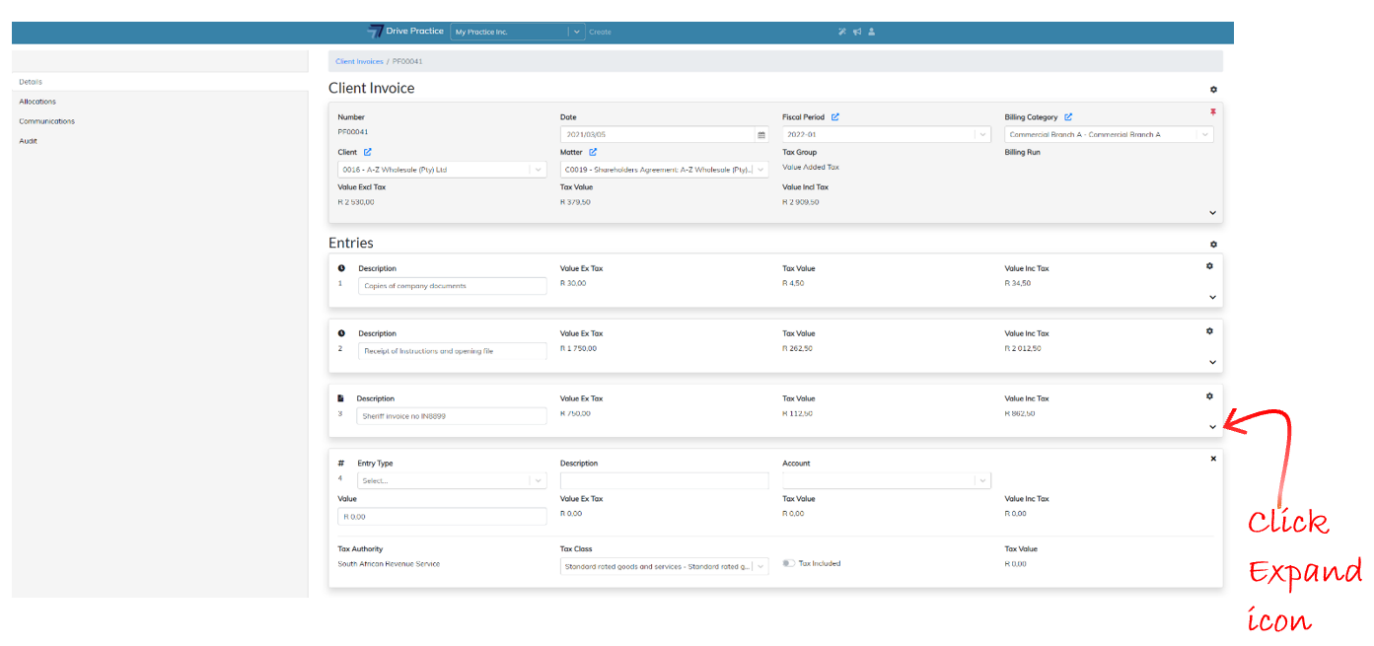
Expand Disbursement Entry
To Expand a Disbursement entry, click on the Expand icon on the bottom right-hand side of the entry card.
Reorder Entries
When adding, editing, and removing in entries to the invoice the entries can get out of sequence. Entries are sequenced in the following order on the invoice:
- Activities
- Disbursements
- General Lines
- Percentage Lines
To reorder the invoice entries into this sequence, click on the Gear icon on the top right-hand side of the first Entry and select Reorder Entries. The invoice entry sequencing rule will be applied. Save the invoice by clicking on the Gear icon on the top right-hand side of the Header and select Save or use the shortcut Ctrl-Enter key to save the invoice.
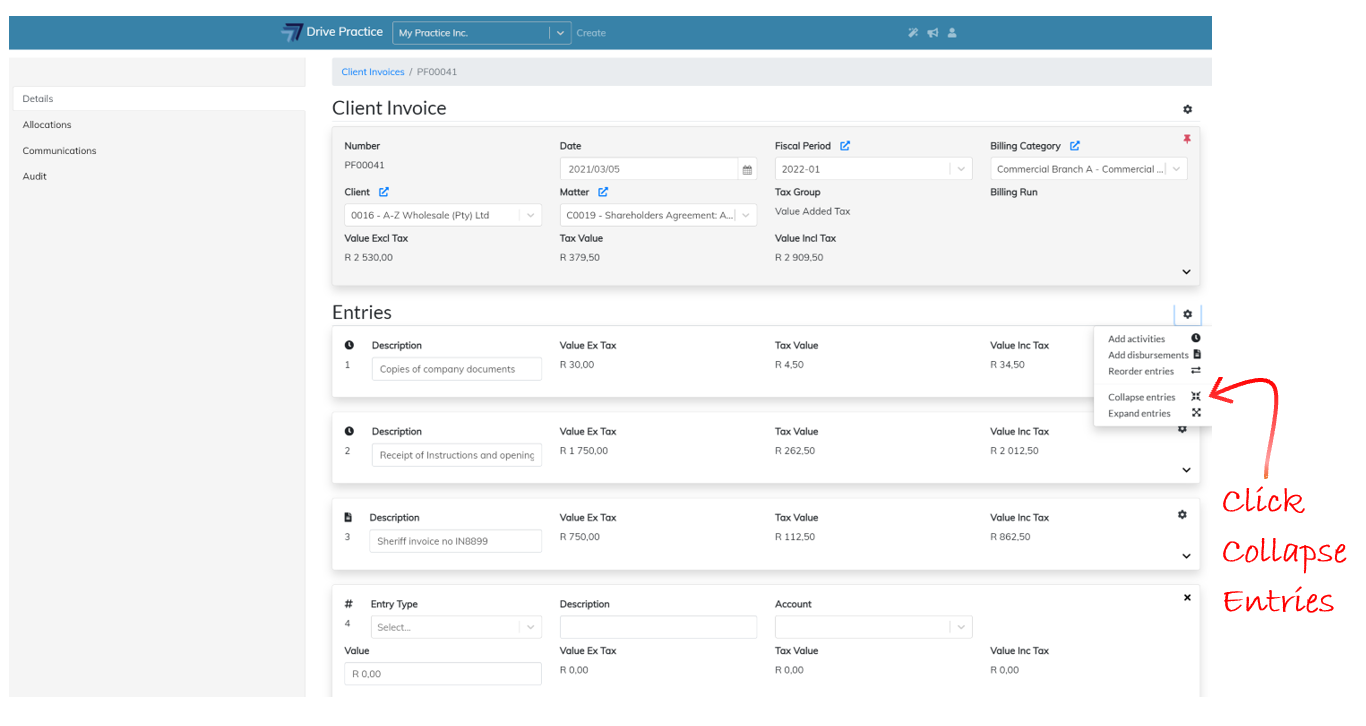
Collapse All Entries
To collapse all the entries on the invoice, click on the Gear icon on the top right-hand side of the first Entry and select Collapse All Entries.
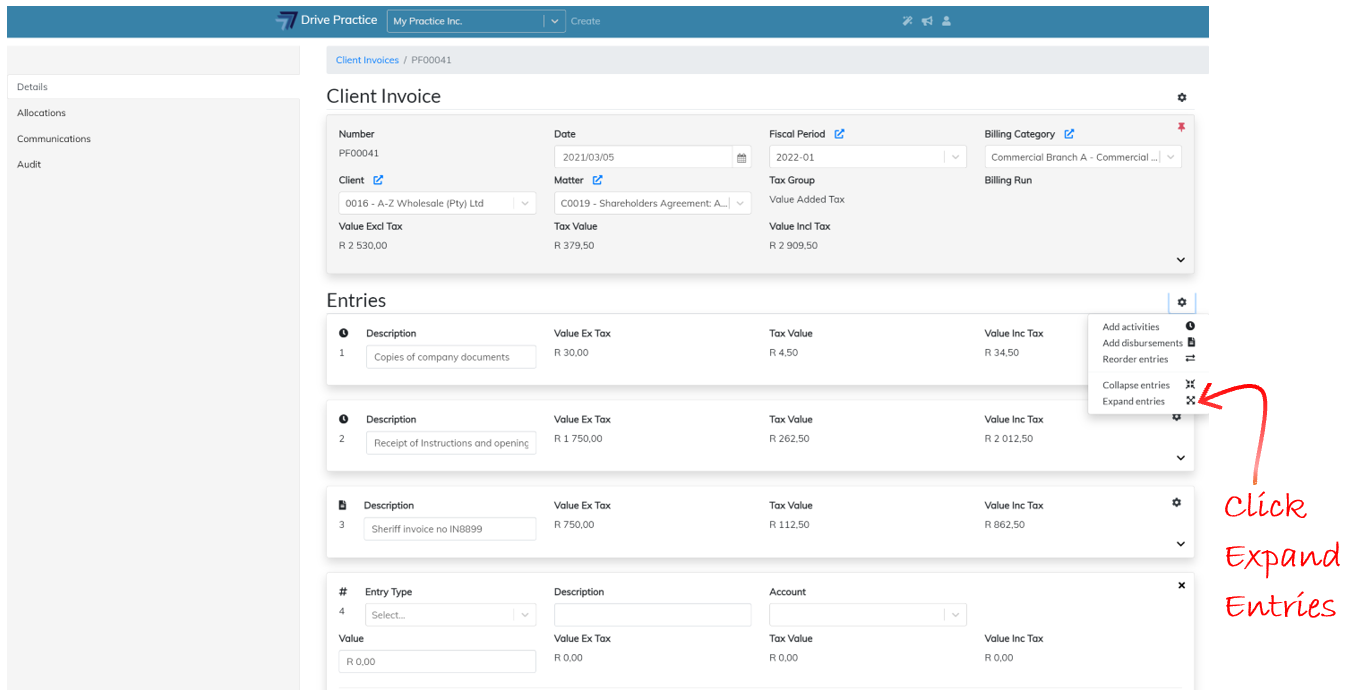
Expand All Entries
To expand all the entries on the invoice, click on the Gear icon on the top right-hand side of the first Entry and select Expand All Entries.
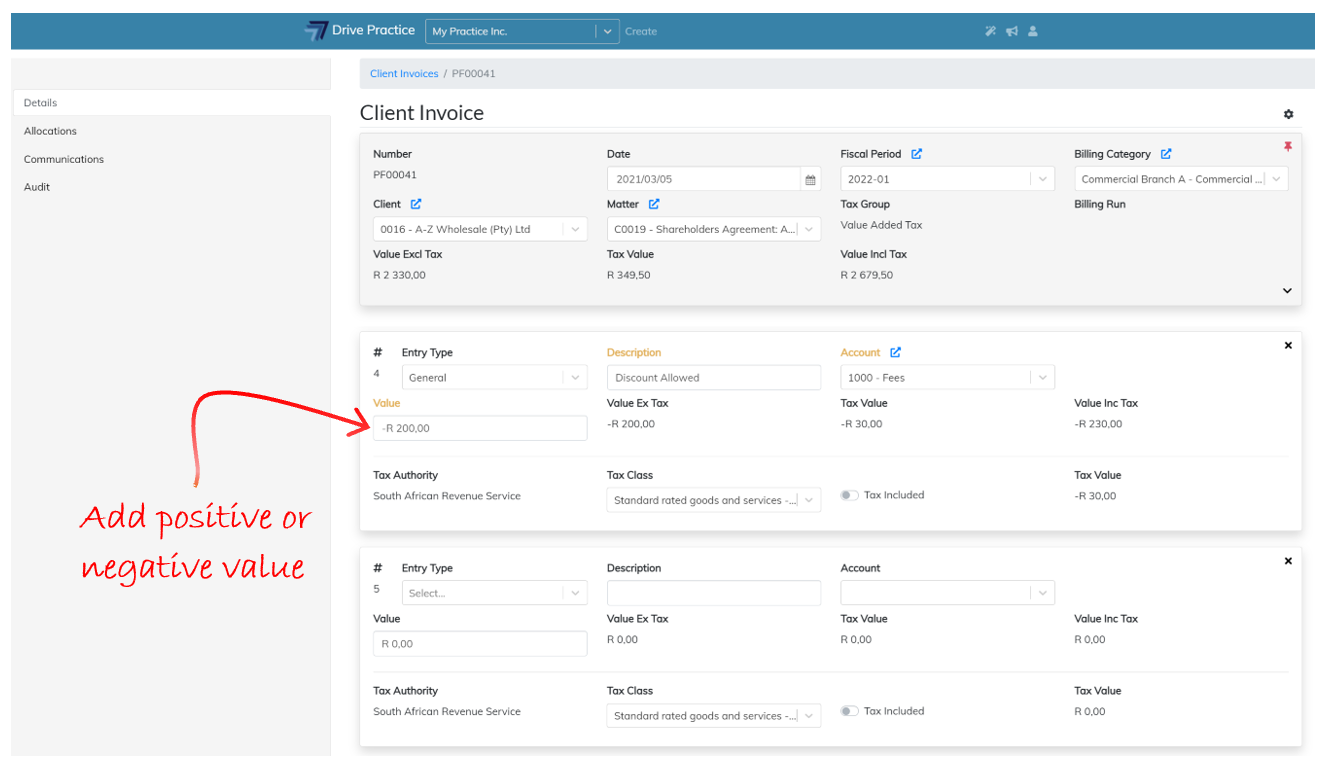
Add General Line to Client Invoice
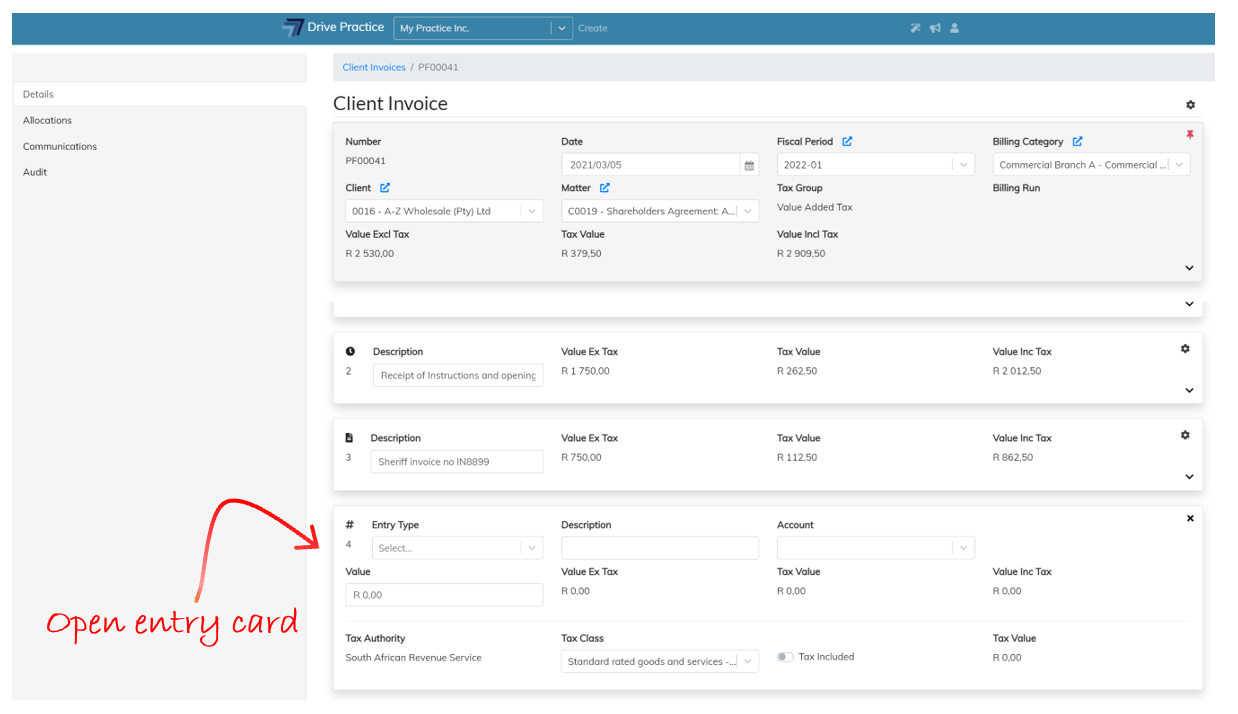
Below the last entry on the invoice is an open entry card which is used to add General Lines or Percentage Lines to the invoice.

General lines can be captured as positive or negative amounts and are used for entering fixed fees (positive amount) or discounts (negative amounts) on an invoice.
Navigate between the fields on a general line entry by clicking on a field or using the Tab and Shift-Tab keys.
To add a General Line, click on the Entry Type field and select General. The fields for a General Line are explained below.
-
Description
Enter a Description for the General line.
-
Account
This field will allocate the General Line to a General Ledger account. Enter some characters of the account name or the account number to filter the list of accounts and then select the account from the filtered by clicking on the account or by using the up and down arrow keys and press enter on the account to select it.
-
Value
The Value field is the amount of the General Line. Enter a positive amount or enter a negative amount using the minus sign to denote that the amount is negative.
-
Value Ex Tax
This field contains the amount of the entry excluding tax and is a calculated field and cannot be edited. If the tax settings are set to Include Tax, the Value ex Tax will be different to the Value field and if the tax settings are set to not be tax inclusive, the Value ex Tax field will be the same as the Value field.
-
Tax Value
The Tax Value field is the tax calculated on the entry based on the tax settings for the invoice, and the entry if the entry tax settings differ from the invoice settings. The Tax Value field cannot be edited.
-
Value Inc Tax
This field is a calculated field based on the tax settings for the invoice, or for the entry if the tax settings differ on the entry to the tax settings on the invoice. The amount in the field is the calculated value of the entry including tax and as a calculated field, cannot be edited.
-
Tax Authority
The Tax Authority field cannot be edited as it is derived from the Tax Group set for the invoice. To change the Tax Authority, read the Change Tax Group instructions.
-
Tax Class
The Tax Class is inherited from the Tax Group settings on the invoice and can be edited on the entry. To change the Tax Class selected click on or tab to the Tax Class field and use the up and down arrows to select the required Tax Class and press enter to select or click on the required entry to select it.
-
Tax Included
This field is a toggle button to turn Tax Included on or off. To change the calculation of tax from tax excluded to tax included, click on the right of the toggle to turn on Tax Included for the entry.
To turn off tax inclusion, click on the left of the toggle to set Tax Included off.

-
Tax Value
This field is a calculated field and cannot be edited and contains the value of the tax calculated for the entry based on the invoice tax settings or the entry tax settings if the entry tax settings differ to those of the invoice.
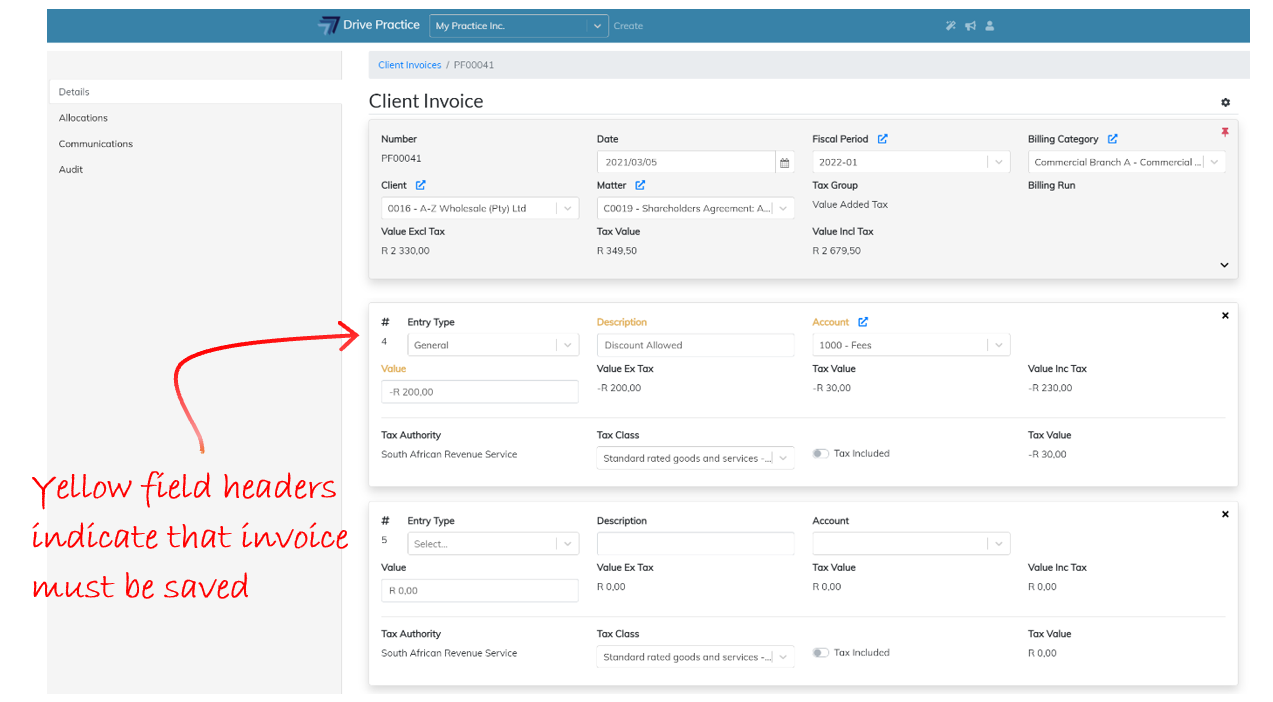
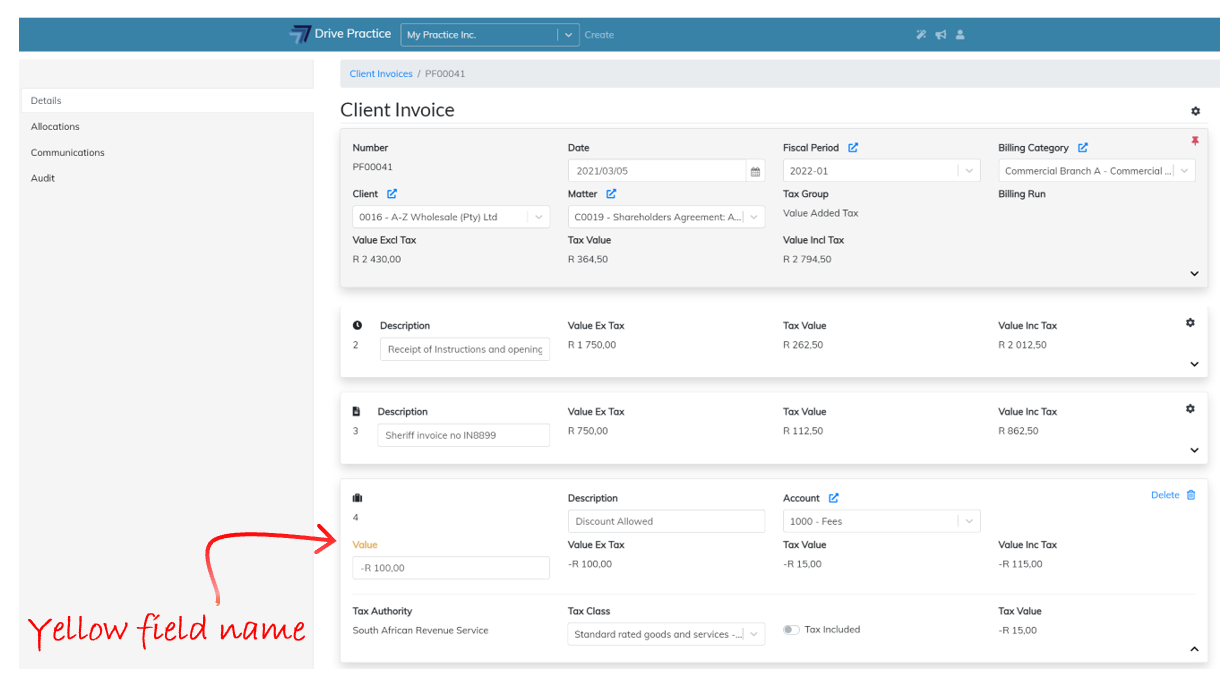
The field name(s) of the field(s) that have been edited turn yellow to indicate that the General Line must be saved.
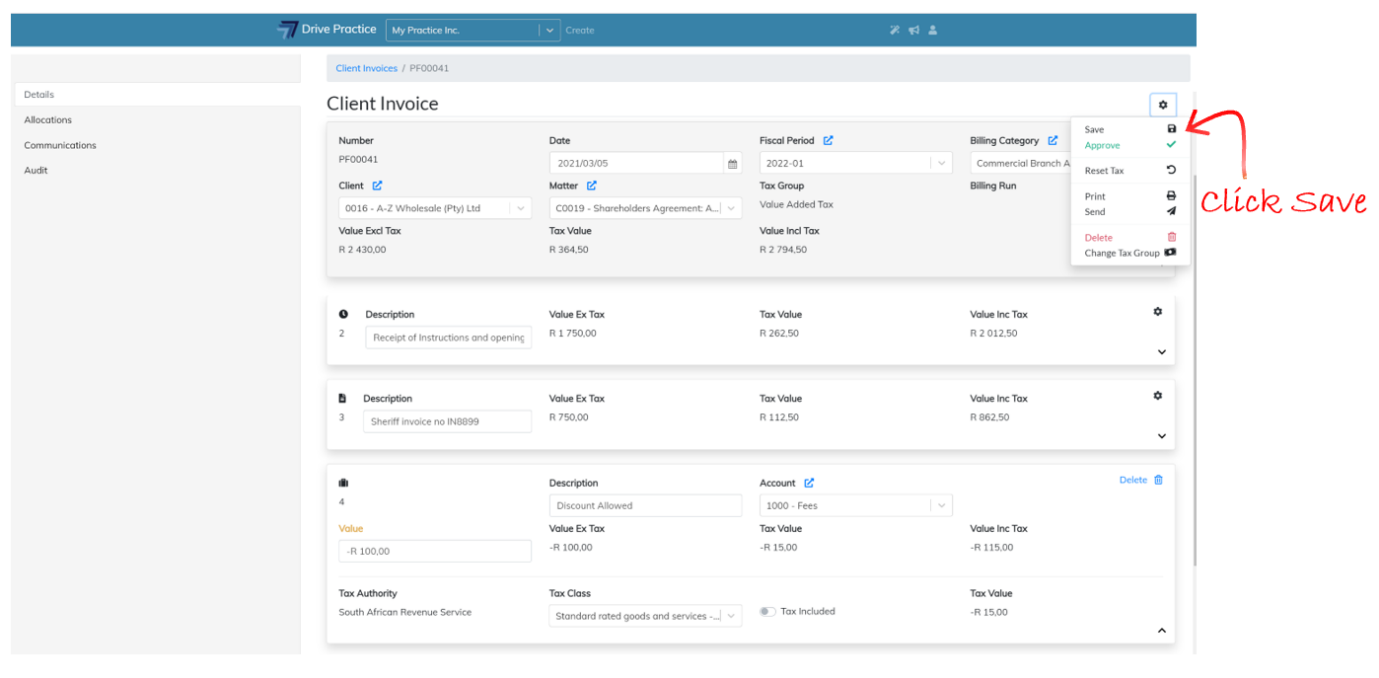
Complete all the fields of the General Line and then save the invoice by clicking on the Gear icon at the top right-hand side of the Header and select Save or use the shortcut Ctrl-Enter key.

Saving can fail if there has been an extended period of no activity and the user has been automatically logged out, when connection to the internet has been lost, or when another user has updated the record in another browser. If a save fails, refresh the page using the browsers refresh button or by pressing the F5 function key, or login again and recapture the fields and execute the save again.
Edit General Line Entry
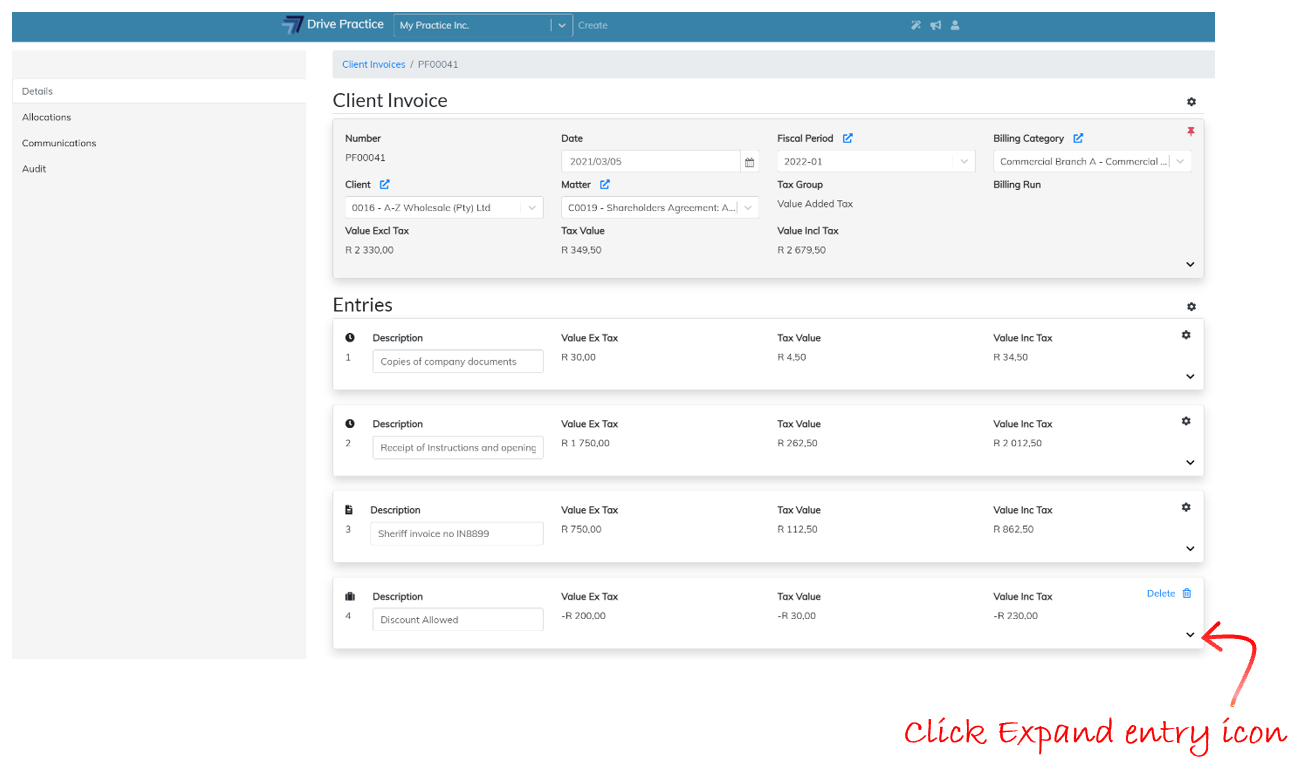
To edit a General Line Entry, expand the entry if it is collapsed using the Expand entry icon on the bottom right-hand side of the General Line entry card.
Click on the field to be edited and/or use the Tab and Shift-Tab keys to navigate through the fields.
The field name(s) of the field(s) that have been edited turn yellow to indicate that the General Line must be saved.
Once all the edits are complete save the invoice by clicking on the Gear icon at the top right-hand side of the Header and select Save or use the shortcut Ctrl-Enter key.
Saving can fail if there has been an extended period of no activity and the user has been automatically logged out, when connection to the internet has been lost, or when another user has updated the record in another browser. If a save fails, refresh the page using the browsers refresh button or by pressing the F5 function key, or login again and redo the edits and execute the save again.
Delete General Line Entry
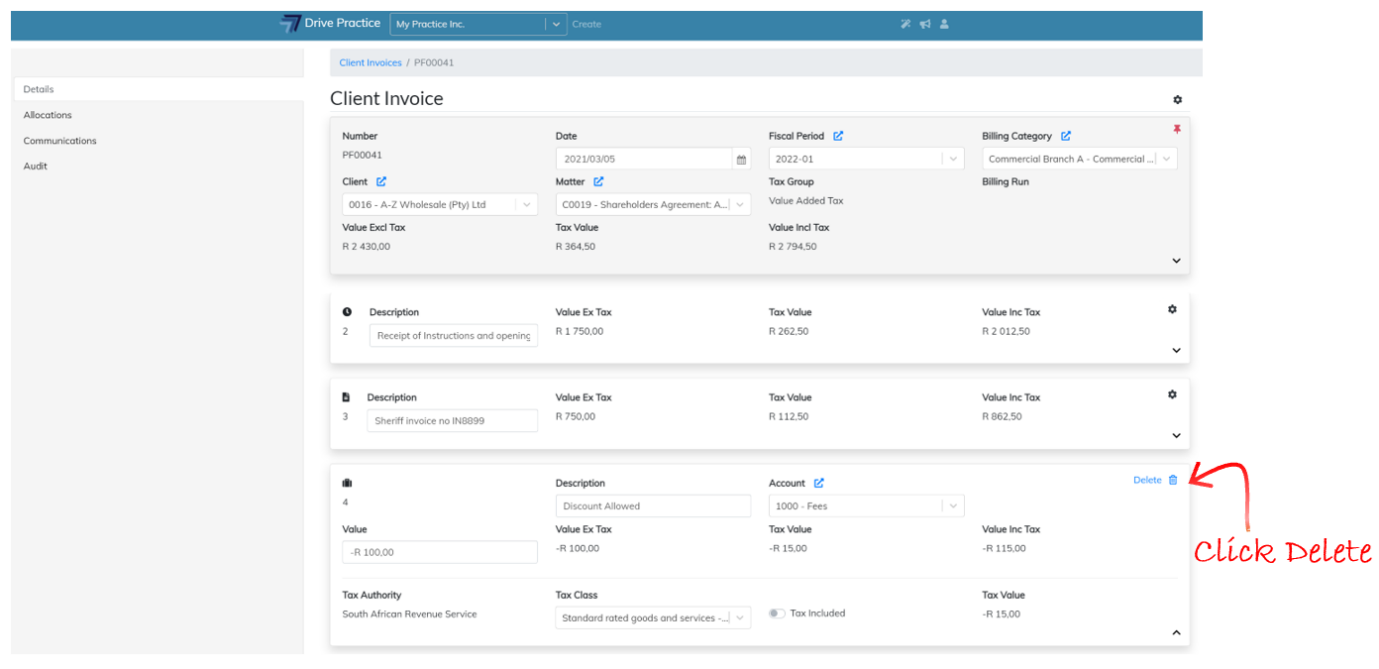
To delete a General Line entry, click on the Delete icon on the top right-hand side of the General Line entry card.
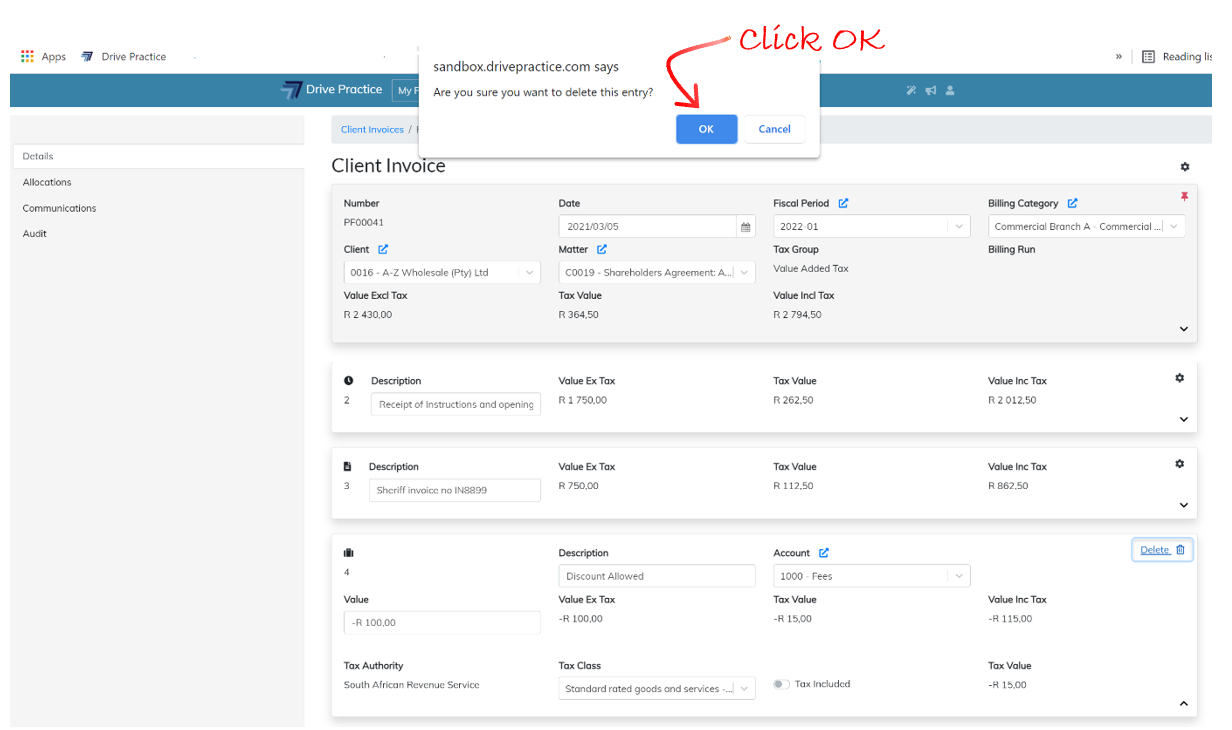
A dialog box will appear at the top of the screen requesting confirmation of the delete action. Click Ok to delete the entry or Cancel to cancel the delete and return to the invoice.
Save the invoice to permanently delete the entry by clicking on the Gear icon at the top right-hand side of the Header and select Save or use the shortcut Ctrl-Enter key.
Saving can fail if there has been an extended period of no activity and the user has been automatically logged out, when connection to the internet has been lost, or when another user has updated the record in another browser. If a save fails, refresh the page using the browsers refresh button or by pressing the F5 function key, or login again and redo the delete and execute the save again.
Collapse General Line Entry
To Collapse a General Line entry, click on the Collapse icon on the bottom right-hand side of the entry card.

Expand General Line Entry
To Expand a General Line entry, click on the Expand icon on the bottom right-hand side of the entry card.

Add % Line to Client Invoice
Below the last entry on the invoice is an open entry card which is used to add General Lines or Percentage Lines to the invoice.
Percentage lines can be captured as positive or negative amounts and are used for entering a positive or negative percentage to be calculated on the parameter chosen.
Navigate between the fields on a Percentage line entry by clicking on a field or using the Tab and Shift-Tab keys.
To add a Percentage Line, click on the Entry Type field and select Percentage. The fields for a Percentage Line are explained below.
Description
Enter a Description for the Percentage line.
Account
This field will allocate the Percentage Line to a General Ledger account. Enter some characters of the account name or the account number to filter the list of accounts and then select the account from the filtered by clicking on the account or by using the up and down arrow keys and press enter on the account to select it.
Percentage
The Percentage field is the percentage to be used to calculate the Value of the entry. Enter a positive amount or enter a negative amount using the minus sign to denote that the amount is negative.
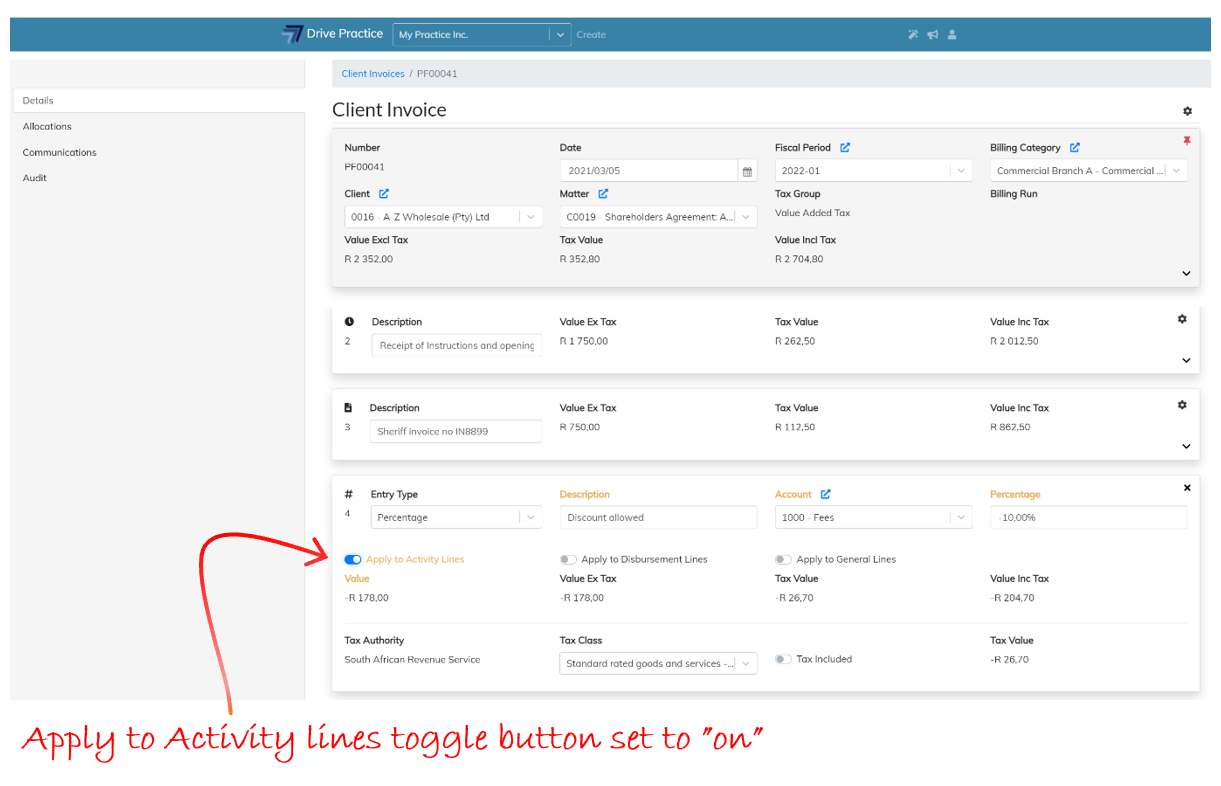
Apply to Activity Lines
This field is a toggle button to toggle the calculation to calculate the percentage entered on the total value of Activity entries. To turn on calculation on the Activity entries, click on the right-hand side of the toggle button.
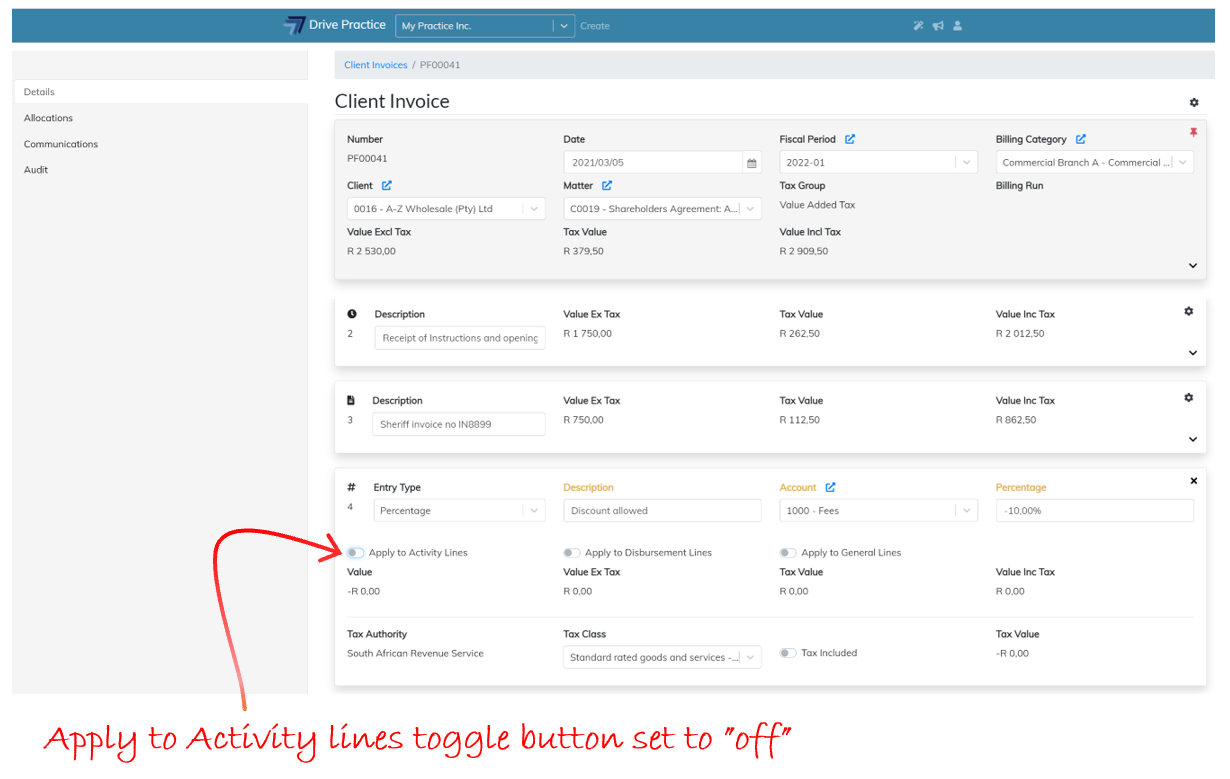
To turn off calculation of the percentage on the Activity entries, click on the left-hand side of the toggle button.
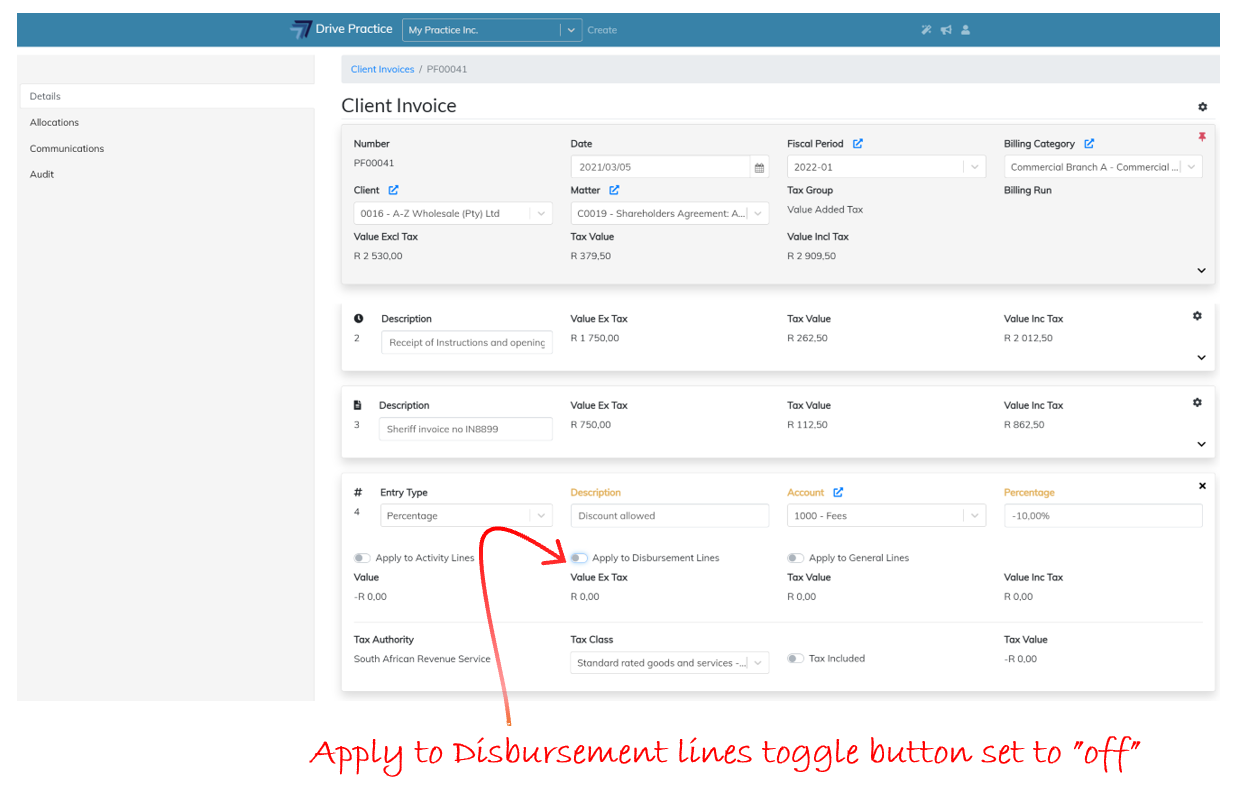
Apply to Disbursement Lines
This field is a toggle button to toggle the calculation to calculate the percentage entered on the total value of Disbursement entries. To turn on calculation on the Activity entries, click on the right-hand side of the toggle button.
To turn off calculation of the percentage on the Disbursement entries, click on the left-hand side of the toggle button.
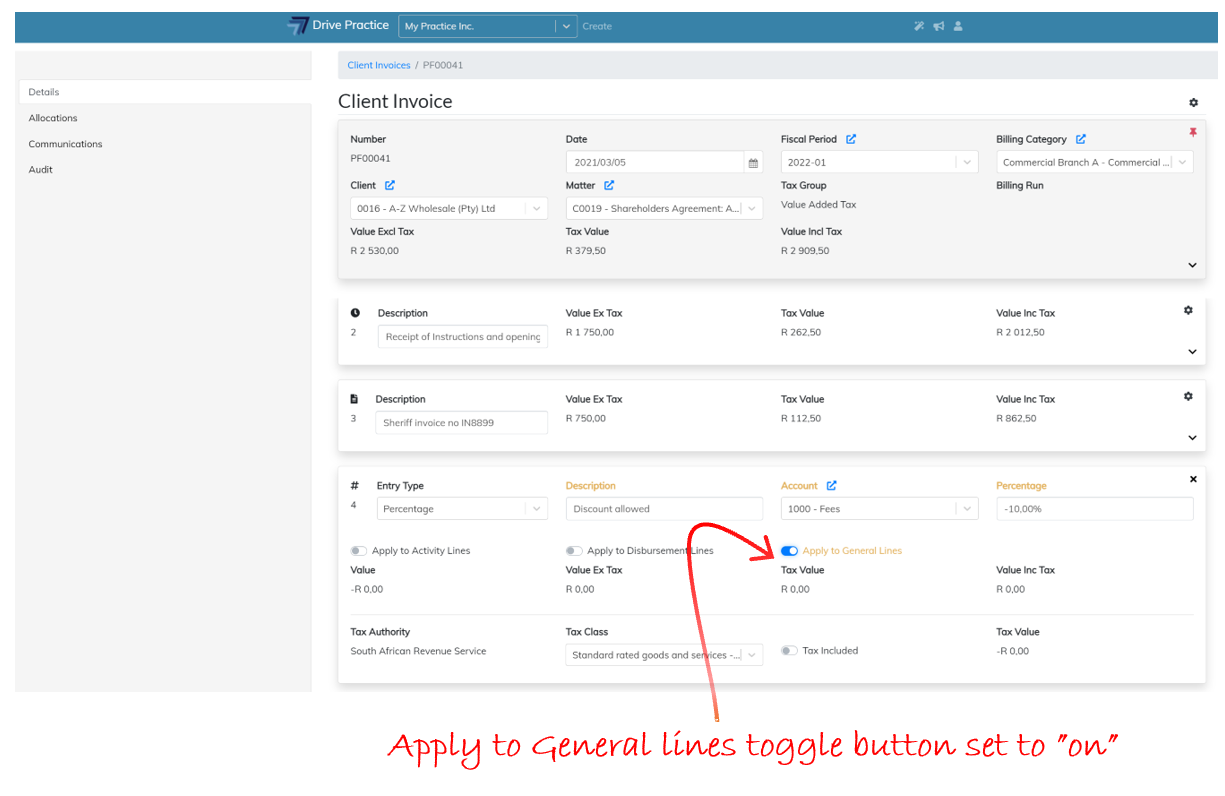
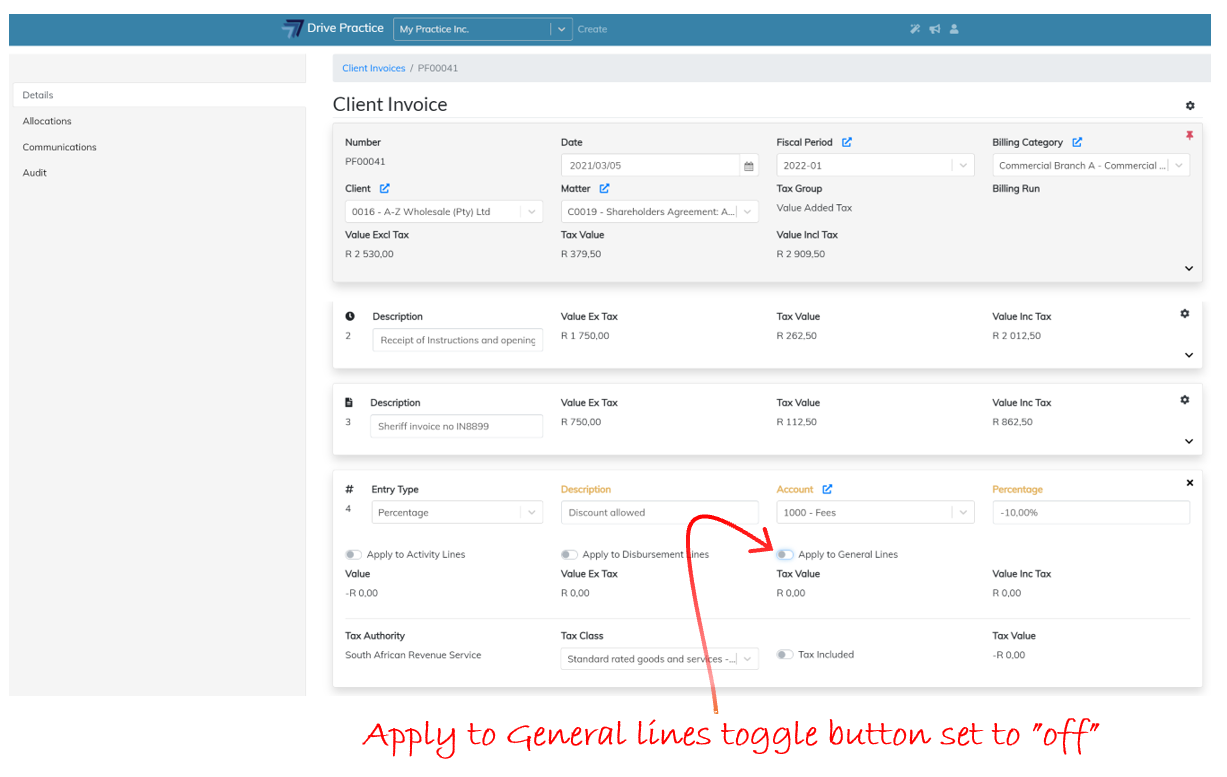
Apply to General Lines
This field is a toggle button to toggle the calculation to calculate the percentage entered on the total value of General Line entries. To turn on calculation on the General Line entries, click on the right-hand side of the toggle button.
To turn off calculation of the percentage on the General Line entries, click on the left-hand side of the toggle button.

Value
The Value field is a calculated field based on the percentage entered and the parameter(s) applied and cannot be edited.
Value Ex Tax
This field contains the amount of the entry excluding tax and is a calculated field and cannot be edited. If the tax settings are set to Include Tax, the Value ex Tax will be different to the Value field and if the tax settings are set to not be tax inclusive, the Value ex Tax field will be the same as the Value field.
Tax Value
The Tax Value field is the tax calculated on the entry based on the tax settings for the invoice, and the entry if the entry tax settings differ from the invoice settings. The Tax Value field cannot be edited.
Value Inc Tax
This field is a calculated field based on the tax settings for the invoice, or for the entry if the tax settings differ on the entry to the tax settings on the invoice. The amount in the field is the calculated value of the entry including tax and as a calculated field, cannot be edited.
Tax Authority
The Tax Authority field cannot be edited as it is derived from the Tax Group set for the invoice. To change the Tax Authority, read the Change Tax Group instructions.
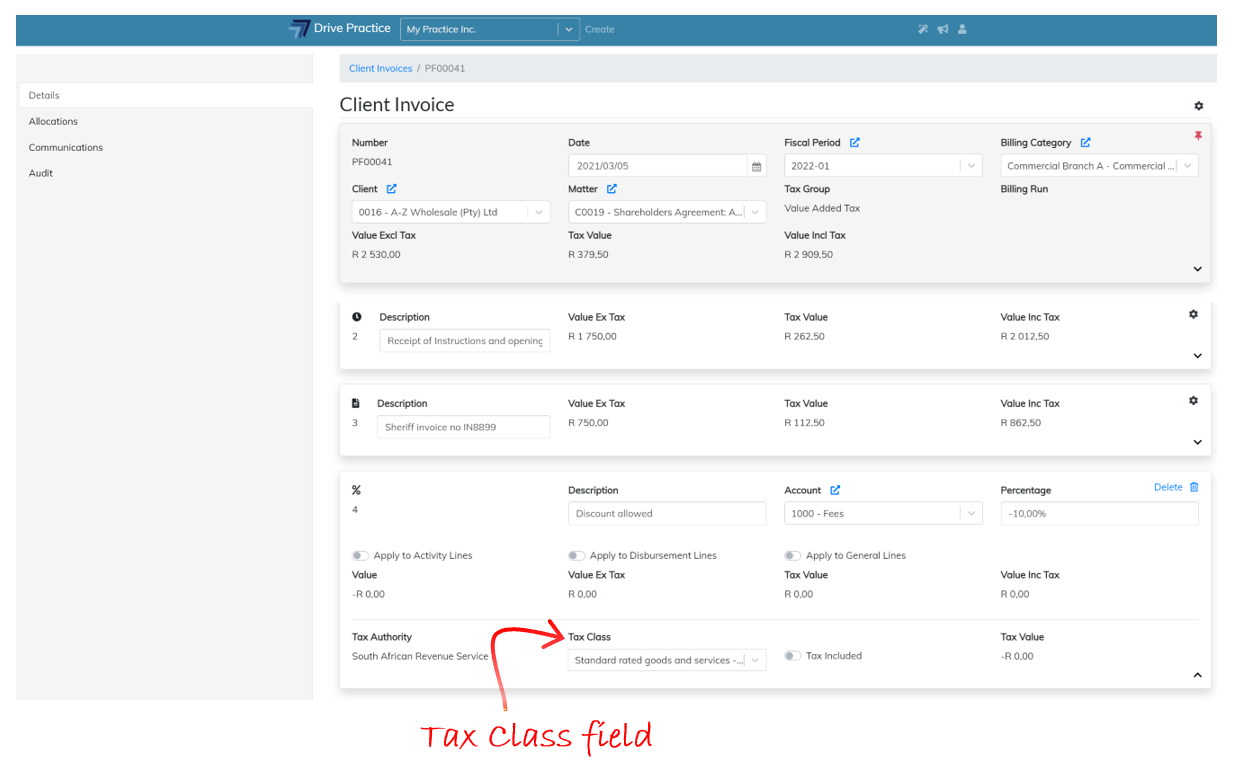
Tax Class
The Tax Class is inherited from the Tax Group settings on the invoice and can be edited on the entry. To change the Tax Class selected click on or tab to the Tax Class field and use the up and down arrows to select the required Tax Class and press enter to select or click on the required entry to select it.
Tax Included
This field is a toggle button to turn Tax Included on or off. To change the calculation of tax from tax excluded to tax included, click on the right of the toggle to turn on Tax Included for the entry.
To turn off tax inclusion, click on the left of the toggle to set Tax Included off.
Tax Value
This field is a calculated field and cannot be edited and contains the value of the tax calculated for the entry based on the invoice tax settings or the entry tax settings if the entry tax settings differ to those of the invoice.
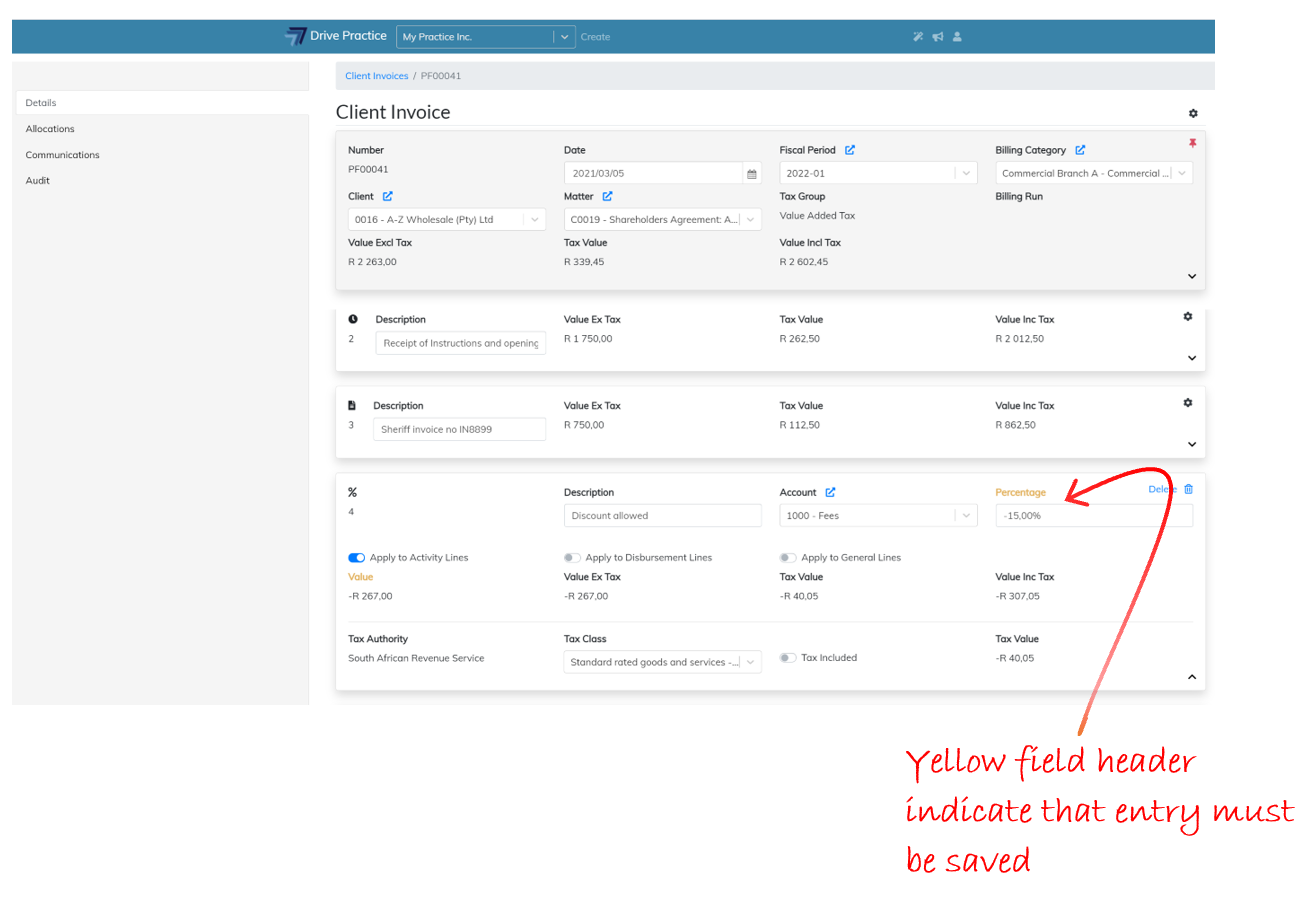
The field name(s) of the field(s) that have been edited turn yellow to indicate that the Percentage Line must be saved.
Complete all the fields of the General Line and then save the invoice by clicking on the Gear icon at the top right-hand side of the Header and select Save or use the shortcut Ctrl-Enter key.
Saving can fail if there has been an extended period of no activity and the user has been automatically logged out, when connection to the internet has been lost, or when another user has updated the record in another browser. If a save fails, refresh the page using the browsers refresh button or by pressing the F5 function key, or login again and recapture the fields and execute the save again.
Edit Percentage Line Entry
To edit a Percentage Line Entry, expand the entry if it is collapsed using the Expand entry icon on the bottom right-hand side of the General Line entry card.
Click on the field to be edited and/or use the Tab and Shift-Tab keys to navigate through the fields.
The field name(s) of the field(s) that have been edited turn yellow to indicate that the Percentage Line must be saved.


Once all the edits are complete save the invoice by clicking on the Gear icon at the top right-hand side of the Header and select Save or use the shortcut Ctrl-Enter key.

Saving can fail if there has been an extended period of no activity and the user has been automatically logged out, when connection to the internet has been lost, or when another user has updated the record in another browser. If a save fails, refresh the page using the browsers refresh button or by pressing the F5 function key, or login again and redo the edits and execute the save again.
Delete Percentage Line Entry
To delete a Percentage Line entry, click on the Delete icon on the top right-hand side of the Percentage Line entry card.

A dialog box will appear at the top of the screen requesting confirmation of the delete action. Click Ok to delete the entry or Cancel to cancel the delete and return to the invoice.
Save the invoice to permanently delete the entry by clicking on the Gear icon at the top right-hand side of the Header and select Save or use the shortcut Ctrl-Enter key.
Saving can fail if there has been an extended period of no activity and the user has been automatically logged out, when connection to the internet has been lost, or when another user has updated the record in another browser. If a save fails, refresh the page using the browsers refresh button or by pressing the F5 function key, or login again and redo the delete and execute the save again.
Collapse Percentage Line Entry
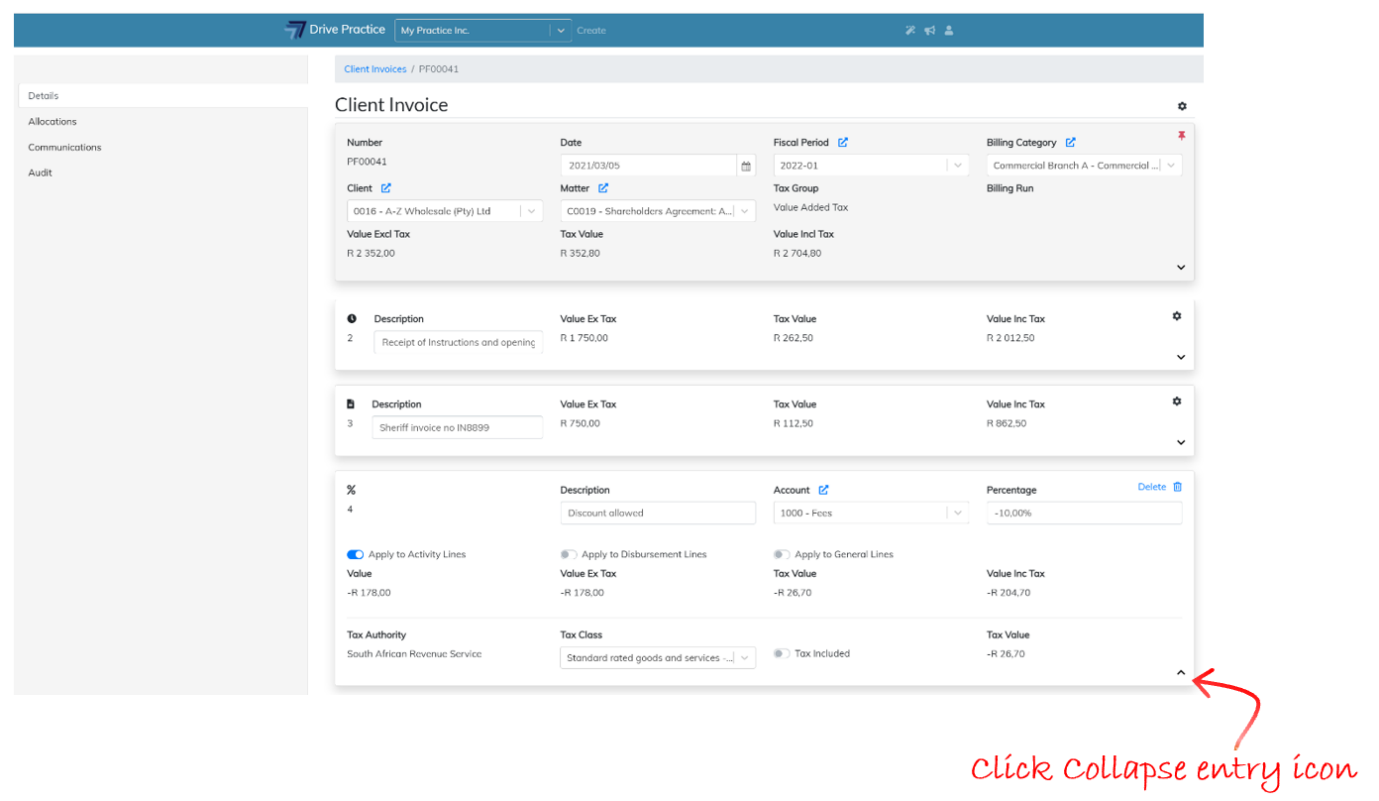
To Collapse a Percentage Line entry, click on the Collapse icon on the bottom right-hand side of the entry card.
Expand Percentage Line Entry
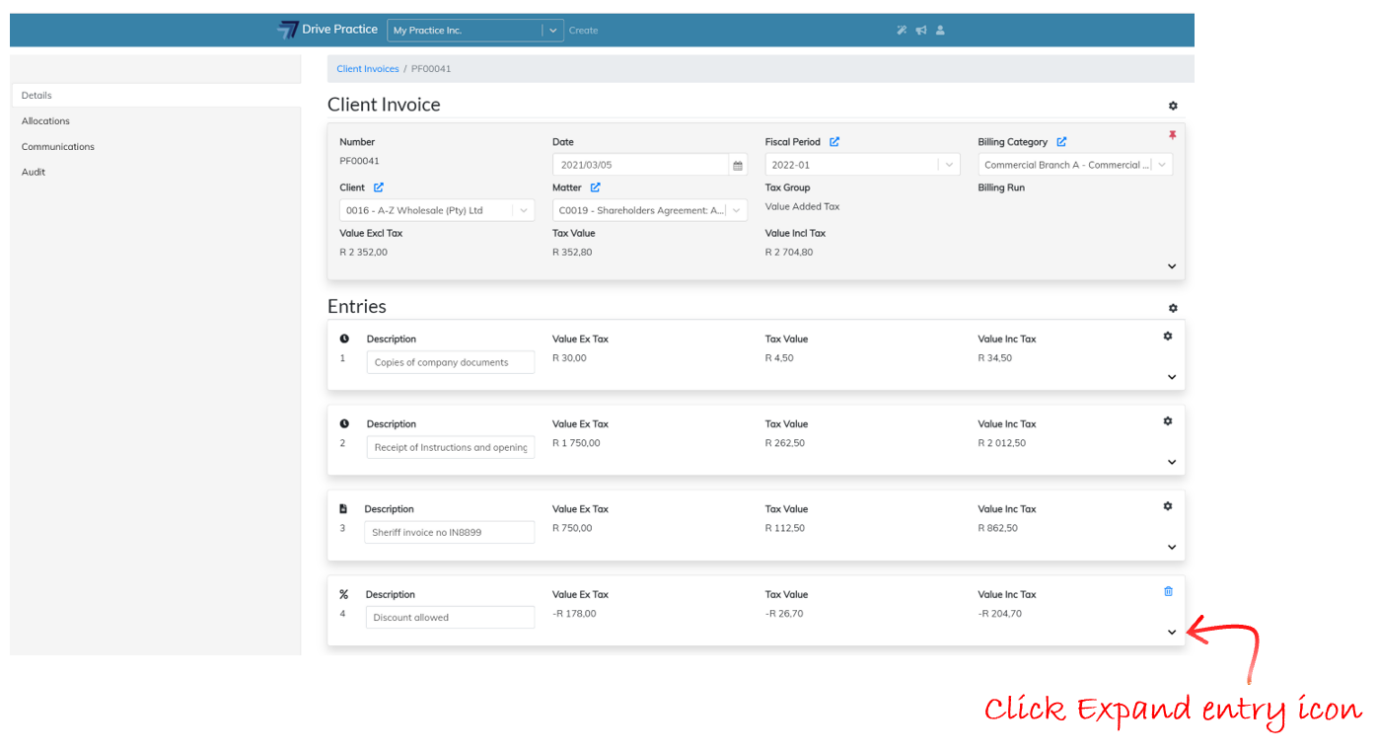
To Expand a Percentage Line entry, click on the Expand icon on the bottom right-hand side of the entry card.
Save Client Invoice
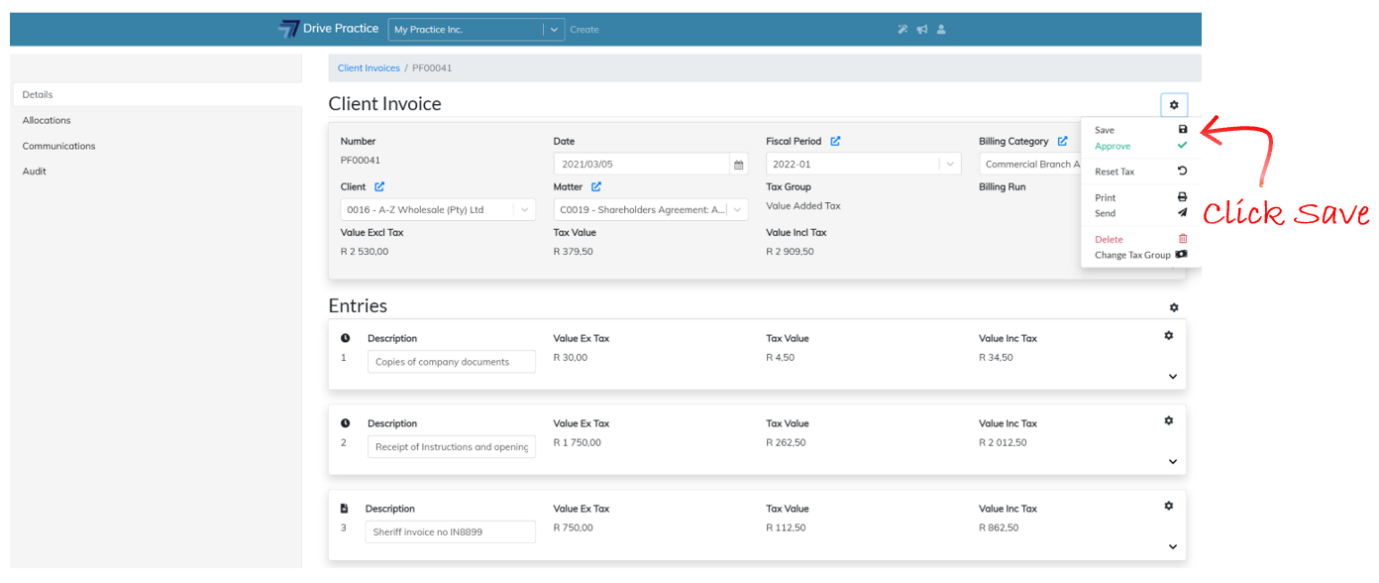
To save an invoice click on the Gear icon at the top right-hand side of the Header and select Save or use the shortcut Ctrl-Enter key.

Saving can fail if there has been an extended period of no activity and the user has been automatically logged out, when connection to the internet has been lost, or when another user has updated the record in another browser. If a save fails, refresh the page using the browsers refresh button or by pressing the F5 function key, or login again and redo the delete and execute the save again.
Approve Client Invoice
Approving a Client Invoice takes it out of a pro-forma state and generates the general ledger journal entry recording the invoice permanently in the books of record. An invoice in an approved state cannot be edited.
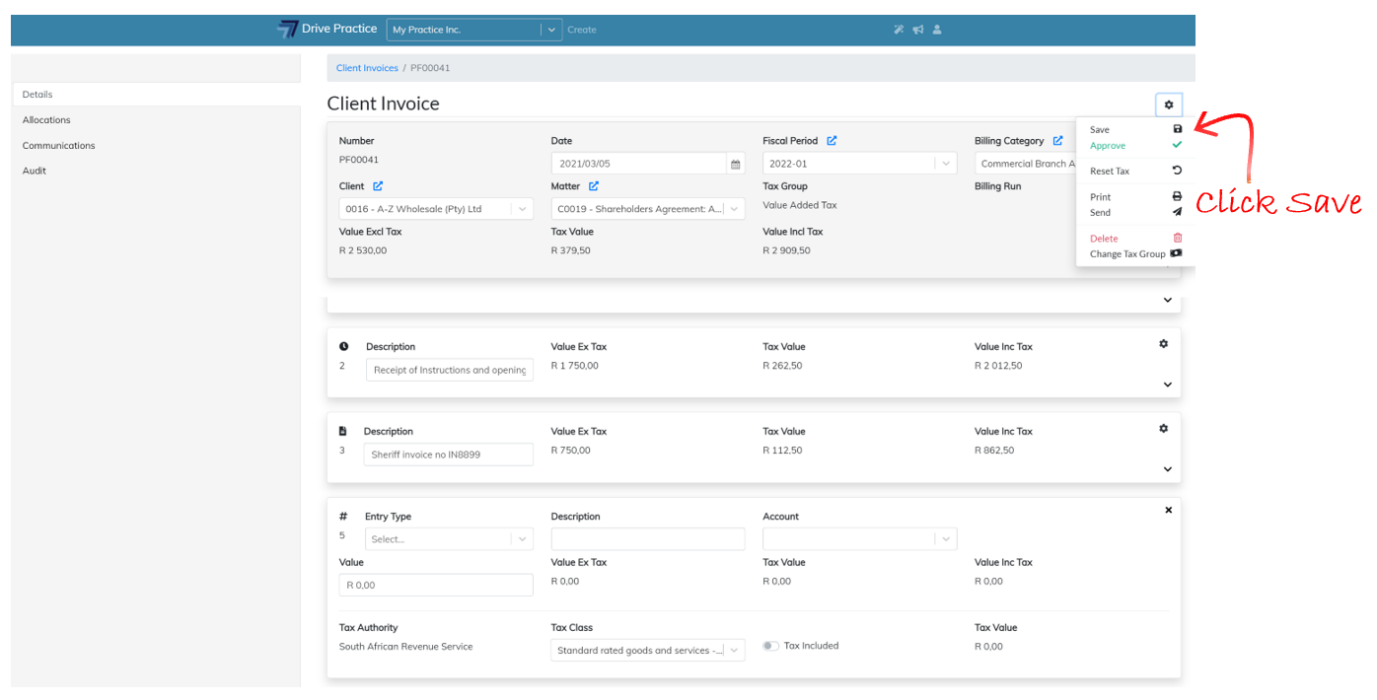
To Approve an invoice, click on the Gear icon at the top right-hand side of the Header and select Approve or use the shortcut Ctrl-Shift-Enter key.

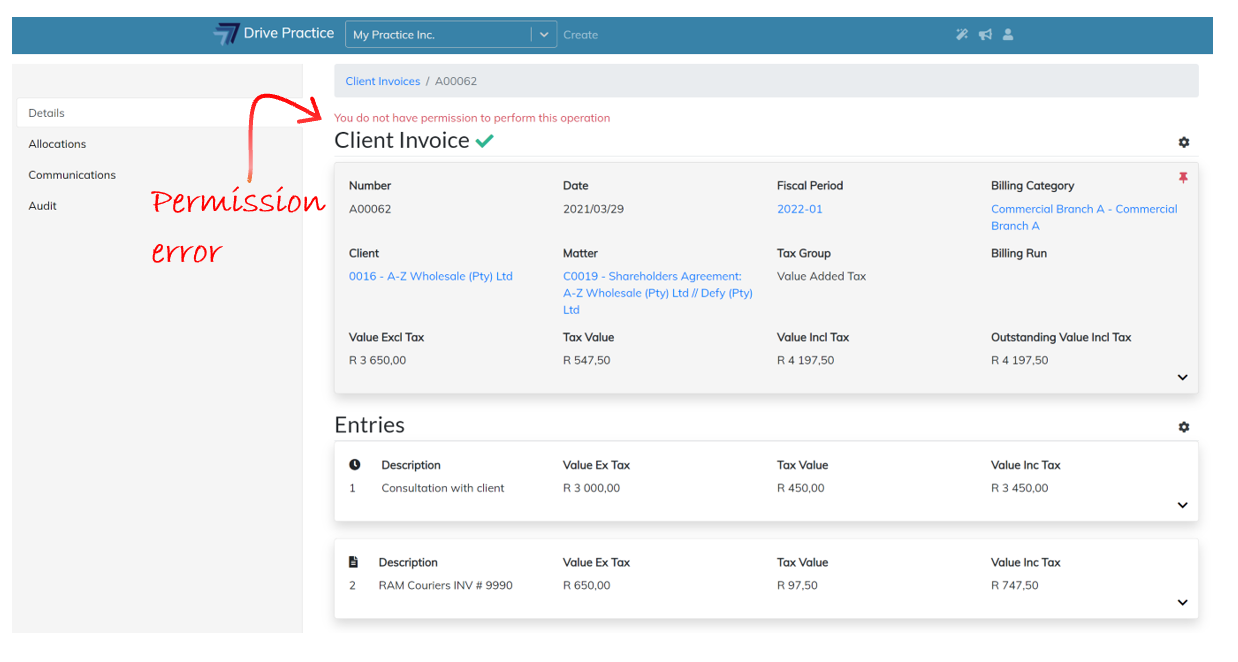
If the Approve Client Invoice right has not be assigned to the user, the user will not be able to approve the Client Invoice. An error message saying that the user does not have permission to perform the operation will appear. The user right to Approve Client Invoices is described in the User Rights for Client Invoices section of this document.

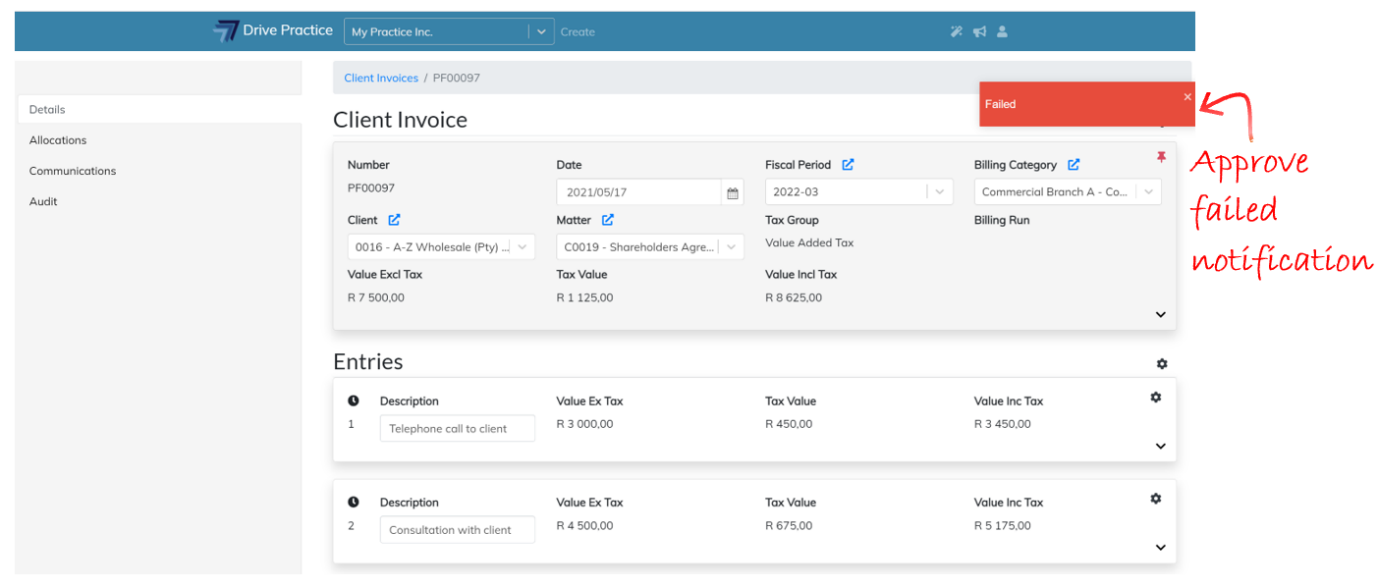
If the user has the Approve Client Invoices right, notifications indicating that the invoice has been saved and approved will briefly appear on the top right-hand side of the screen.
Once approved, green tick will be displayed at the top of the invoice Header to indicate that the invoice is in an approved state.
Approving an invoice can fail for a few reasons, many of which reasons will be displayed as an error message to help identify the cause.
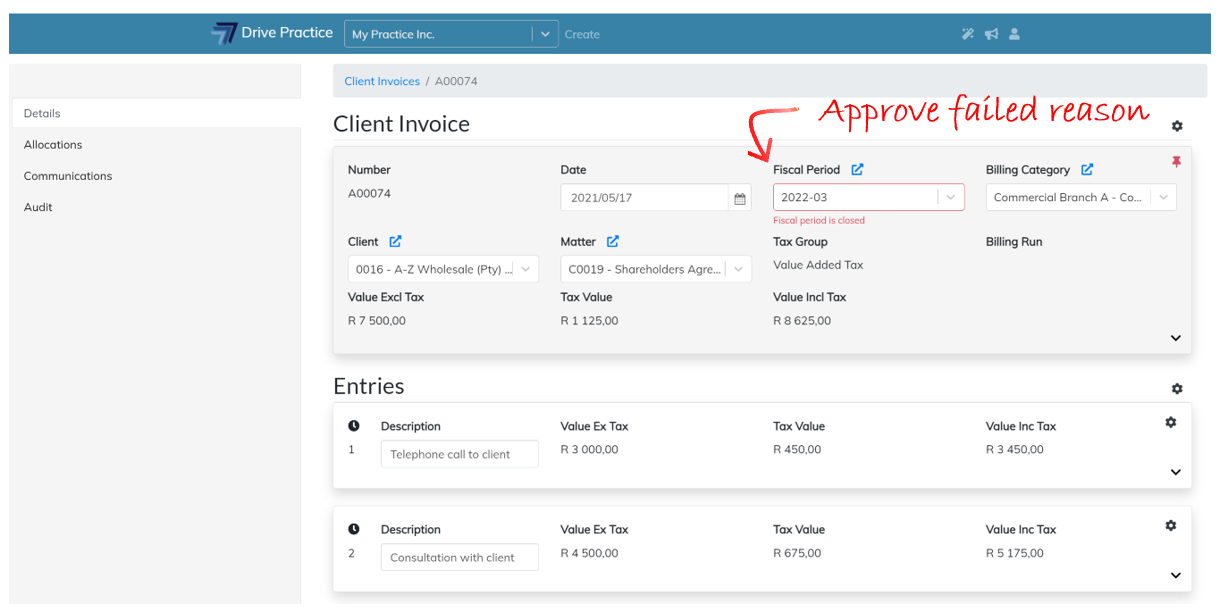
Correct the offending issue and re-execute the approve function.
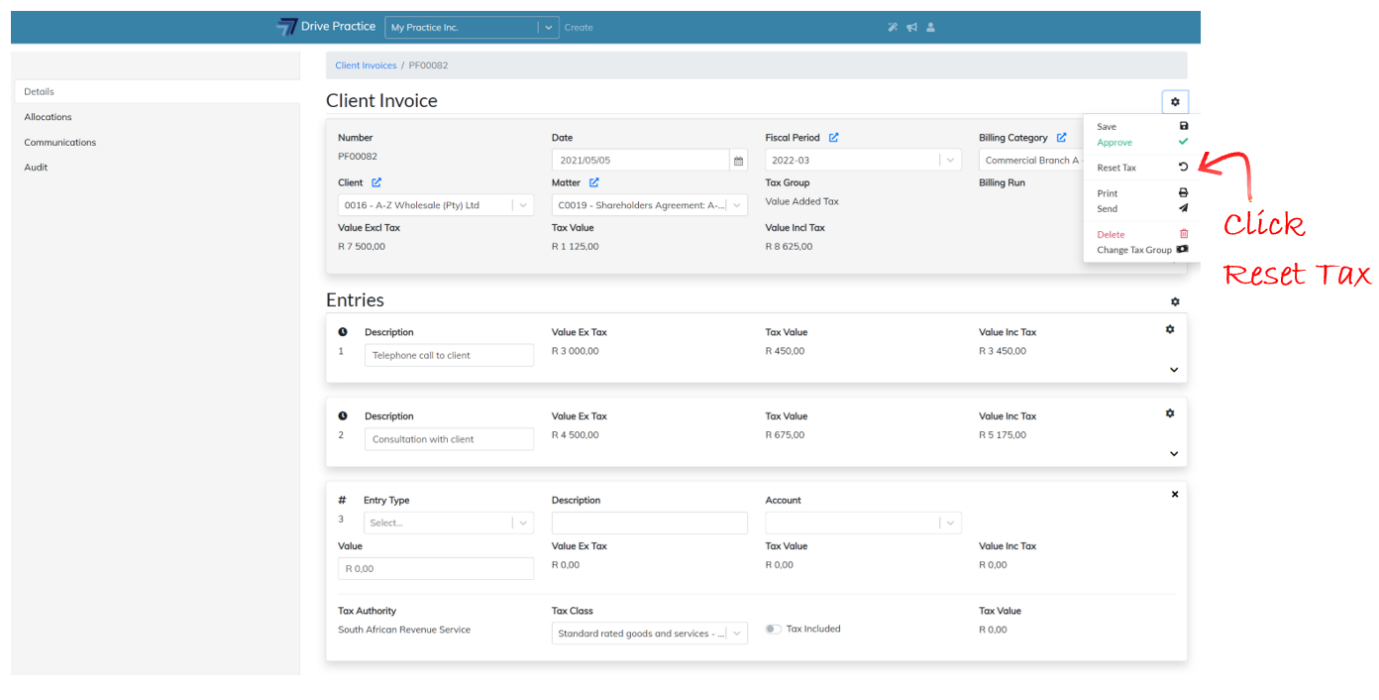
Reset Tax
The Reset Tax function is used to reset the tax settings to those that default for the Client that is being invoiced should the tax settings have been altered during editing of the invoice.
To Reset Tax on an invoice, click on the Gear icon at the top right-hand side of the Header and select Reset Tax.
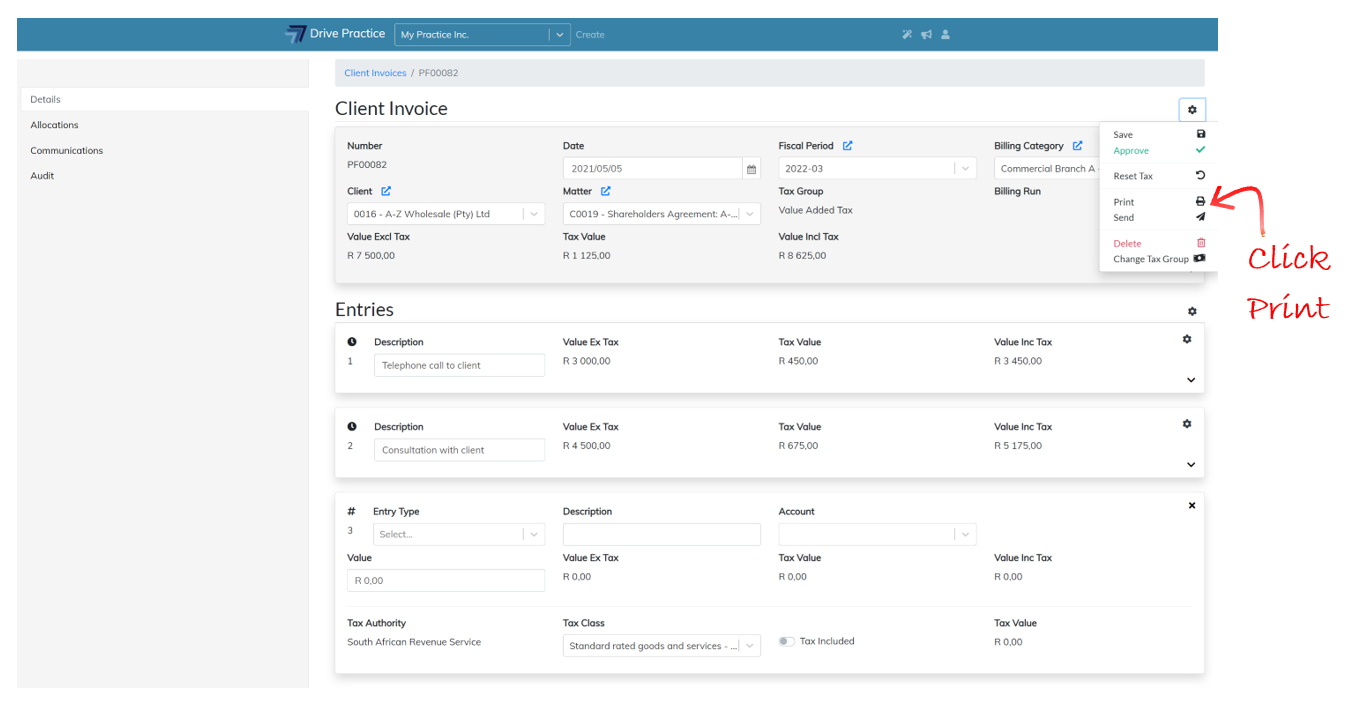
The Print function is used to print the invoice, creating a downloadable pdf file.
To Print an invoice, click on the Gear icon at the top right-hand side of the Header and select Print.
Send
The Send function is used to send the invoice via email to the contacts designated on the Matter’s Billing tab.
To Send an invoice, click on the Gear icon at the top right-hand side of the Header and select Send.
Invoices can be sent when they are in a pro-forma or Approved invoice state.
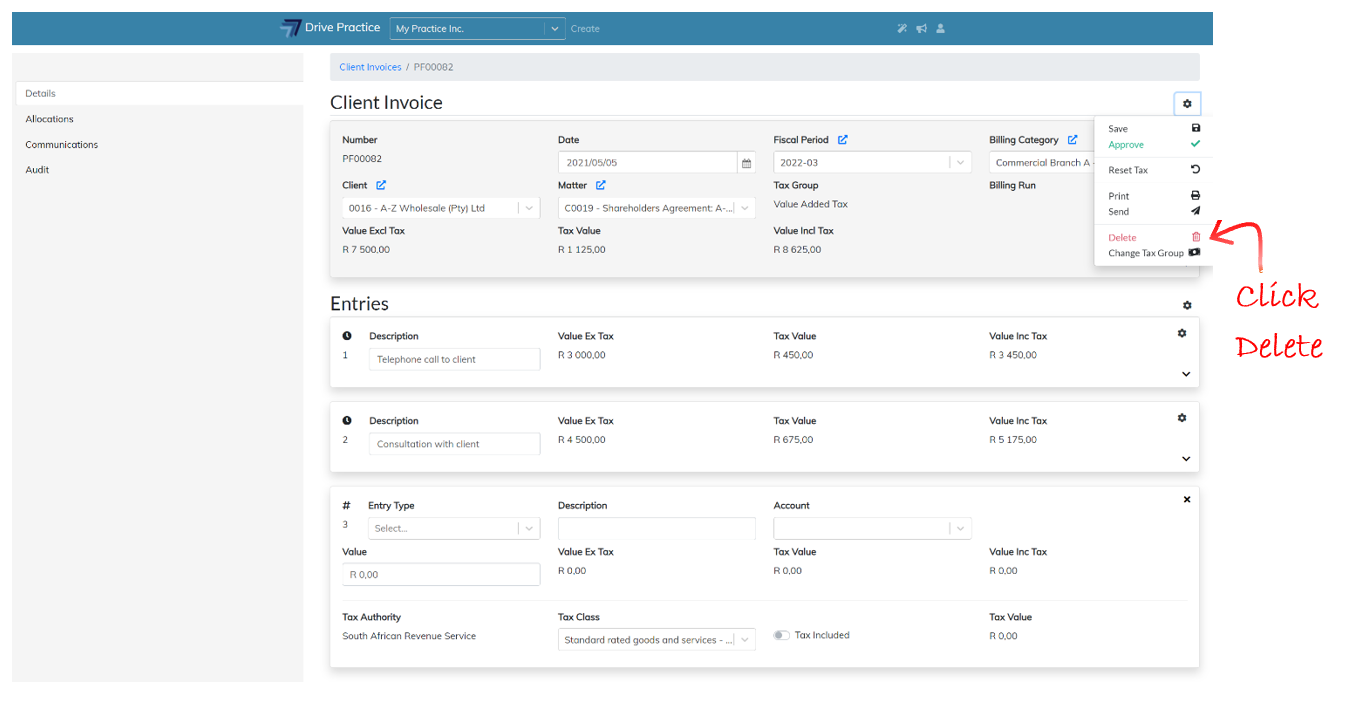
Delete
Only invoices that are in a pro-forma or Unapproved state can be deleted.
To Delete an invoice, click on the Gear icon at the top right-hand side of the Header and select Delete.
After deleting the invoice, the screen will return to the Client Invoice list.
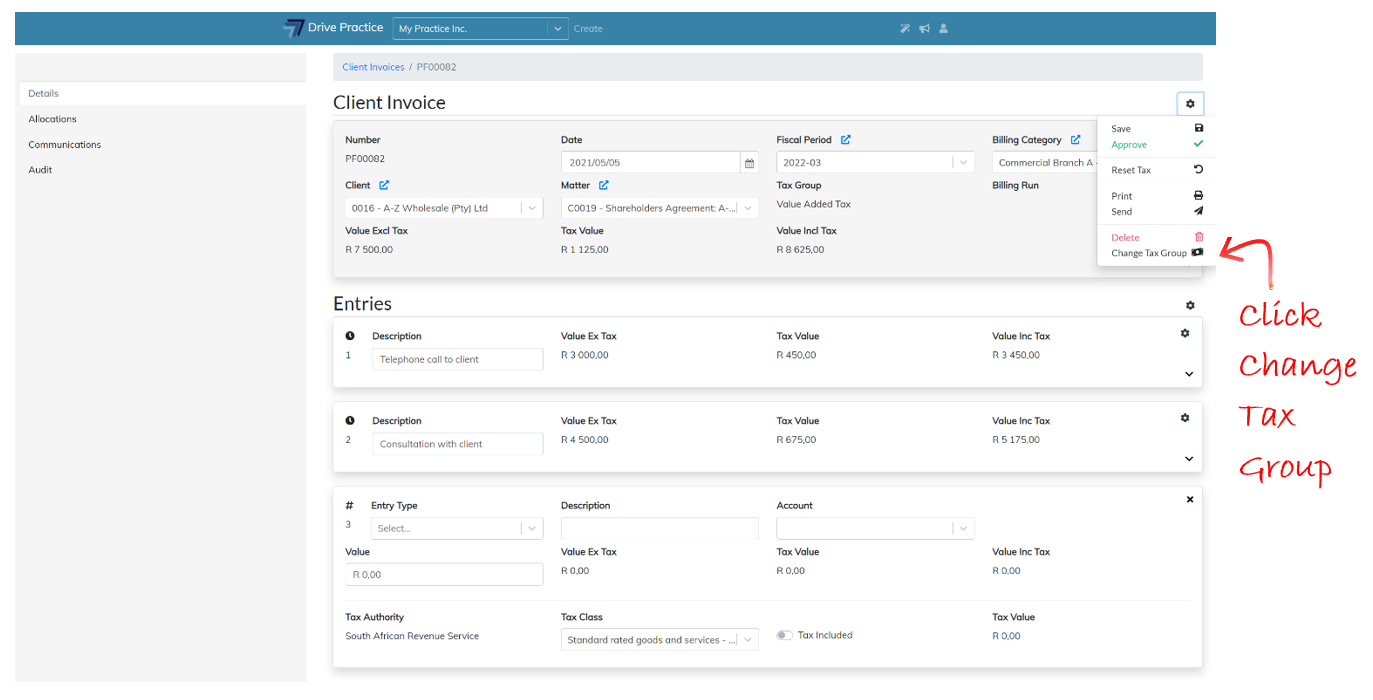
Change Tax Group
If the organization has more than one tax group (i.e. it reports tax on supplies and purchases to more than one authority such as to SARS and the Namibian Revenue Authority) and the tax group applied to the invoice is for the wrong authority, then the tax group on the invoice can be changed, so that the tax is calculated according to the correct authority and can be reported to that authority.
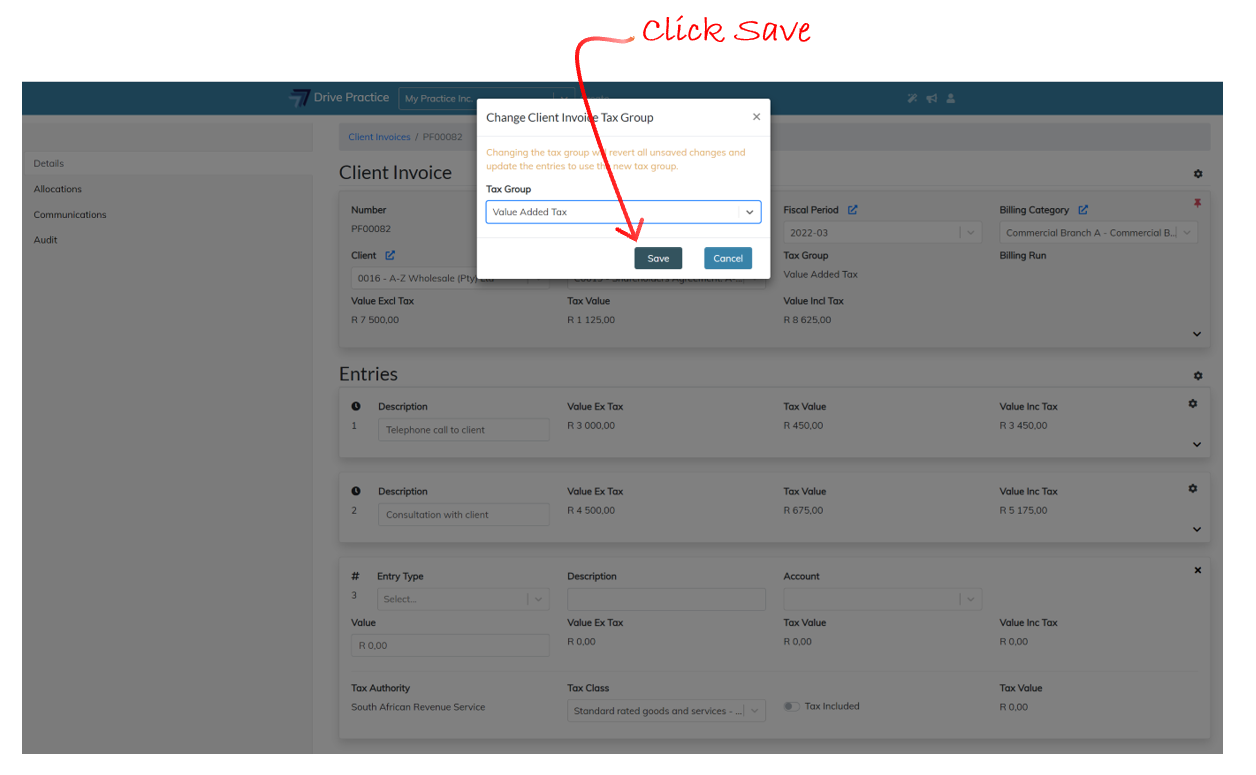
To change the invoice Tax Group, click on the Gear icon at the top right-hand side of the Header and select Change Tax Group.
A dialogue box will open warning that changing the tax group will revert all unsaved entries and will recalculate the tax according to the tax group chosen.
Click on the dropdown box and select the required Tax Group and click Save to save the new tax group to the invoice or Cancel to return to the invoice without changing the Tax Group.
Unapprove
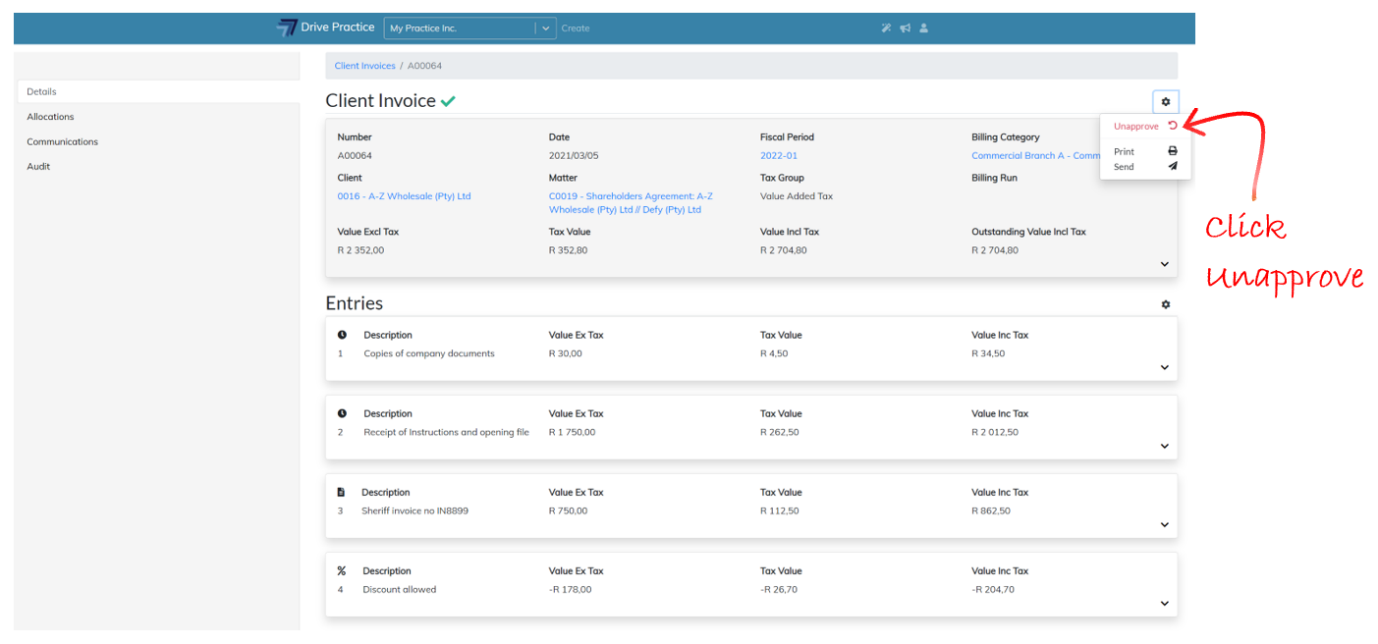
Once an invoice has been approved it cannot be edited. Where edits are required to be made, the invoice can be unapproved in order to make such edits or to delete the invoice.
Unapproving an invoice has tax implications, especially if an invoice is unapproved some time after and in a subsequent financial period to when it was first approved or is dated, and should only be done when absolutely required and where the invoice has not already been sent to a client.
To Unapprove an invoice, click on the Gear icon at the top right-hand side of the Header and select Unapprove.
If the Unapprove Client Invoice right has not be assigned to the user, the user will not be able to unapprove the Client Invoice and the user will be given an Access Denied error message. The user right to Unapprove Client Invoices is described in the User Rights for Client Invoices section of this document.
Once unapproved, the green tick indicating that the invoice is in an approved state will no longer be displayed at the top of the invoice Header. The invoice number that was assigned to the invoice will remain on the invoice, even if it is re-approved.

Unapproving an invoice can fail for a few reasons, many of which reasons will be displayed as an error message to help identify the cause.
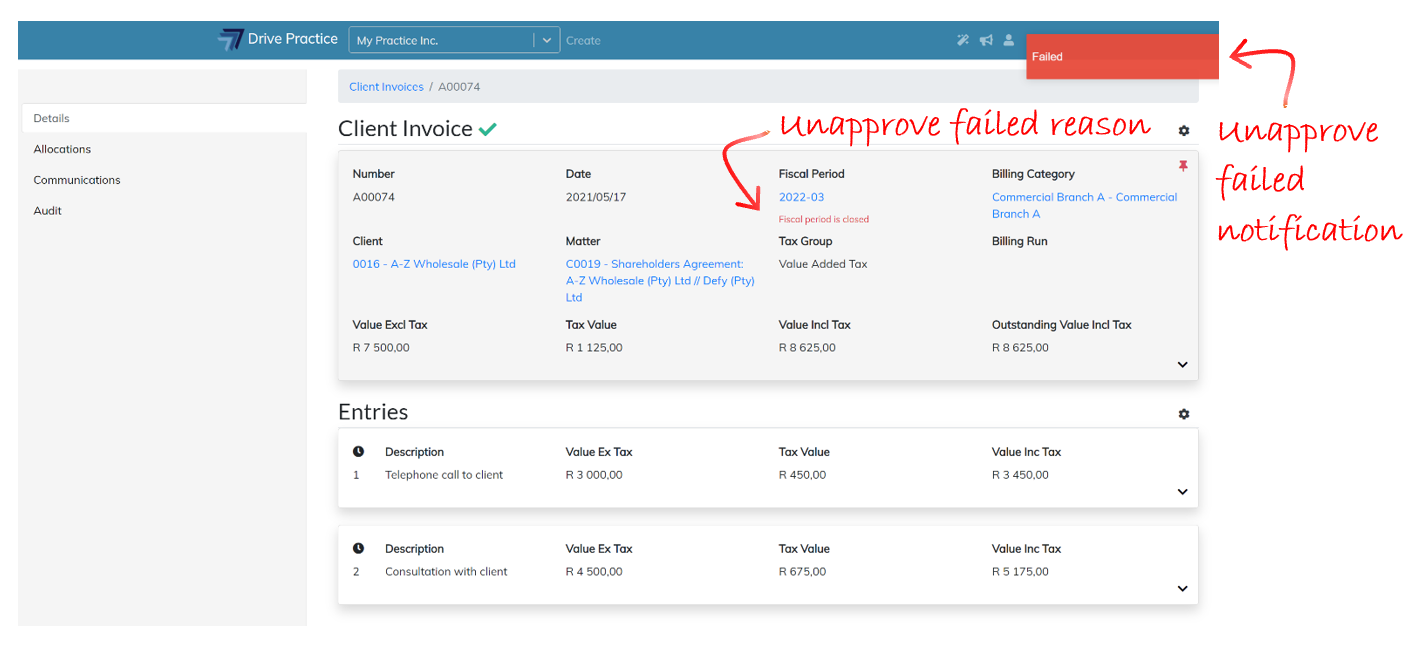
Correct the offending issue and re-execute the unapprove function.
Best practice to modify what has been invoiced to a client where an invoice has already been sent to the client is to pass a credit note against the invoice, sending the credit note to the client together with the newly generated modified invoice.