Edit Billing Run Header
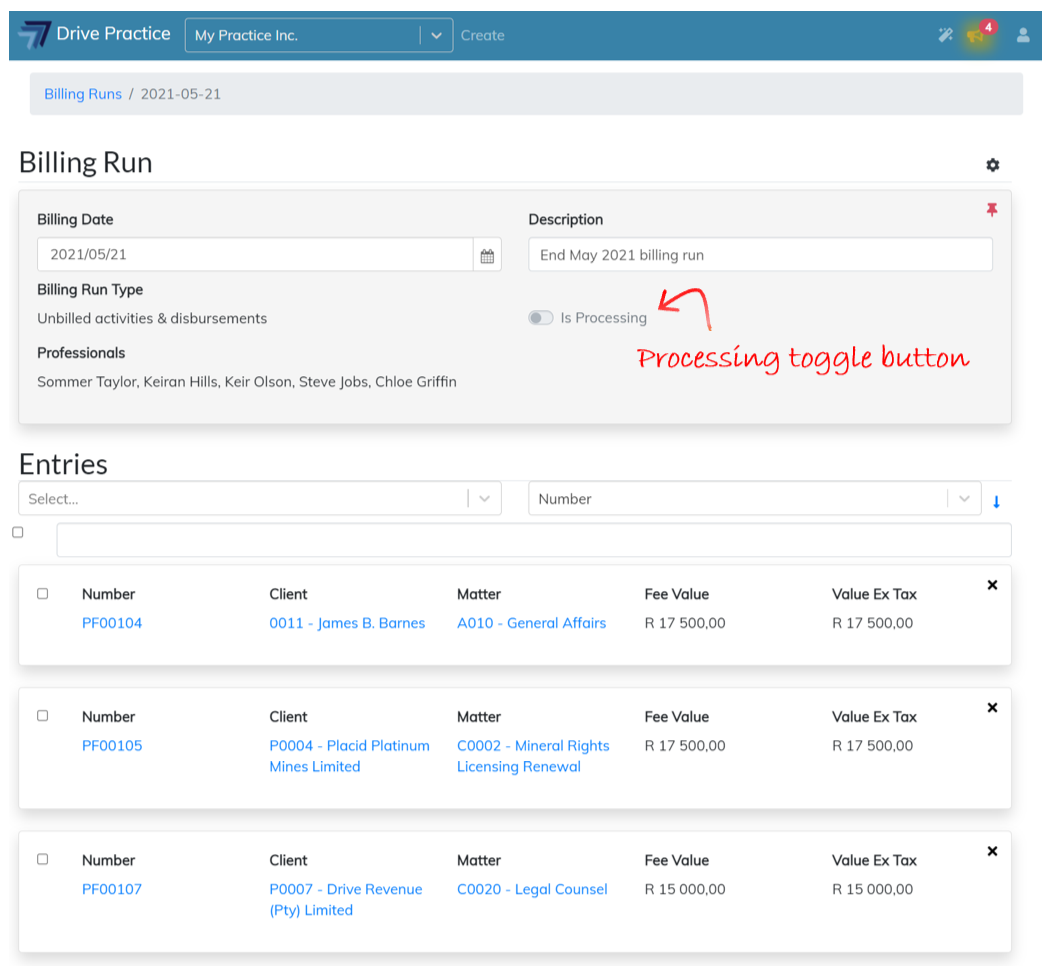
The Header of a Billing Run may be edited while in the pinned or unpinned state. To edit the Header, click on the Billing Date or Description fields and edit their content if required. The type of billing run and professionals for whom the billing run has been generated cannot be edited. The “Is Processing” toggle is a system field which also cannot be edited.
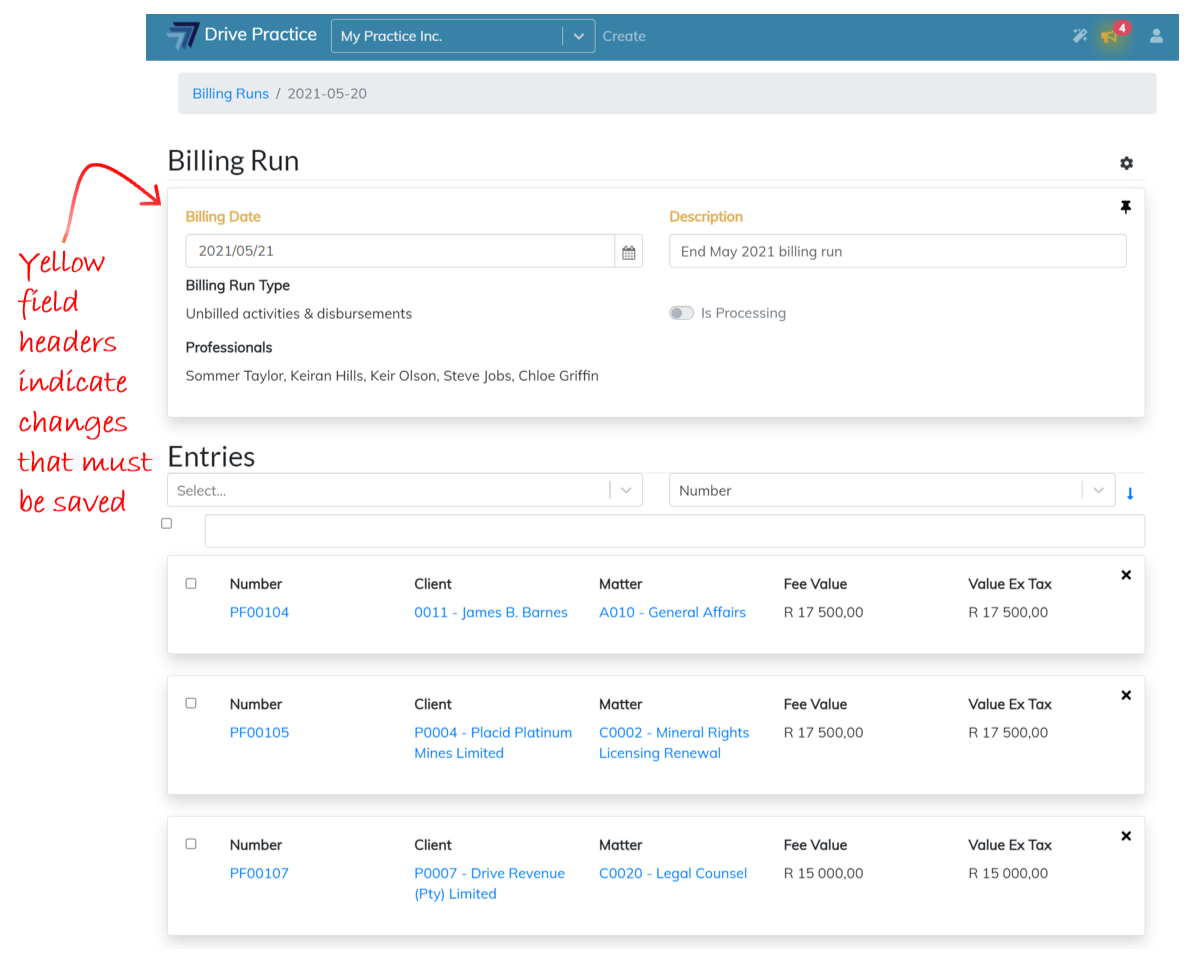
The field header(s) of the field(s) modified will turn yellow to indicate that the changes need to be saved.
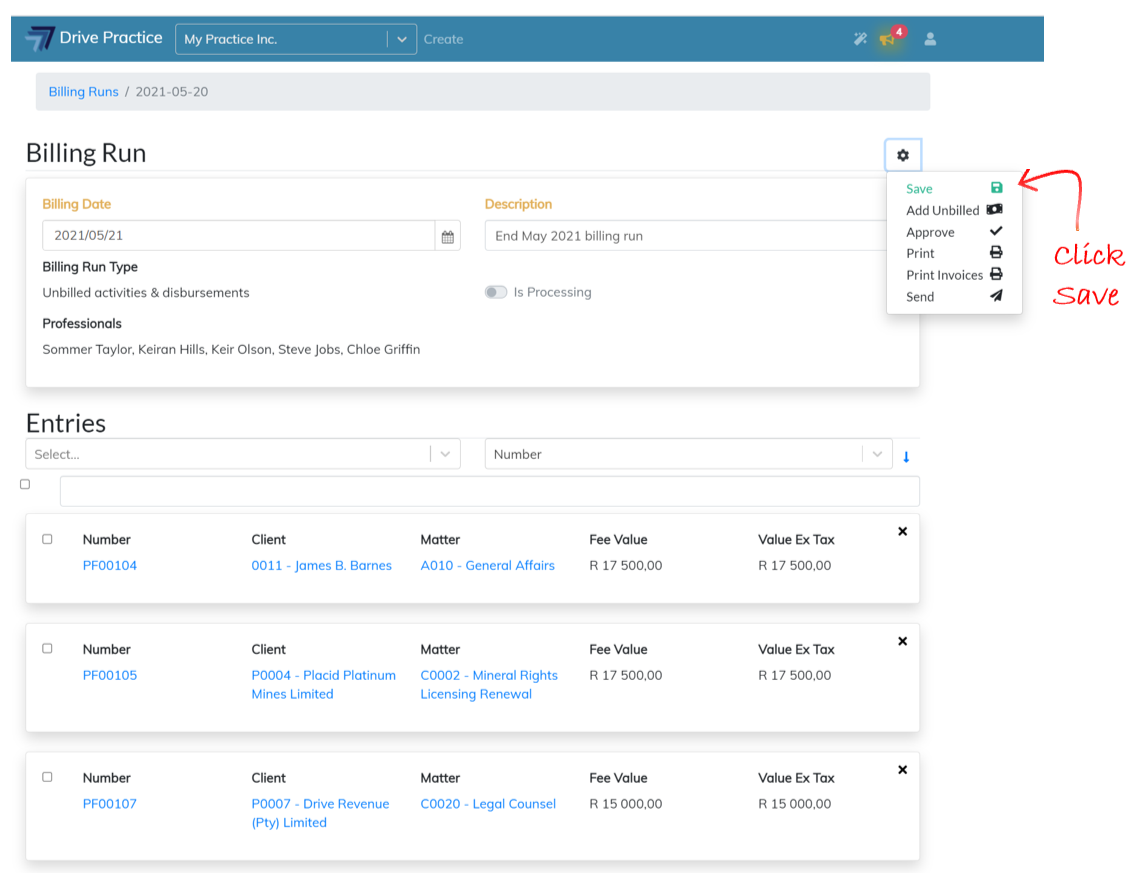
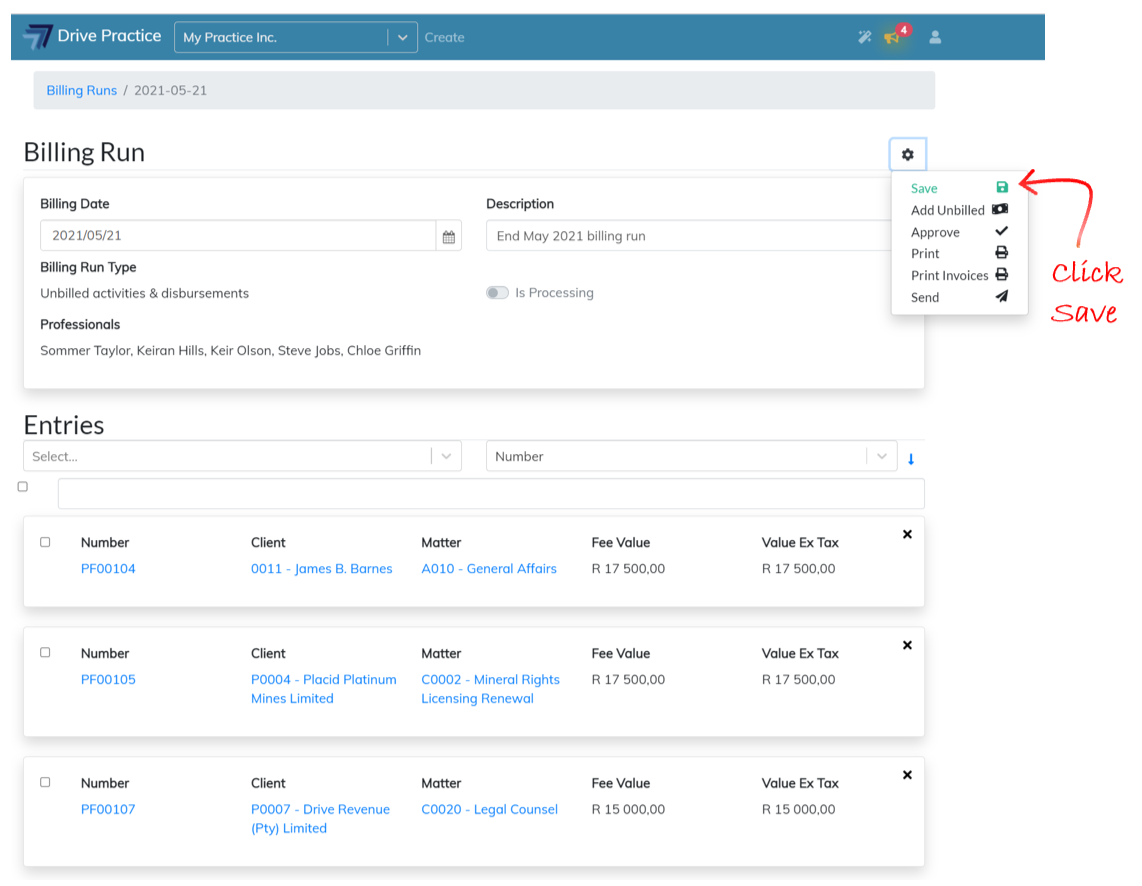
Click on the Gear icon on the right-hand side of the Billing Run Header and select Save or use the Ctrl-Enter shortcut key to save the change(s).
Billing Date vs Invoice Date
When invoices are generated as entries on a billing run, the Billing Date field is used as the benchmark of which unbilled activities and disbursements to include in the case of an Unbilled activities and disbursements type billing run, and on which invoices to calculate interest in the case of and Interest on overdue invoices type billing run.
Changing the billing date of a billing run after the billing run has been created does not change the dates of the invoice entries already generated in the billing run.
If the billing date of a billing run has been changed to a later date and unbilled activities are added to the billing run, there could be activities that are added to existing invoices in the billing run, which are of a later date than the invoice date.
Strictly speaking, invoice dates should be greater than or equal to the latest date of entries on an invoice.
The best practice to follow if the billing run date was set incorrectly when the Billing Run was created would be to carry forward all the entries in the billing run, which functionality is described in the Edit Billing Run Entries section below, change the billing run date, and then add back the entries using the Add Unbilled function described below. In this way the entries will all have the Billing Run date as their invoice date and all entries that were intended to be on the invoices will be included.
In the event there is just one or two invoices that need to include unbilled entries from a date later than the Billing Run date, then open those invoices individually and add the unbilled activities and disbursements using the add unbilled activities and disbursements function described in the Client Invoices document.
Edit Billing Run Entries
Use the PgUp and PgDn keys to scroll through the entries, the End key will take you to the last entry in the billing run and the Home key will take you to the first entry in the billing run.
If the Header is pinned, the entries will scroll under the header as you move down the list of entries.
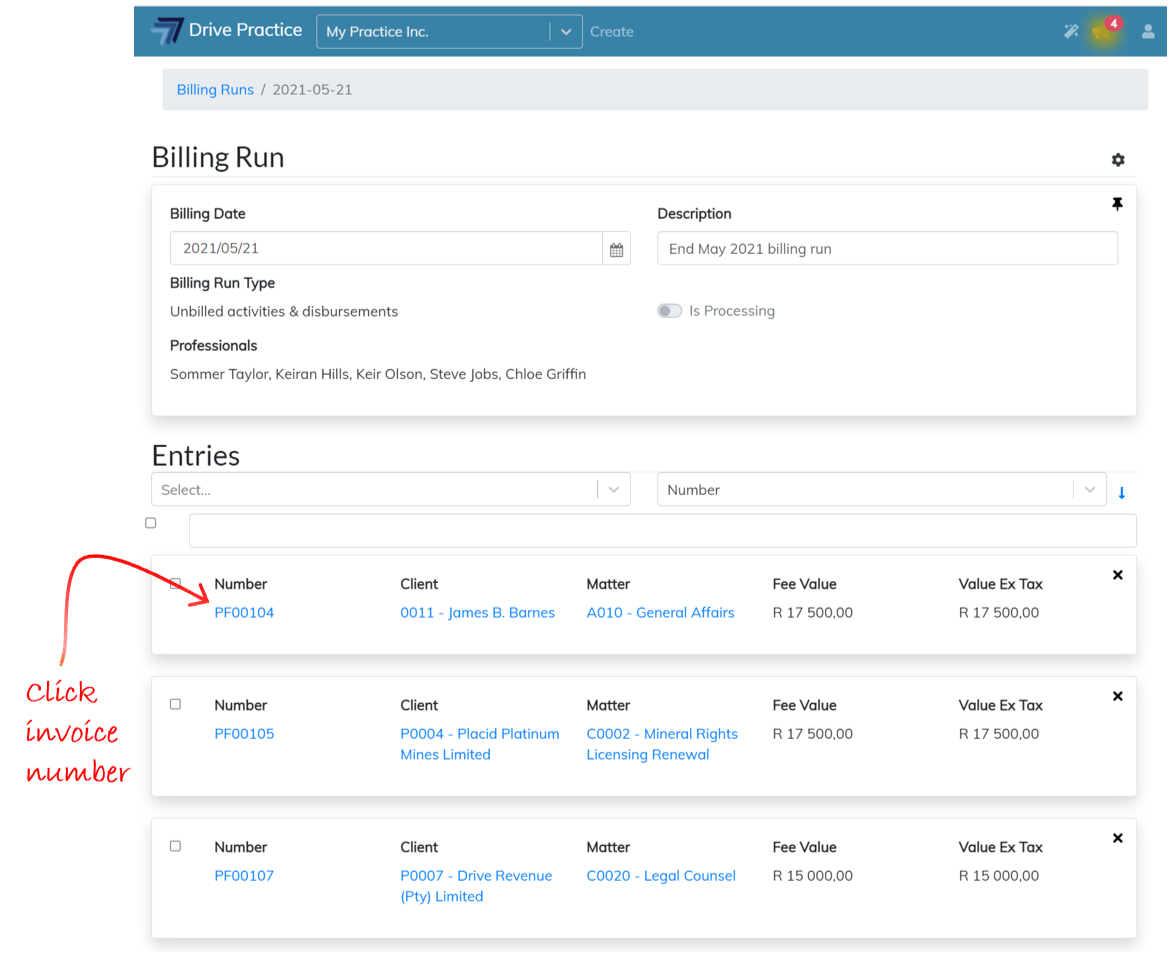
Since each entry in a billing run is a client invoice, to edit the contents of the entry the invoice needs to be opened. To open an invoice entry in a billing run, click on the invoice number and use the instructions in the Client Invoices document to edit the invoice.
Often a matter may not be ripe to be billed at the time that a billing run is generated. Where such invoices are generated, they can be “carried forward” by clicking on the “X” on the top right-hand side of the entry card.
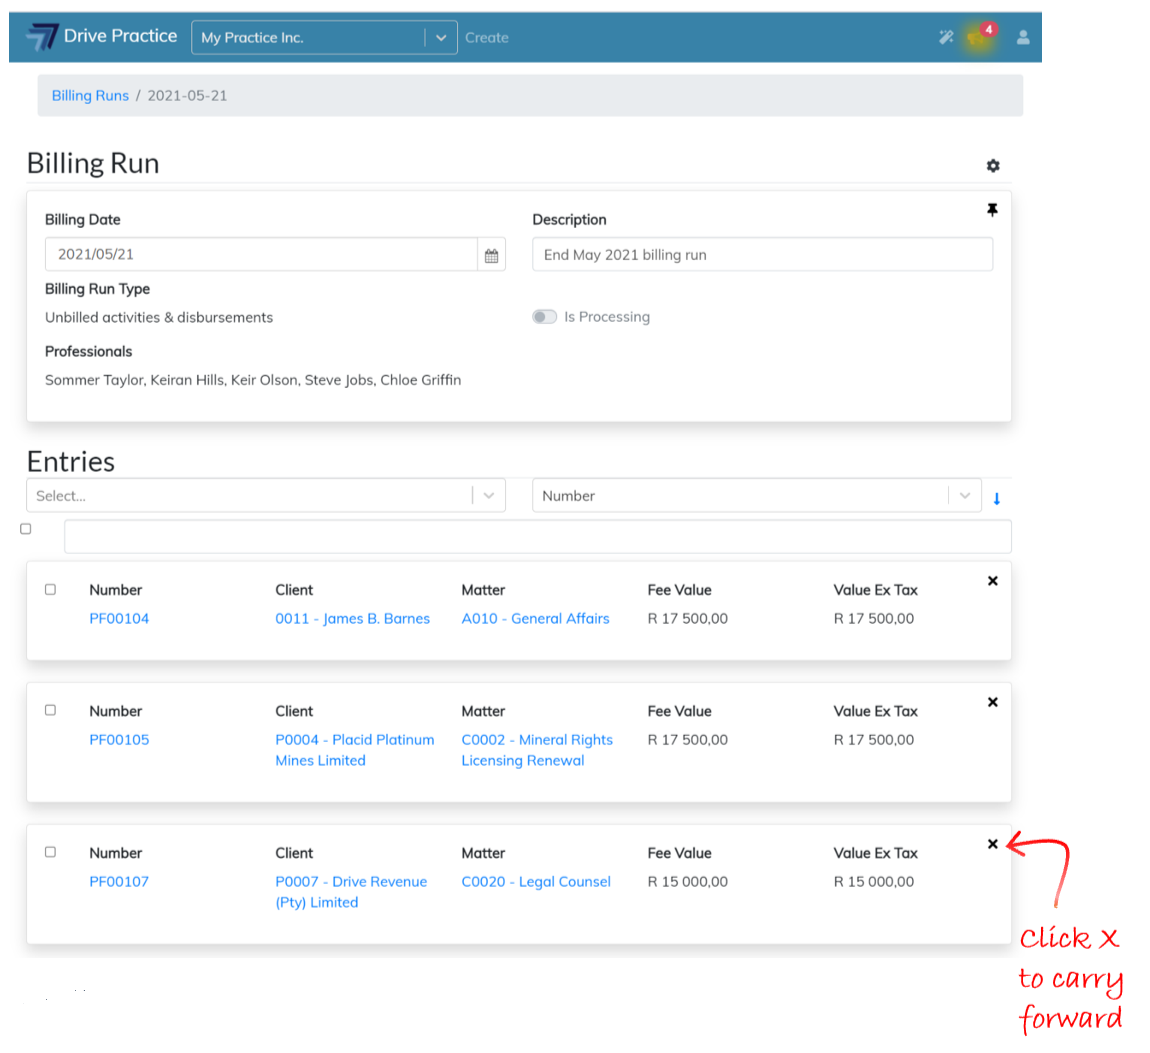
This removes the entry from the billing run, deletes the pro-forma invoice and puts the activities and disbursements back into WIP (Unbilled Activities and Disbursements) on the matter, making them available to bill on another billing run or on an invoice created individually for the matter.
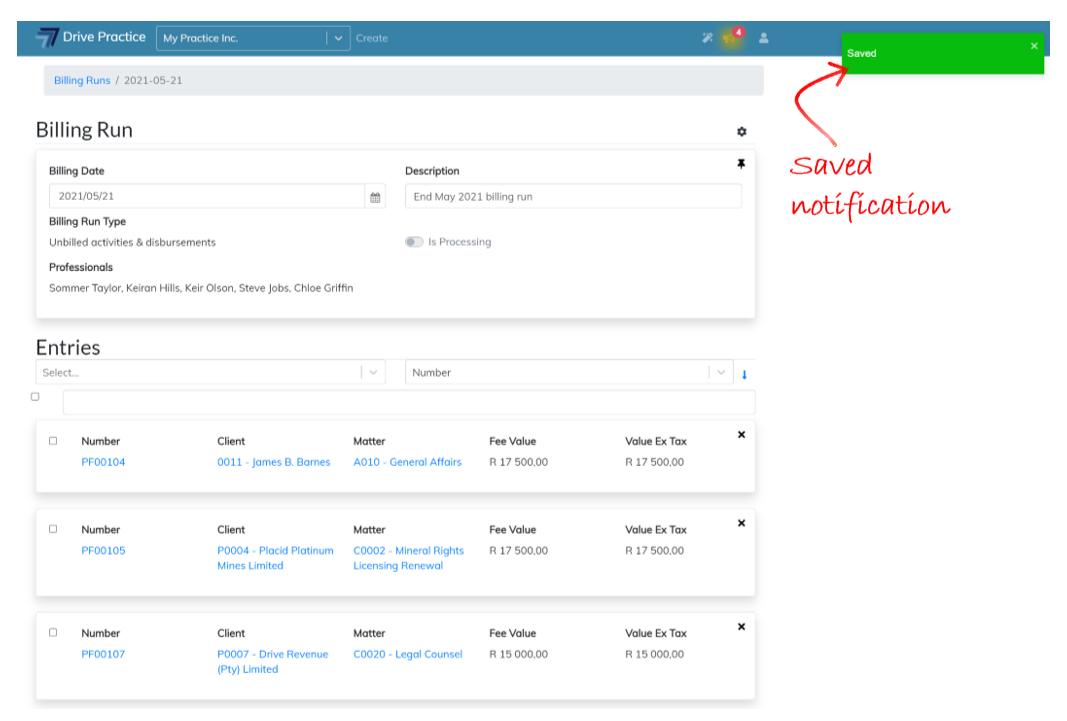
Once the entry has been removed, a short notification will appear on the top right-hand side of the screen indicating that the change to the billing run has been saved.
To the left of each entry card and the Entries heading is a checkbox. These checkboxes are used to perform selective or bulk actions on the billing run entries.
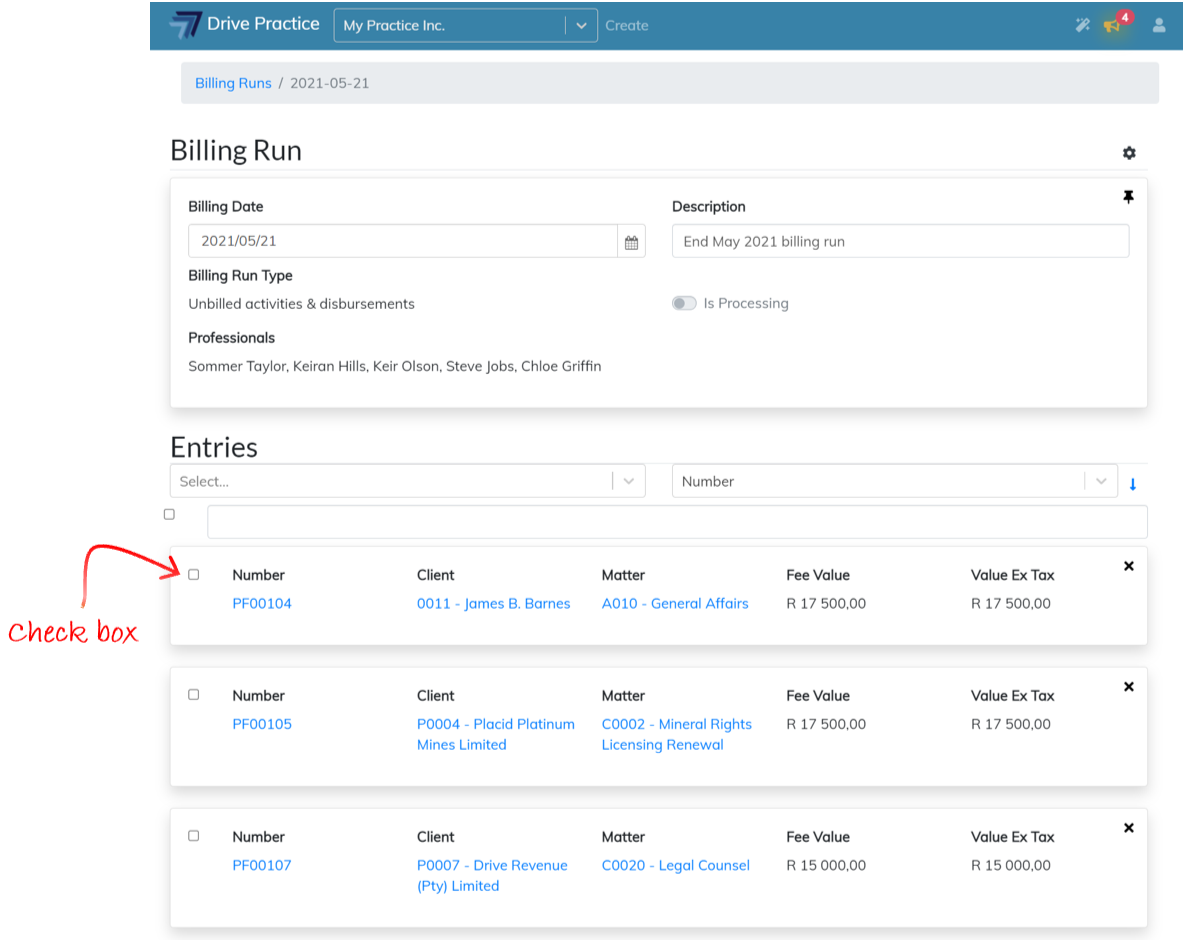
Bulk actions that can be performed are Approve and Send, which are described in the Approve and Send functions.
Save
The Save function is used to save changes to the billing run.
To Save the billing run, click on the Gear icon on the top right-hand side of the Header card and select Save or use the Ctrl-Enter shortcut key.
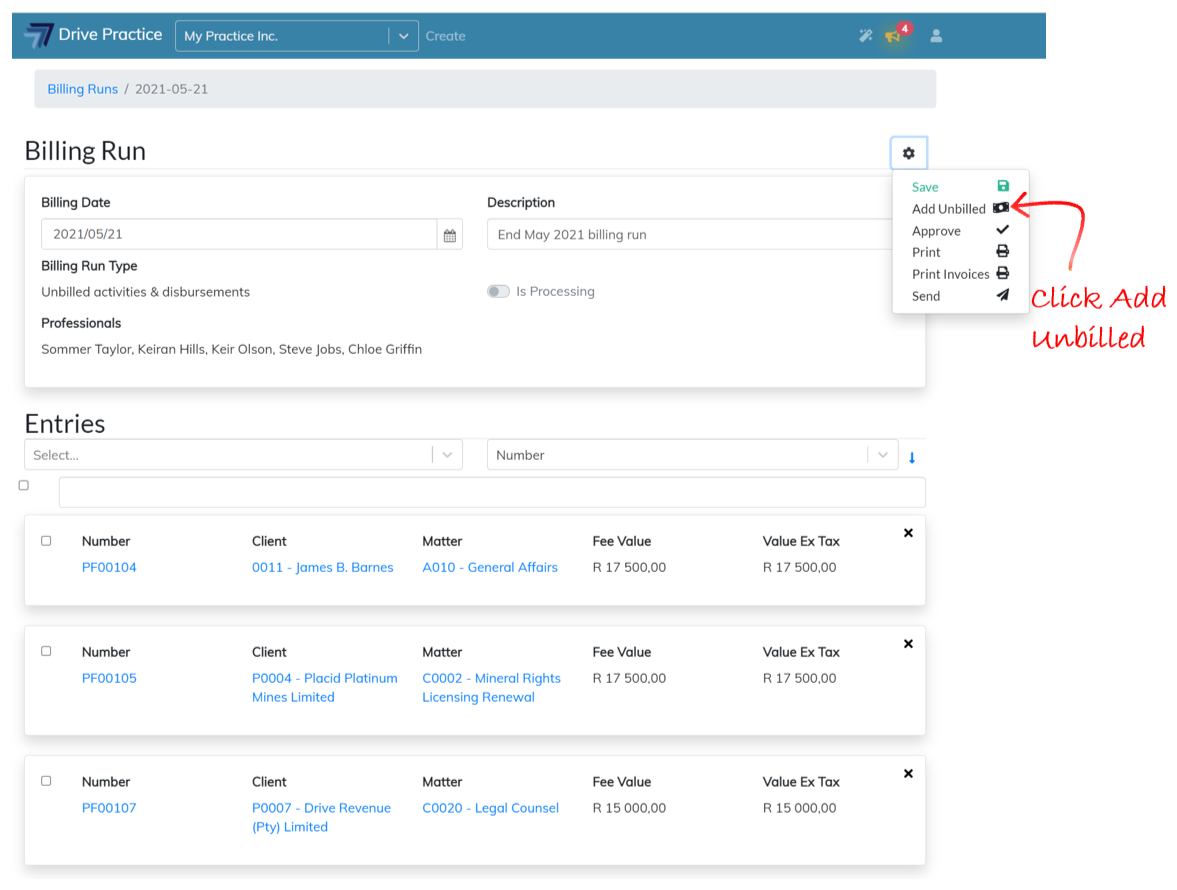
Add Unbilled
The Add Unbilled function is used to add in additional activities and disbursements that are required to be billed on the billing run.
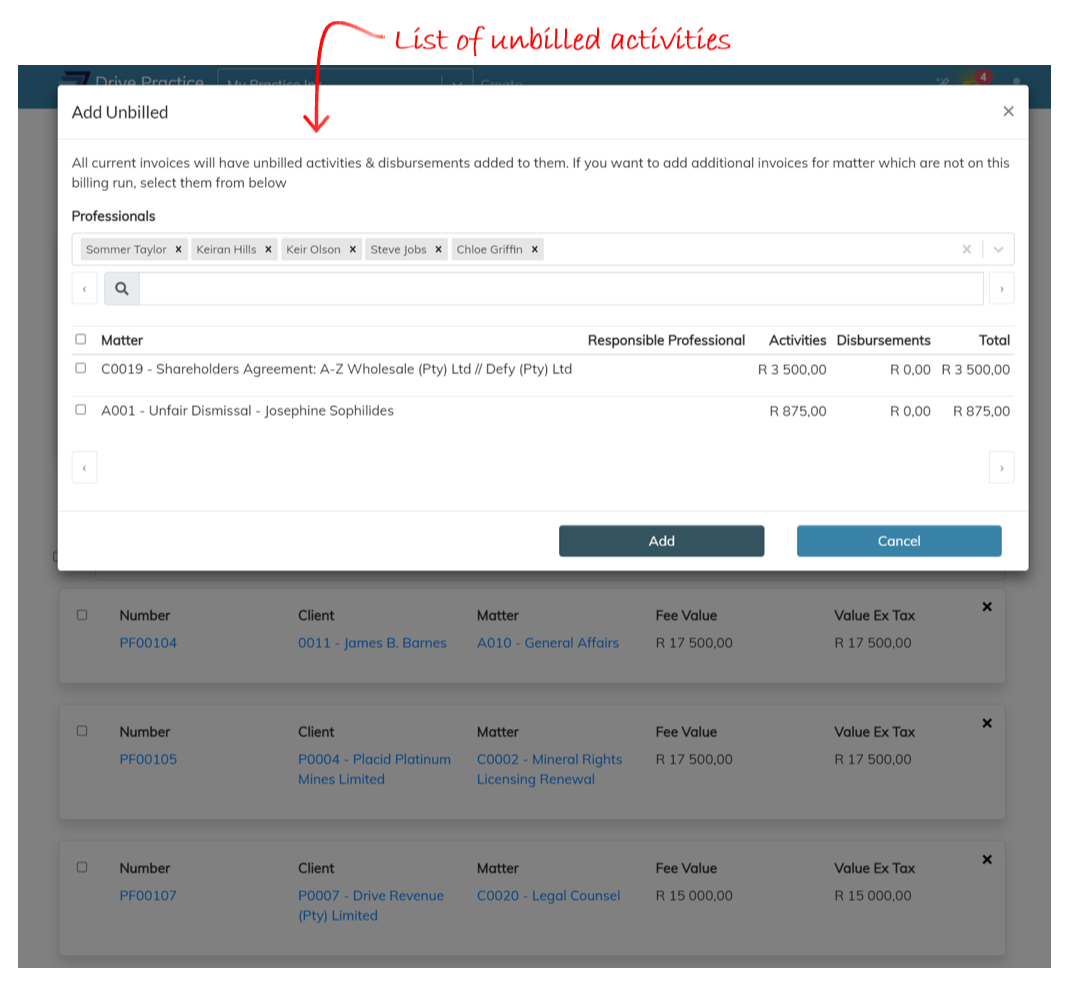
Where there are already entries for a matter on the billing run and subsequently further unbilled activities and disbursements fall within the parameters for inclusion in the billing run, these entries, if selected to be added to the billing run, will be added to the existing pro-forma invoice on the billing run and will not create an additional invoice for the matter. Where there are entries selected for matters for which there are no pro-formas already in the billing run, new invoice entries will generated when these selected entries are added.
To use the function, click on the Gear icon on the right-hand side of the Header card and select Add Unbilled.
The Add Unbilled window will pop up with a list of matters that have unbilled activities and/or disbursements. The list can be filtered by responsible professional, and the search bar can be used to find matters by typing any string of characters in the matter name or number.
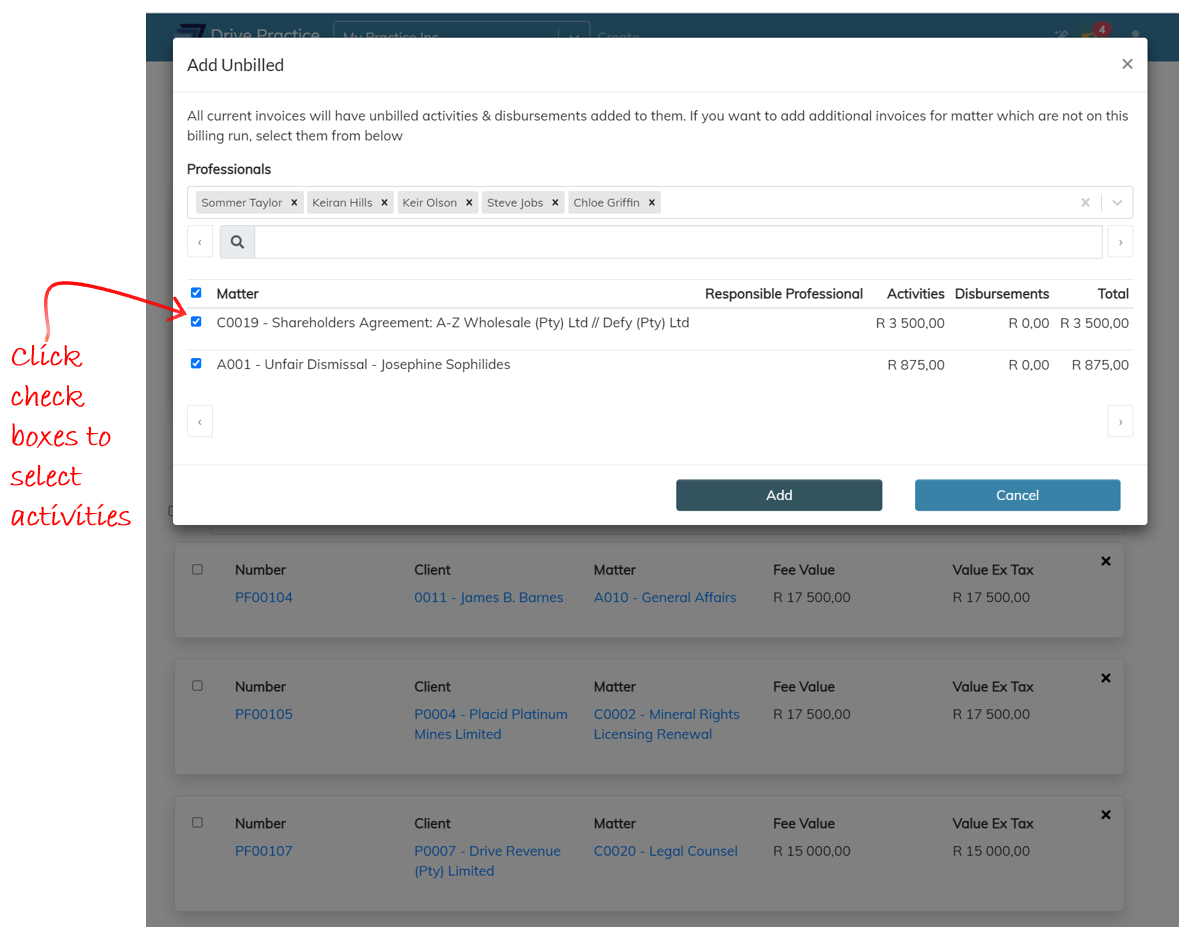
A single, or multiple matters, can be selected from the list by checking the checkbox next to each matter or check the checkbox on the left of the list column headings to select all the matters. To scroll through the list, click on the left and right arrows at the bottom of the list or on either side of the search bar.
Once an entry or entries have been selected, click on the Add button to add the entries to the billing run.
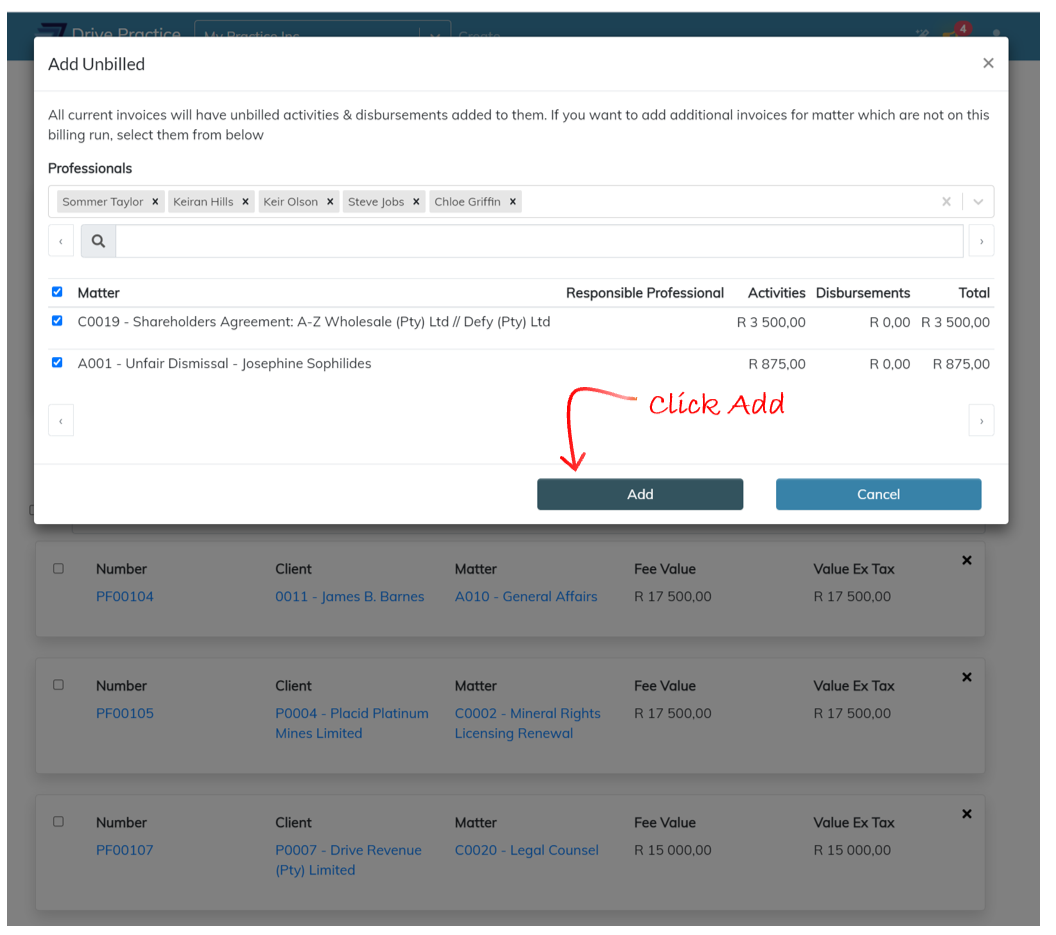
The Add Unbilled window will close and a brief notification indicating that the entries have been scheduled to be added to the billing run will appear.
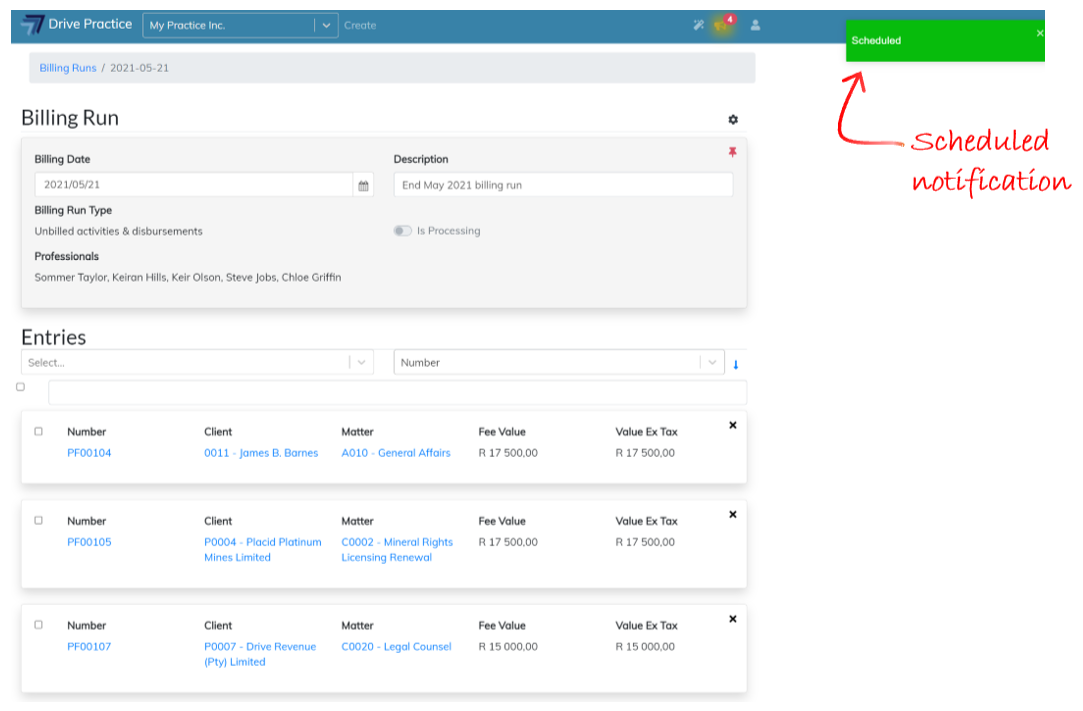
Refresh the Billing Run screen by pressing the F5 function key or click on the browsers refresh button to refresh the screen.
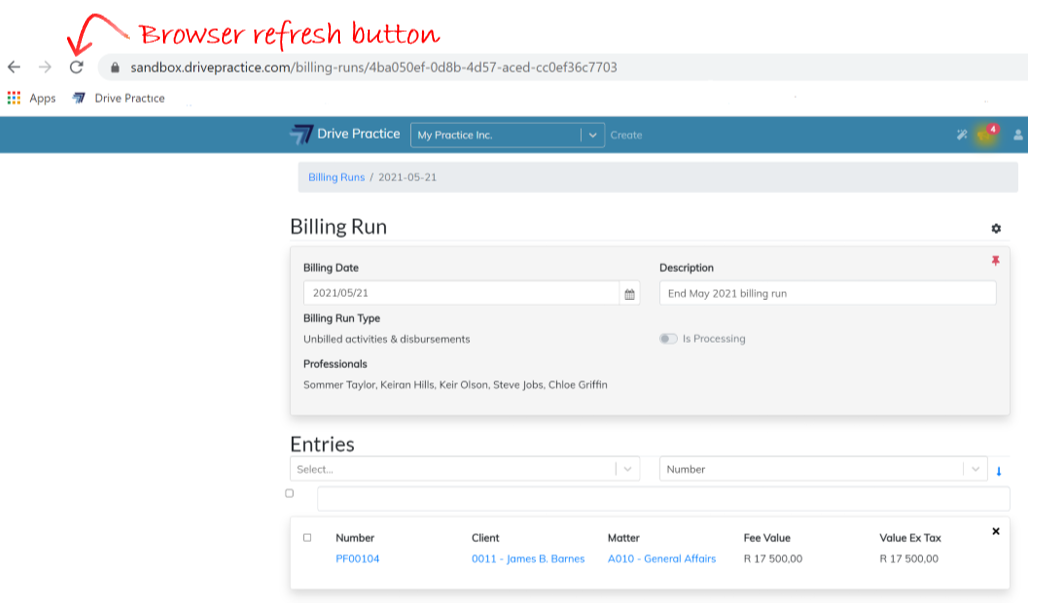
Once the screen refreshes, the Billing Run will either indicate that it is still processing the changes if the “Is Processing” toggle is on, or that the updates have been made if the “Is Processing” toggle is off.
Approve
The Approve function is used to bulk Approve the invoice entries in a billing run.
To Approve invoices individually, the invoice entry can be opened, and the invoice approved as described in the Client Invoices document.
To Approve invoice entries in bulk, click on the checkbox on the left-hand side of the entries to be approved and then click on the Gear icon on the top right-hand side of the Header card and select Approve.
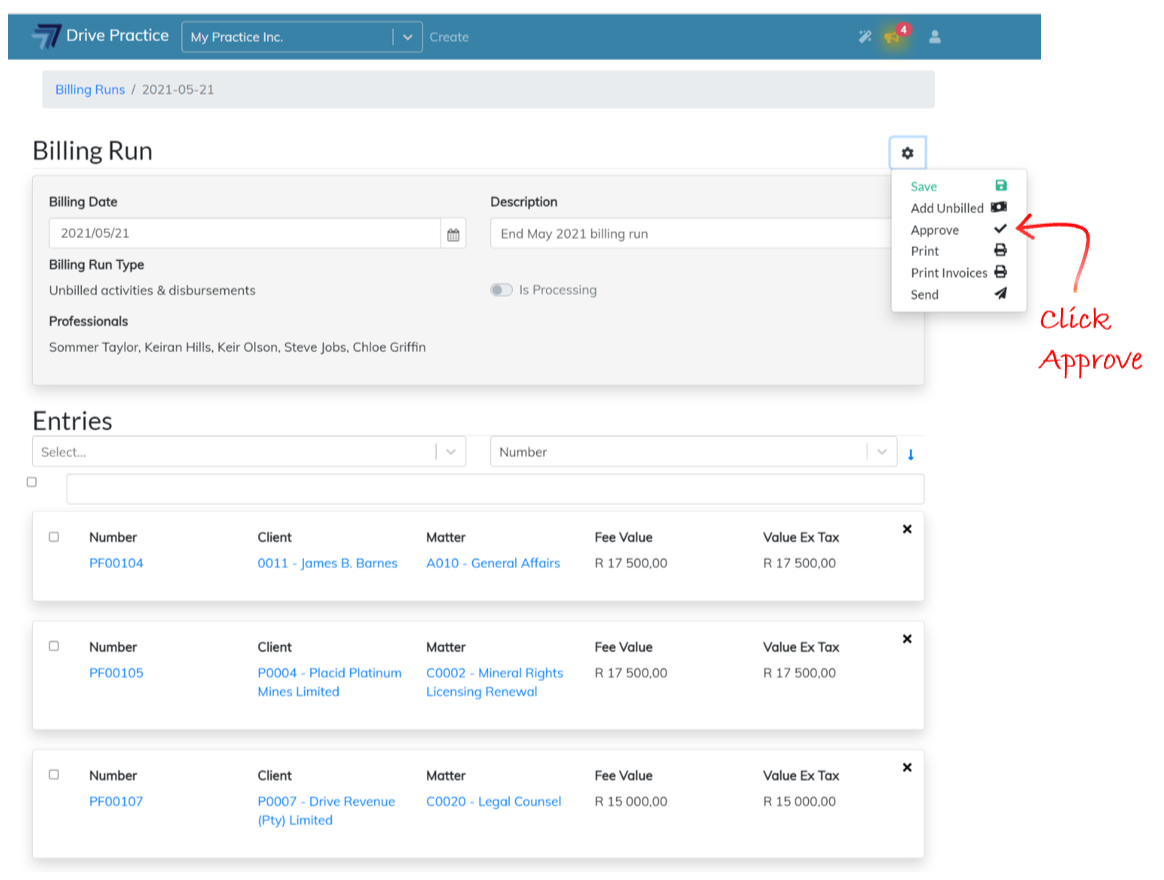
To select all the entries in the billing run to be approved, click on the checkbox on the left-hand side of the Entries header to select all the entries and then click on the Gear icon on the top right-hand side of the Header card and select Approve.
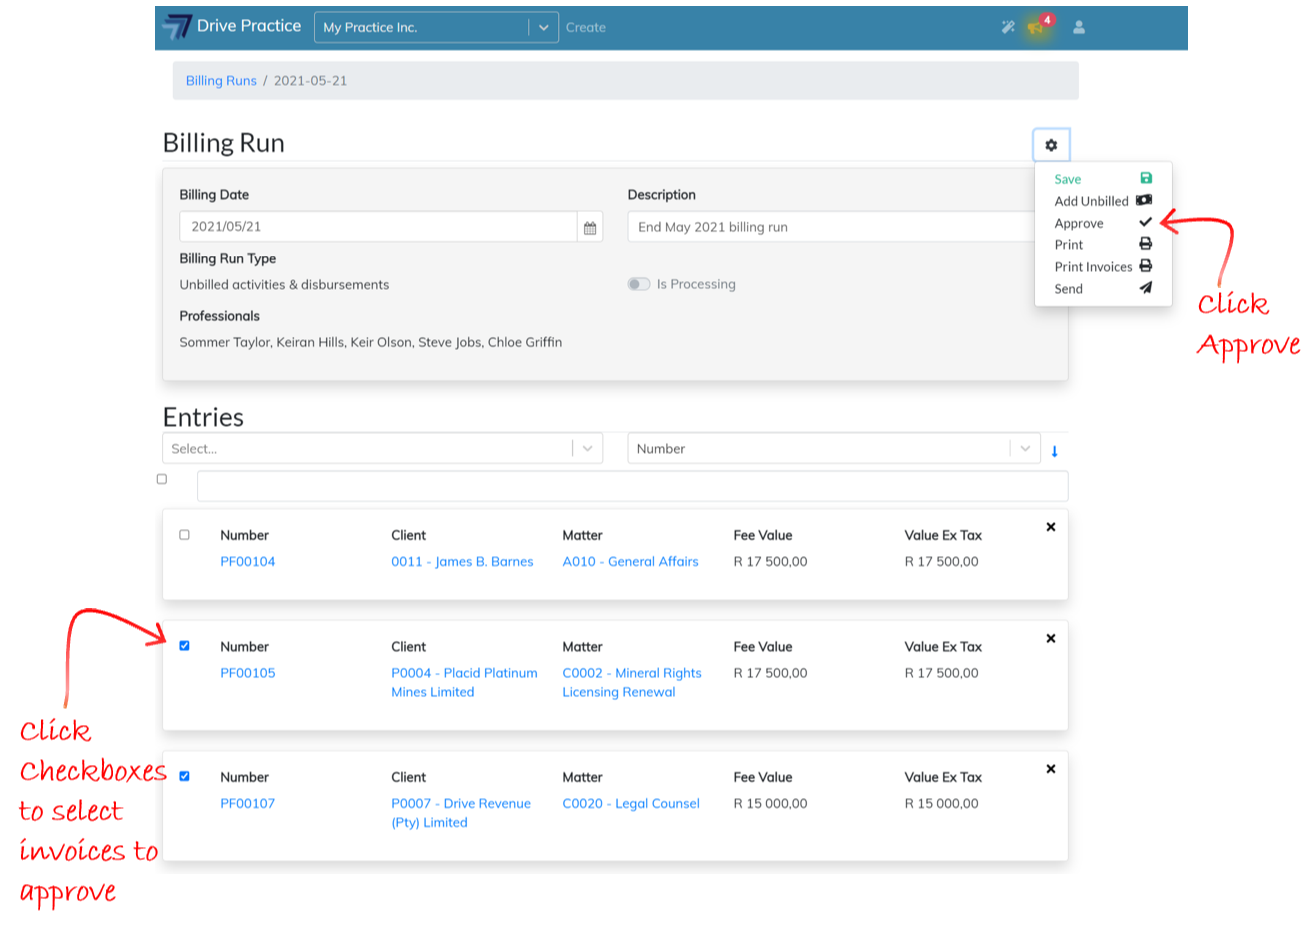
Leaving all the checkboxes blank and clicking on the Approve function will also approve all the (unapproved) entries in the billing run.
The Print function prints the Billing Run Report.
To print the Billing Run Report, click on the Gear icon on the right-hand side of the Header card and select Print.
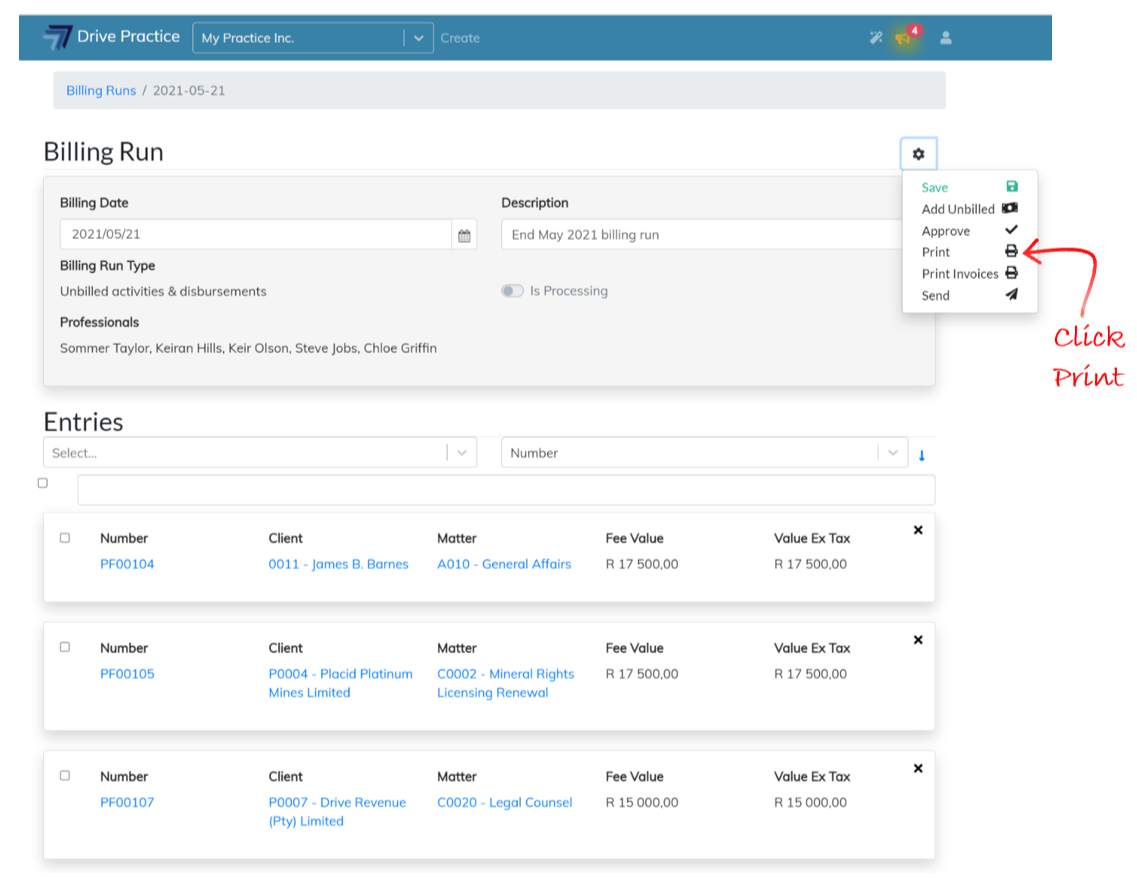
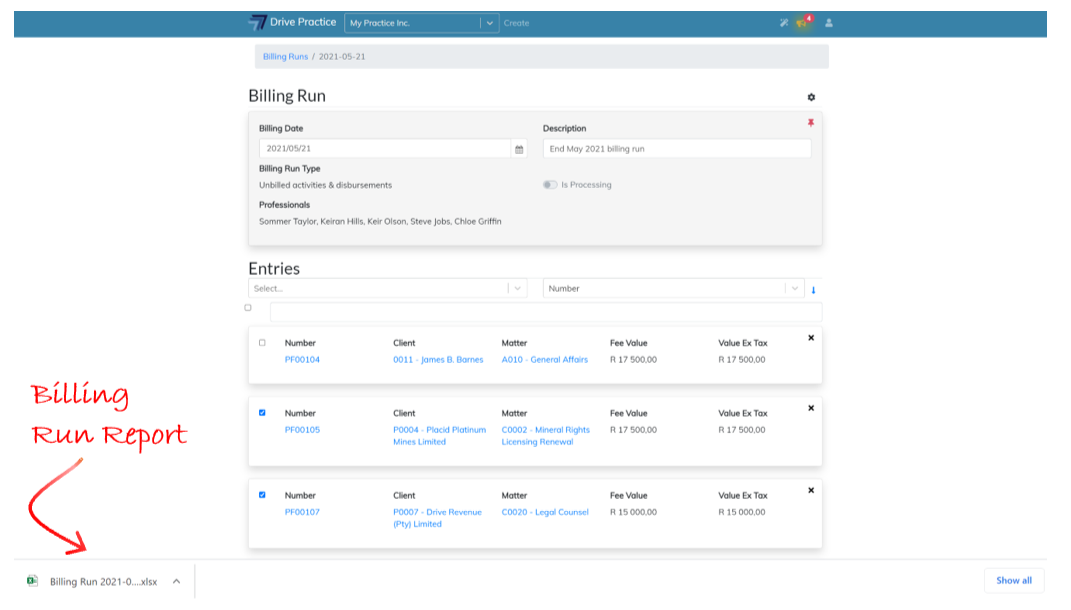
The Billing Run report when generated will download an Excel report to the user’s local downloads folder.
The report, generated to a print ready formatted Excel spreadsheet, when printed to a printer, will print by Responsible Professional, listing all the matters in matter number order for each Responsible Professional, with subtotals for fees and disbursements by matter, client and totals for each Responsible Professional’s billings in the Billing Run.
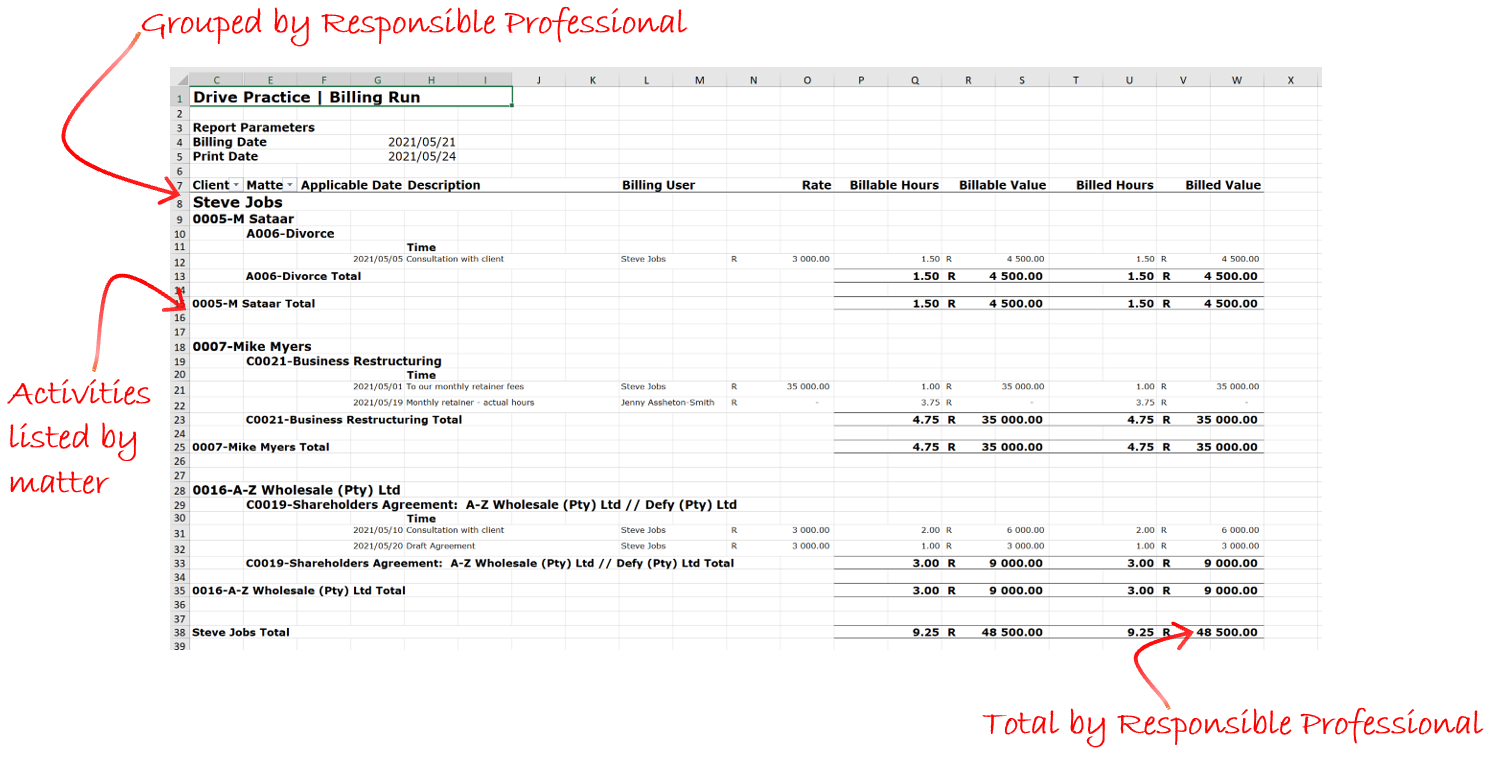
The spreadsheet is grouped and sub-totalled so that the entries can be collapsed or expanded to see totals by Responsible Professional, by Matter (most detailed view), totals by Responsible Professional, by Client, totals by Responsible Professional, and totals for the Billing Run.
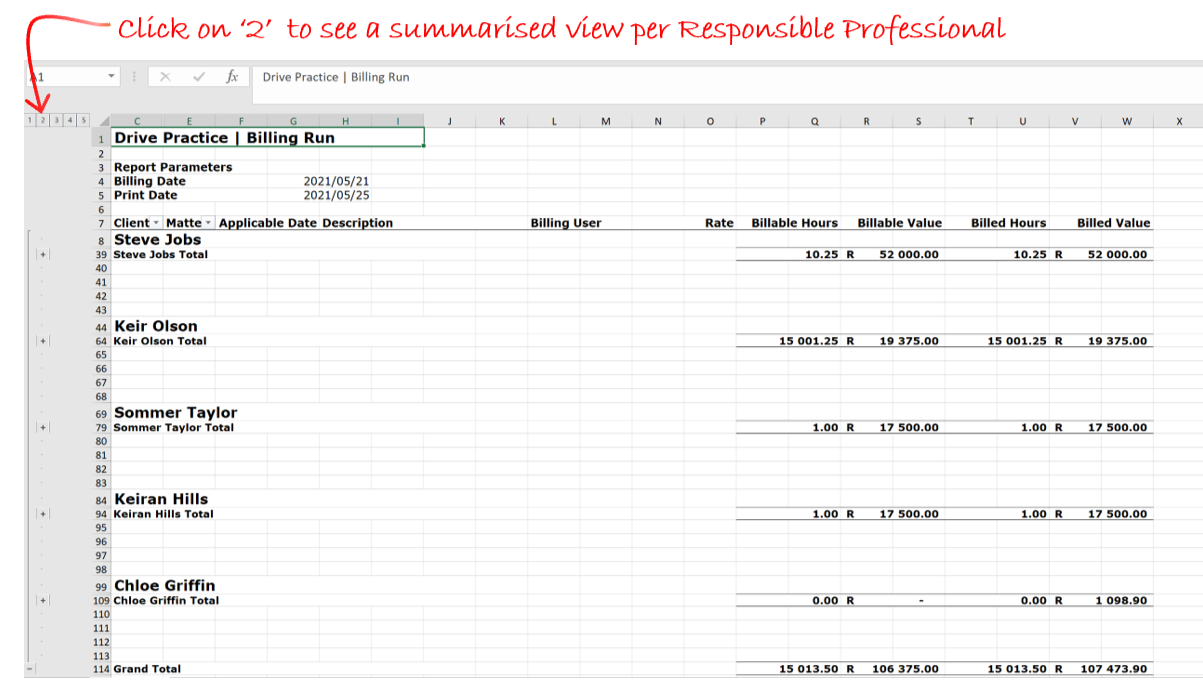
When the report is printed, each Responsible Professional’s section of the report is started on a new page so that the report can be separated and given to a professional with only the matters on the report for which they are responsible.
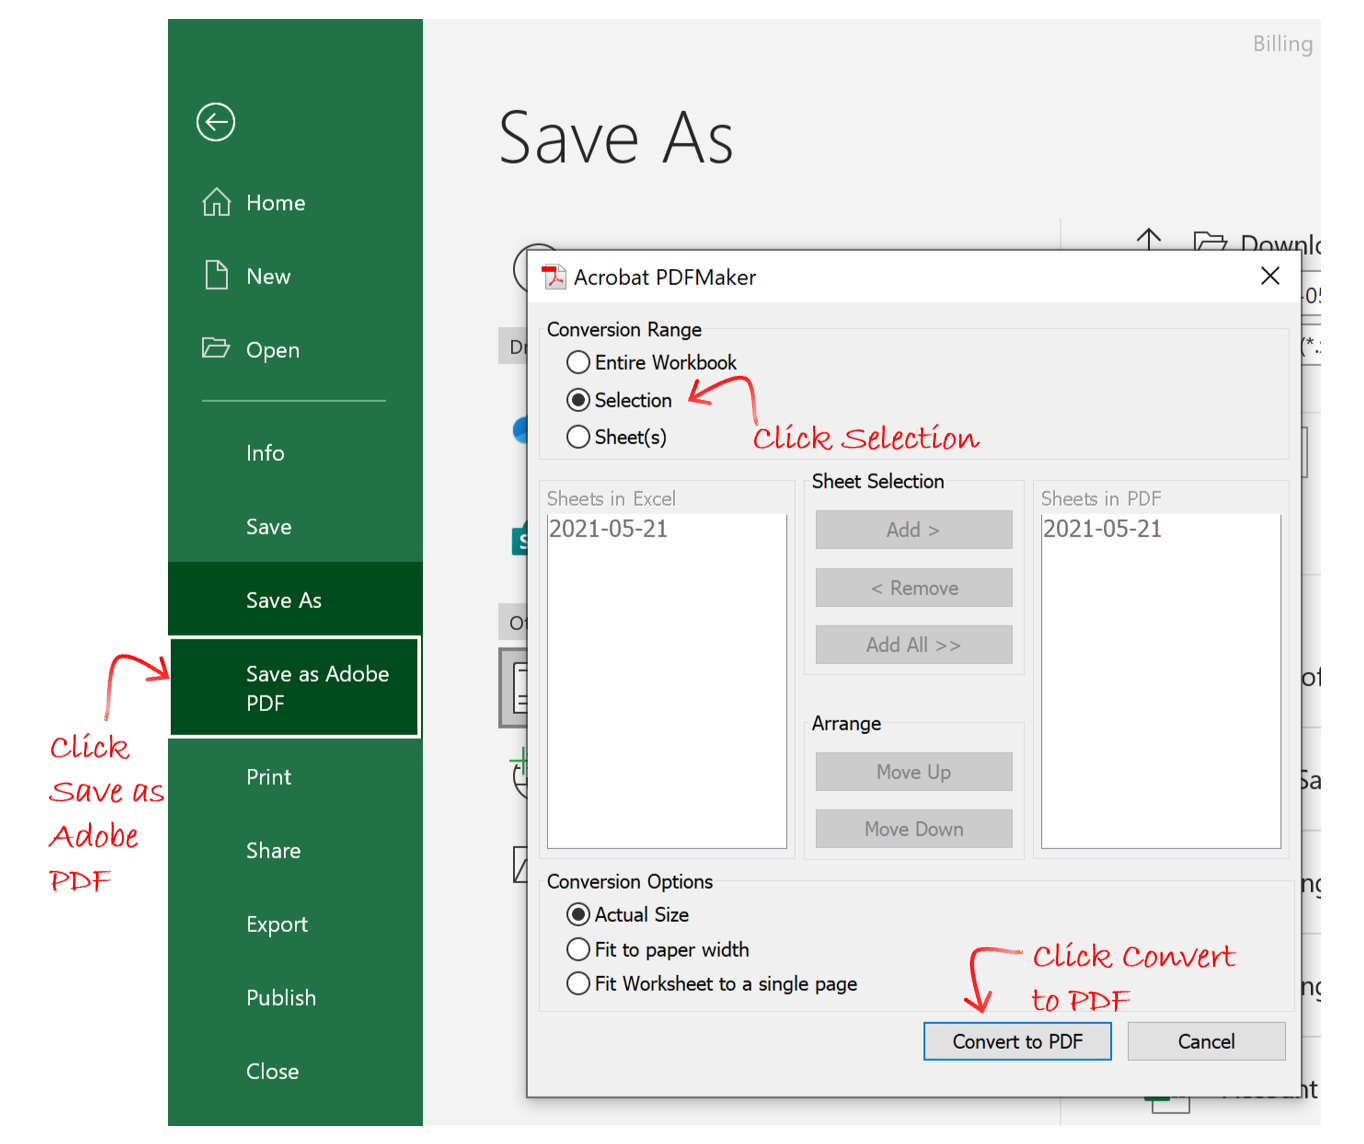
The report can also be printed (in sections or completely) to a pdf to be emailed to or stored on a shared drive for each professional.
To print the report to a pdf by professional, open the downloaded Excel Billing Run Report, select the professional’s area of the spreadsheet and click File-Save as Adobe PDF and make sure you choose “Selection” in the top left of the Conversion Range section of the Adobe PDF Maker window, and then click the “Convert to PDF” button on the bottom right of the window.
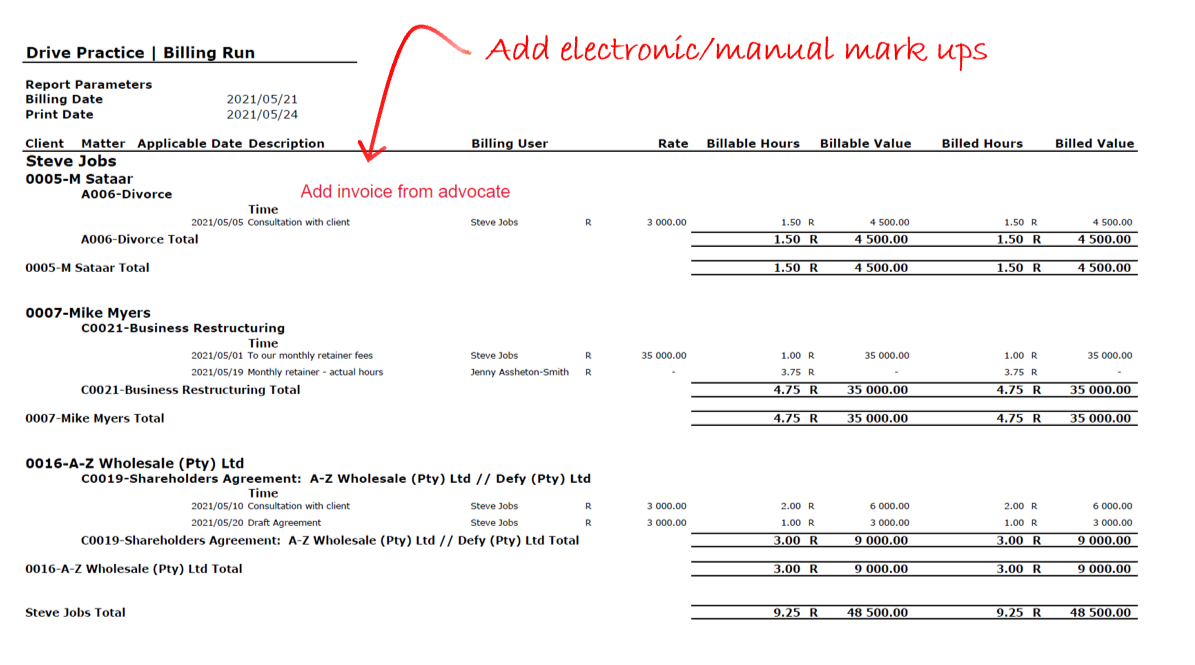
Whether electronically or manually, the report(s) can be marked up by the professionals for their support staff to amend the billing run entries where required.
Print Invoices
This Print Invoices function is used to print all the invoices in the Billing Run to a zipped file of PDFs.
To use the Print Invoices function, click on the Gear icon on the top right-hand side of the Header card and select Print Invoices.
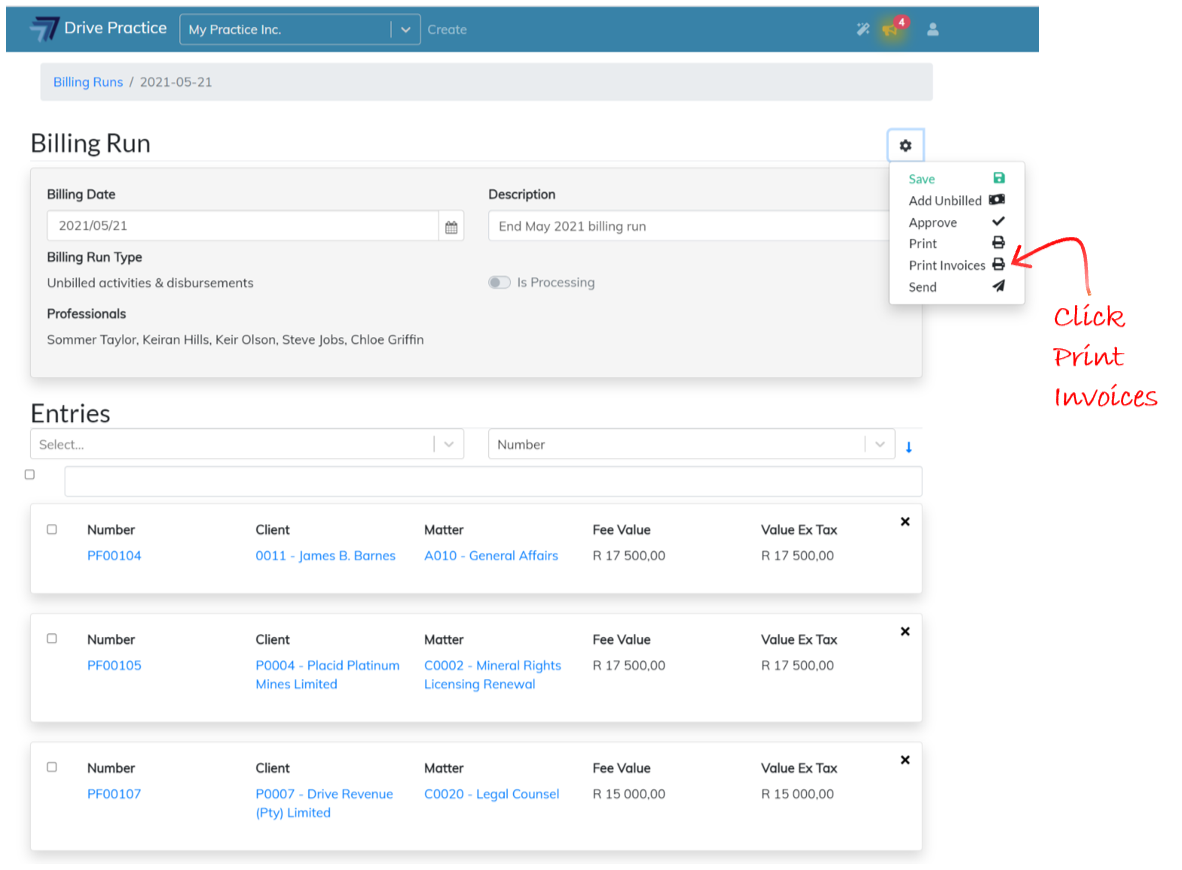
A zipped folder of PDF invoices will be generated in the user’s local download folder.
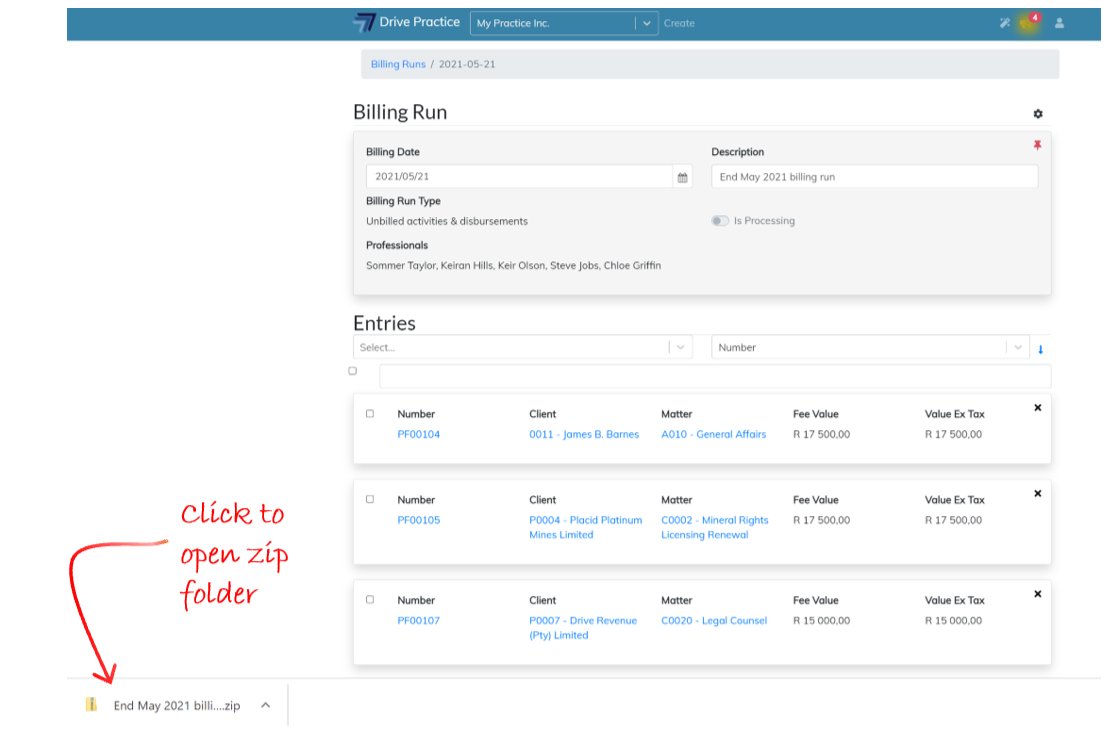
These invoices can then be stored electronically in the practice’s folder for storing invoices, and they can be printed to hard copy for filing or checking.
To print invoices individually, open the invoice entry on the Billing Run and use the invoice’s Print function as described in the Client Invoices document.
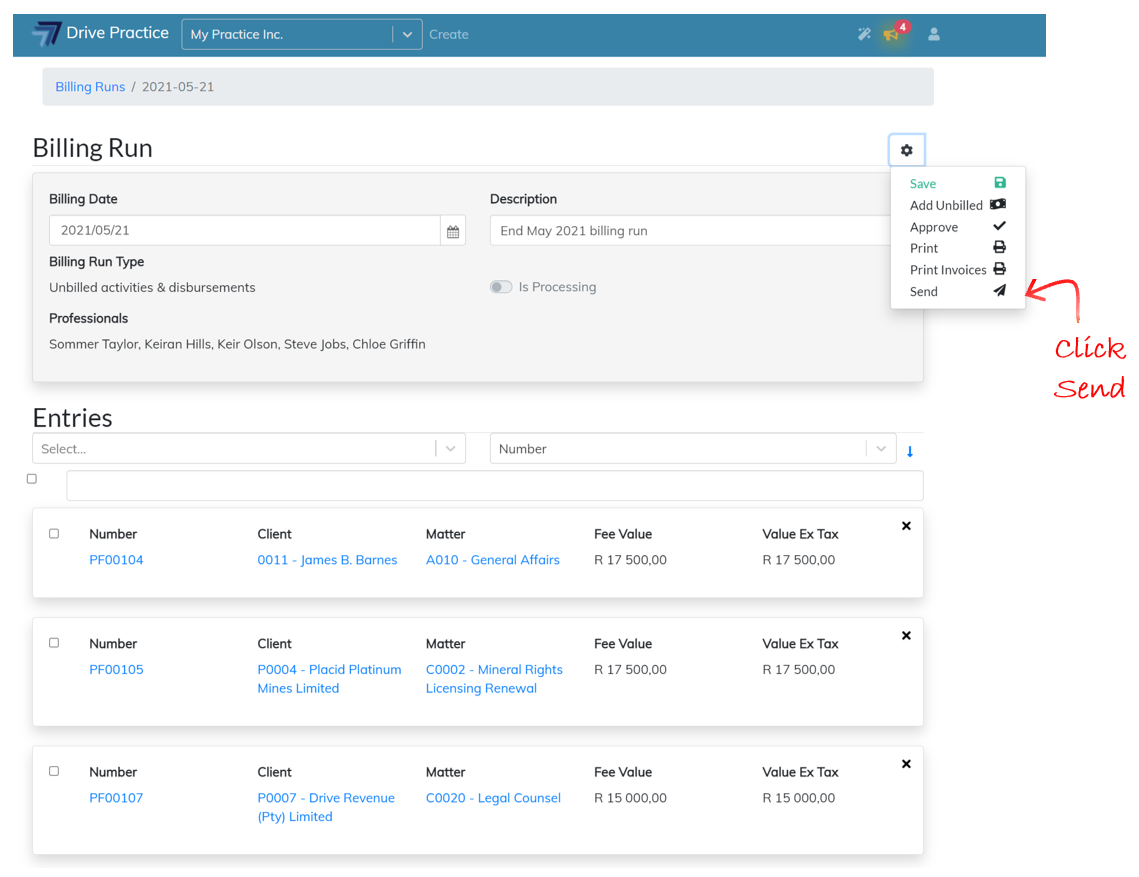
Send
The Send function is used to send the invoices in the Billing Run in bulk to the contacts selected for each matter on the matter’s Billing tab.
To use the Send function, click on the Gear icon on the top right-hand side of the Header card and select Send.
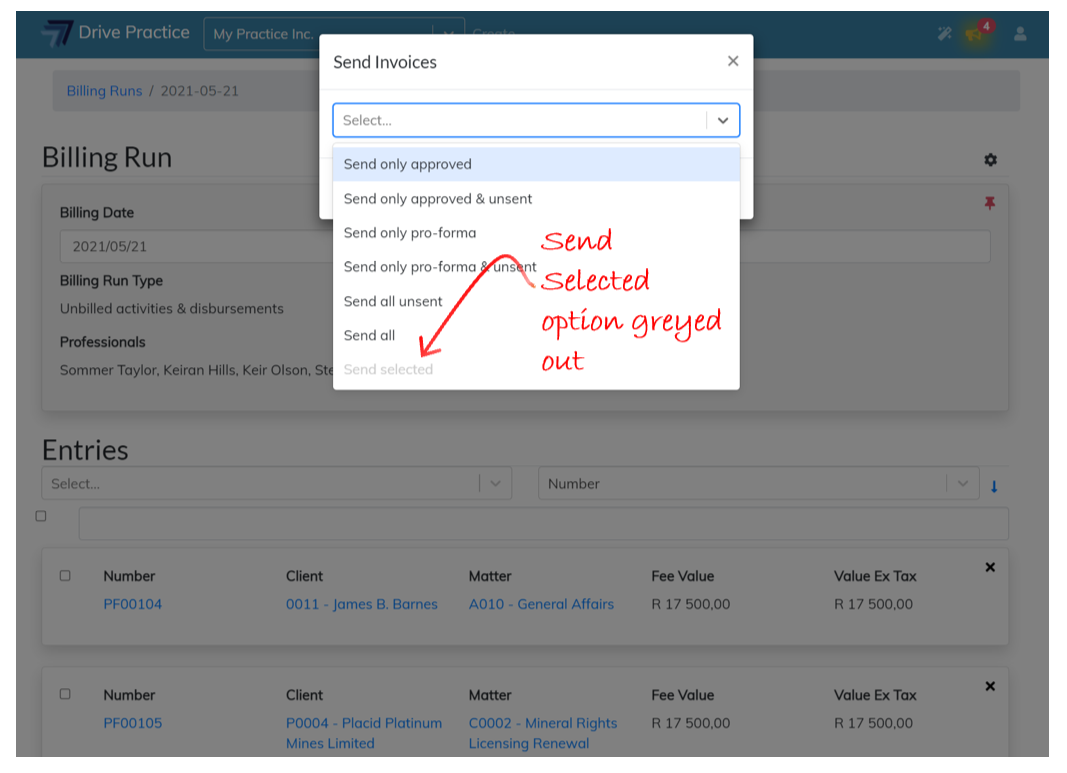
The Send Invoices dialogue box will pop up with selections on which invoices to bulk send. Click on the dropdown field to select the send option required.
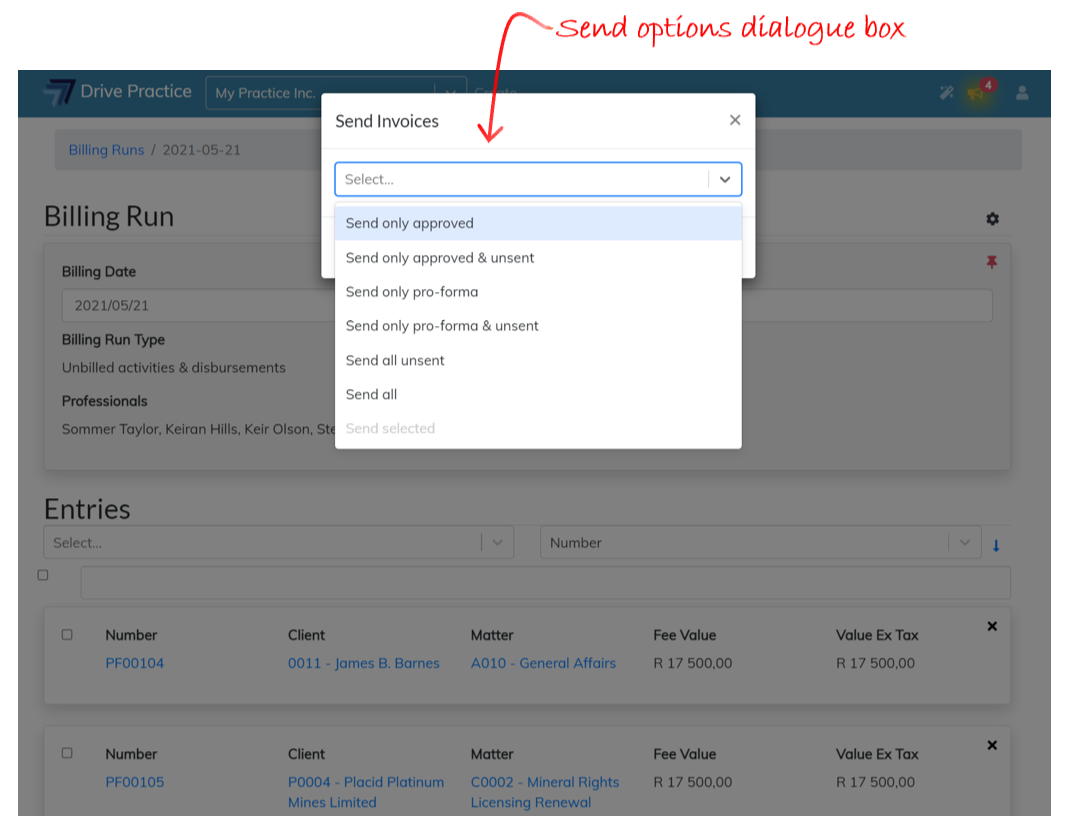
Each option in the dialogue box is described below.
-
Send only approved
This option will only send invoices in the Billing Run which are Approved.
-
Send only approved and unsent
This option will only send invoices in the Billing Run which are Approved and have not been sent before.
-
Send only pro-forma
This option will only send invoices in the Billing Run which are not currently in an Approved state.
-
Send only pro-forma and unsent
This option will only send pro-forma’s (invoices in the Billing Run which are currently not in an Approved state) and that have not been sent before.
-
Send all unsent
This option will send all the unsent approved and pro-forma invoices in the Billing Run.
-
Send all
This option will send all the invoices in the Billing Run, whether Approved or not, and irrespective of whether they have been sent before.
-
Send selected
This option will send all the invoices in the Billing Run which have been checked. If no invoices have been selected, the option will be greyed out and not available to select.