Capture Activity
[Last edited 02 July 2020]
To use the Capture Activity Global Action, click on the wand icon at the top right of the screen next to the Announcement button. Click on the Capture Activity option.
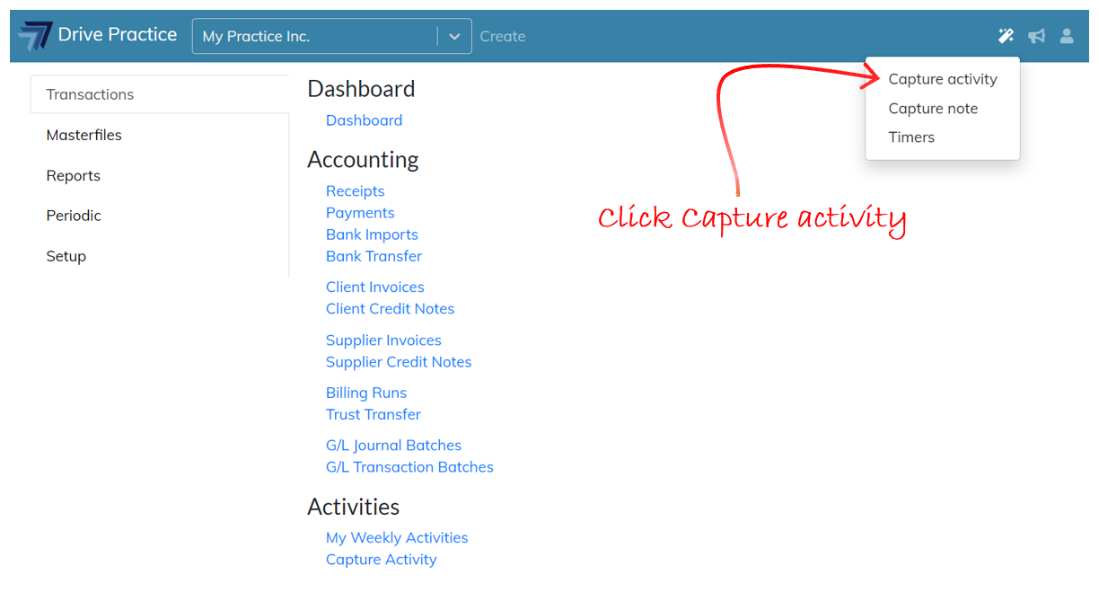
The Capture Activity Global Action panel will open on the right of the screen.
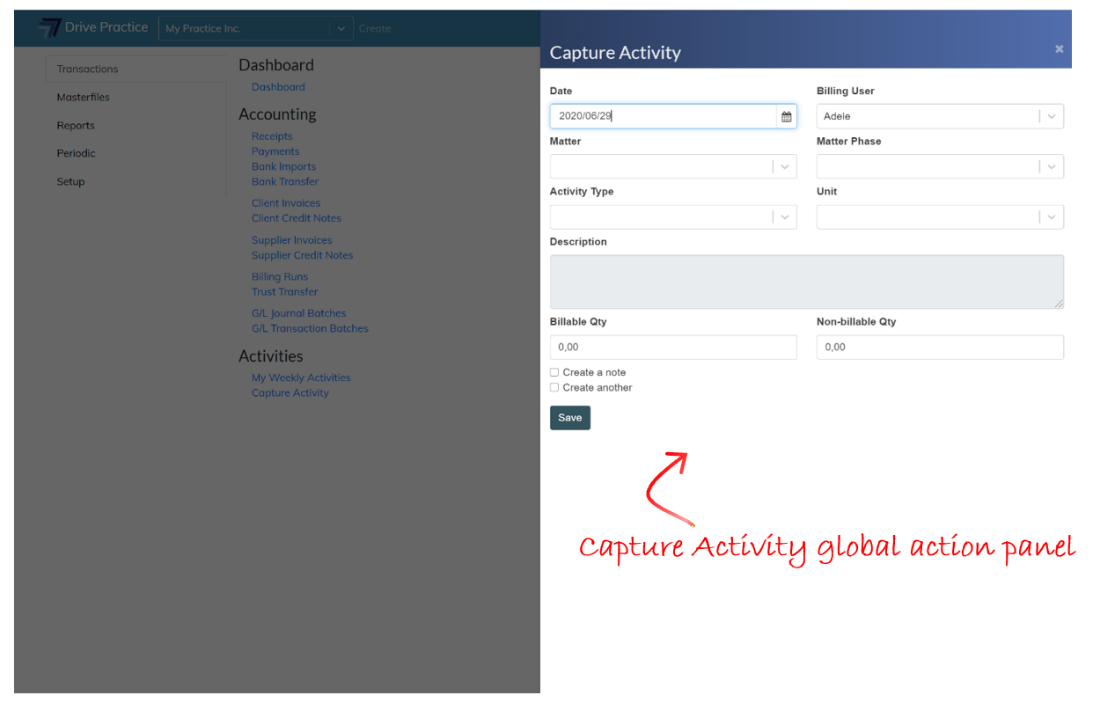
This screen contains all the fields that the Capture Activity function on the Transactions menu which is used by each individual billing user to capture their own time.
The Global Actions Capture Activity screen however, differs in two ways from the Transactions Capture Activities screen in that it provides additional functionality to be able to capture activities on behalf of another billing user, and the fields are placed side by side.
The placement of the fields side by side is to make the best use of the screen real estate and provides that a user can tab through the fields and use keyboard keys to select or enter data into them which can be a more efficient and faster process of capture than using a combination of keyboard strokes and mouse clicks.
The Capture Activity fields are described below.
-
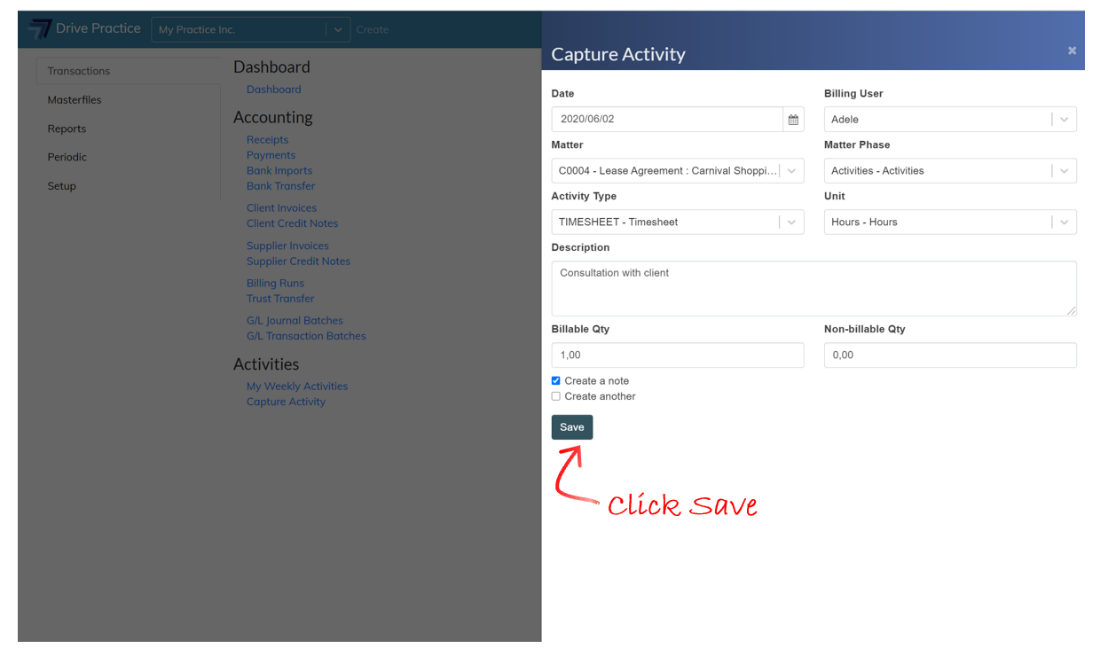
Date
This is the date of the activity being captured.
The date will default to today’s date. To change the date, enter a new date in yyyy/mm/dd format or click on the calendar icon to select a date.
-
Billing User
This is the billing user to which the activity will be attributed.
Tab to the Billing User field or click on the field to activate the dropdown list.
The billing user will default to the logged in user. Users that are not active or are not a billing user will not appear in the list to be selected. If the logged in user is not a billing user, the billing user will be blank and the logged in user must select a billing user from the list.
Use the up or down keys to navigate to the desired billing user and press enter to select or click on the desired billing user in the list to select. You can also type a few characters of the billing users name to filter the results for easier selection where there are a large number of billing users.
-
Matter
This is the matter against which the activity is to be allocated.
Enter a few characters of the matter name, matter number or client name to filter the matter list in order to select the matter for which the activity is to be captured.
Use the up and down arrows to get to the matter in the filtered list and press enter to select the matter or use the mouse to select the matter by clicking on the matter in the filtered list.
-
Matter Phase
This is the phase of the matter against which the activity should be logged and only the open phases for the selected matter will be available in the dropdown list.
Tab to the Matter Phase field or click on the dropdown arrow on the Matter Phase field. Use the up or down arrow keys to select the matter phase or use the mouse to click on the matter phase to select.
-
Activity Type
This field is used to select the Activity Type from the list of Activity Types that have been linked to the matter.
Tab to the Activity Type field and use the up or down arrows to navigate to the desired Activity Type and press enter to select or use the mouse to click on the desired Activity Type to select. You can also type in a few characters of the desired Activity Type’s name to filter the list if there are many Activity Types linked to the matter.
-
Unit
This field is used to select the selected activity type’s unit to apply to the activity being captured.
Tab to the Unit field and use the up or down arrows to navigate to the desired unit and press enter to select. You can also type in a few characters of the Unit’s name to filter the list if there are many Units associated with the selected Activity Type and use the keyboard or mouse to select the Unit from the filtered list.
-
Description
This is the description of the activity being captured. Depending on the Activity Type and Unit selected, the activity may have a default description that can be modified if required.
Tab to the description field and enter a description, or modify the default description if required.
-
Billable Qty
This is the amount of the Unit for the activity that is to be billed to the Client. Depending on the Activity Type and Unit this quantity could have decimal places or be a whole number, such as 1.25 for one and a quarter hours, or 3 for an activity that is billed in pre-defined minute portions, or 200 for photocopies.
Tab to the Billable Qty field and enter the quantity.
-
Non-billable Qty
This is the amount of the unit for the activity that is not to be billed to the Client and is captured for record purposes only.
Tab to the Non-billable Qty field and enter an amount.
-
Create Note
This field is a check box that when ticked, will create a note from the activity captured that has the same date and description as the activity captured. When the check box is not ticked, no note will be created.
Tab to the Create Note field and press Space or click on it to check the box.
-
Create Another
This field, when checked indicates whether a new blank Capture Activity panel should open once the current one is Saved.
Tab to the Create Another field and press Space or click on it to check the box.
Once the fields have been completed, click save or Ctrl-Enter to save the activity captured, or click on the Save button. If Create Another was not checked, the panel will close, returning you to the context you were in before you invoked the Global Action menu and chose Capture Activity.